The Art of Counseling - Shooting Video with Rebel T1i
Your Canon EOS Rebel T1i/500D offers a first-ever feature for digital SLR cameras: the ability to record digital movies. It’s easy — and fun — to learn how to make videos with your digital camera. You won’t get the quality of a professional video camera, but you will have a fun way to record memories without requiring a video editor.
Contents
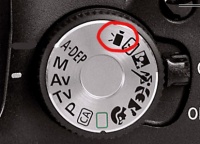
Set the Mode dial to the Movie setting
As soon as you select Movie mode, you can preview your shot on the monitor. You also see various bits of recording data on the screen; remember, you can press the DISP button to cycle through the different data display modes if you want more or less screen clutter.
Use the Menu button
Use the Menu button to display the Movie menu and then select the desired movie quality setting under Movie Rec. Size.
You can record movies at three different quality levels. The setting you choose determines the frame size and aspect ratio of the movie: 1920 x 1080, known as Full High-Definition; 1280 x 720, which qualifies as plain ol’ High Def; and 640 x 480, which gives you standard definition. The two higher-quality settings produce movies that have a 16:0 aspect ratio, which is found on many new TV sets and computer monitors. The 640 x 480 setting delivers a 4:3 format, which fits old monitors and standard TVs. The Quality setting also determines the frame rate: 20 frames per second (fps) for Full High-Definition, and the more typical and slightly less choppy 30 fps for the other two.
The higher the Quality setting, the larger the size of the file needed to store the movie. At the highest setting, you can fit about 12 minutes of movie on a 4GB memory card; drop the setting to 640 x 480, and you can double the length of the movie. No matter what Quality setting is selected, the maximum size for all movie files is 4GB.
Movie Preferences
Through the Movie menu, shown here, you can alter five settings in addition to movie quality (Movie Rec. Size): grid display, metering timer, AF mode, sound recording, and remote control.
Grid display allows you to display two different styles of grids to help keep your shots aligned properly. Choose Grid 1 for a loosely spaced grid; choose Grid 2 for a more tightly spaced grid. For no grid, leave the option set to the default, Off.
Metering timer allows you to request a shorter or longer delay in the meter readings for autoexposure settings. (The default is to establish settings when you press the shutter button halfway, then let the meter sleep for 16 seconds to save battery power.)
AF mode offers three autofocus methods.( Manual focus usually provides better results.)
Sound recording determines whether you record sound or shoot a silent movie
Remote control allows you to start and stop recording via the optional remote control unit. (For the RC-1 remote unit, after you select On, you also must set the timing switch to the 2-second delay to use it for movie recording.)
Compose your shot and set the focus
If you are using manual focus (which is recommended), set the lens switch to MF and twist the focusing ring on the lens to bring your subject into focus.
Apply Exposure Compensation if desired
You don’t really have much control over exposure during movie recording; the camera automatically sets all exposure options for you. However, you can tell the camera that you think that it’s over- or underexposing your movie and request that your next recording be a little darker or lighter.
To apply this exposure shift, set the display to one of the two modes that reveals the exposure meter at the bottom of the screen. (Press DISP to change the display mode.) Then press and hold the Exposure Compensation button, shown here. Rotate the dial to move the bar under the meter to the right for a brighter picture; move the indicator left for a darker picture. Release the Exposure Compensation button when you finish.
Press the Live View button to start recording
When you press the Live View button, highlighted here, a red “recording” symbol appears on the monitor.
Press the Lv button to stop recording
Your movie is ready to preview, download onto your computer, and review.


