Buchla 200e MIDI Functionality
In order to utilize the MIDI functionality of the 200e, create a patch as you normally would, making sure to patch signal to output module (227e). For example:
Contents
Overview
225e translates incoming MIDI messages into voltages, pulses, and clock. These control signals appear on three types of buses within the 225e. Buses A-D are normed to respectively addressed modules. All controls from 225e buses can be patched out to modules directly. Located on the same panel, but completely independent of the MIDI Interface is the Preset Manager, dedicated to storing and recalling up to 30 presets, and implementing firmware updates.
Storing and Recalling Presets and MIDI Control Parameters
- In the preset manager, choose “select” with the mode switch (under the word "DATA" - lower right corner).
- The first line of the display contains the current (last recalled) preset number followed by its name (if it has been named).
- The second line points to a memory location (from 1 to 30).
- Rotate data wheel clockwise to select a memory location for your preset.
- Enable remote enable in MIDI encoder section above, as well as on modules involved in current patch, and press the store button.
Renaming and Naming Presets
A preset can be named or renamed. To name the preset:
- Hit the “mode” switch in the preset manager section, which will turn on the "name" LED.
- Use the "last" and "next" switches to direct the cursor position, and the “data” knob to select characters.
- When naming is complete, push the “mode” switch 5 times, returning to "select" on LCD menu.
Recalling Presets
To recall an existing preset:
- Enable remote enable on active modules.
- Select preset with the data wheel and hit "recall".
- Selected preset will appear in the first line of the LCD display (the "current" preset).
225e Internal Addressing
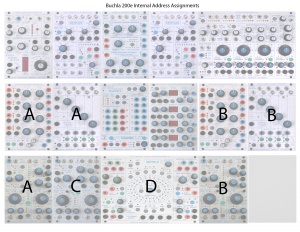
Each module possesses a specific internal address that corresponds to 225e MIDI Decoder module bus and allows internal communication between 225e and modules. Please refer to Buchla 200e Internal Address Assignment diagram:
Or press and hold ‘Remote Enable’ button of specific modules to display address on LCD of preset manager section on 225e.
Configuring MIDI Track in Software
Appropriate bus of 225e must be selected (bus A-D, letter corresponding to module address) and assigned to appropriate MIDI channel (1-16) in 225e module and MIDI track in DAW.
Open DP and create MIDI track. Assign MIDI track to 200e 1-16, and put track in record mode.
Assigning Buses In 225e
To assign a bus use “bus select” to illuminate the LED next to desired bus.
- For buses A-H, the LCD will display Bus, Channel, Poly/ Mono, Transpose (Tr), Fine tune (FT), and Velocity (Vl).
- Toggle between fields with cursor buttons and adjust with knob to right of cursors.
- Parameters of trigger can be edited within 225e in edit section as above, and stored and selected in preset manager.
- Any number of buses can be assigned to a single MIDI channel.
- Note messages assigned to the same MIDI channel can be directed to respond polyphonically.
- To assign polyphonic response, set Poly/ Mono to Poly and assign bus to desired MIDI channel in edit section LCD of 225e.
Buses A, B, C, and D are routed internally to addressed modules that respond directly to MIDI messages. The 259e, 261e, 281e, and 292e are assigned to these internal buses and will respond to note messages. Pulses are routed to 281e, velocities to 292e, and pitches are routed to 259e and 261e. These modules do not require patch out from 225e.
Buses E, F, G, and H handle only note messages, decoding them into voltages that represent pitch, velocity, pulse, and gate.
Buses J, K, L, M, N, and P handle controllers. Controller buses output only controller messages (two controller outputs for each bus-- a and b), translating controller messages into standard (10v) Control Voltages. Controller output bus P(b) is a dedicated MIDI Clock output.


