Light Meters Quick Guide

Contents
Precautionary Statements
Light meters are delicate instruments, handle with care!
Do not open, take apart, drop or handle roughly!
Keep the strap around your neck when using the meter.
Scratches can collect dirt which may slightly reduce light transmissions and affect the meter’s accuracy.
Do not expose meters to magnetic fields, extreme heat, humidity, leave in a locked car or expose to direct sunlight for periods of time.
Keep the meter in its case when not in use.
Media Loan Light Meters
Media Loan carries 3 basic types of light meters. Sekonic and Tundra analog meters, and a Sekonic digital meter.
Reflected Light Readings
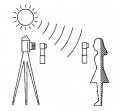
Reflective Reading

Reflected Light Readings All of Media Loan’s light meters will read reflected light, which is the light reflected off a subject (see image right). With the Lumigrid accessory, the Sekonic analog meters will measure the light reflected from a scene. The High Slide cannot be used with the Lumigrid accessory for a reflected light reading. Sekonic digital meters and Tundra meters require you to slide the sphere accessory to expose the window below. Use for landscapes and other distant objects.
Grey Card Readings
To get an accurate reflected light reading, use an 18 percent grey 'Neutral Test Card' as a substitute for your subject. This card is especially made to reflect 18 percent of the light falling on it, the equivalent of a middle grey on a scale between white and black. The meter will read the grey card as the ideal average scene. If using a grey card is not possible, measure the reflected light from an appropriately lit subject which closely approximates this middle grey tone. (Media Loan does not have grey cards.)
Incident Light Reading
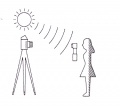
Incident Reading

Incident light is the intensity of light coming from the source (sun, room light, etc.) and falling on a subject that can be measured. This is the equivalent of an 18 percent grey reading. Use for people and close objects.
Measurement for Movie Camera
The procedure for taking measurements when using a movie camera is the same as for taking ambient light measurements.
Motion Picture Camera Shutter Speeds
Standard frames per second = 24 FPS. Slow motion = 36 FPS or higher. Fast Motion = 18 fps or lower.
Shutter Speeds (at 24 FPS unless otherwise noted):
Bolex
- 1/80th of a second
- 1/65th of a second (with RX lenses)
- 1/30th of a second (single frame without RX lenses)
CP-16
- 1/55th of a second
Oxberry Animation Stand 0.25 second (single frame)
Sekonic Studio Deluxe Light Meters
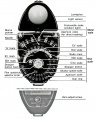
Sekonic Analog Meter

The Sekonic light meter functions as a dual purpose exposure meter, reading either incident or reflected (luminance) light. This professional, versatile instrument is designed, however, to give the most accurate exposure information based on incident light readings.
Accessories

Accessories

Lumisphere
Shaped like a dome, the Lumisphere attachment simulates the curvature of a human face. Position it over the light sensor on the meter’s swivel head. The Lumisphere may only be used for incident light readings.
Lumigrid
When an incident light reading cannot be taken (distant landscapes, wild animals, etc.), use the Lumigrid accessory to measure reflected light. Reflected light measurement with the Lumigrid accessory is possible only when the intensity of the reflected light exceeds 125 foot candles.
Also, all Lumigrid readings are measured with the red ‘H' pointer without the High Slide inserted. This accessory works well for reading illuminated or neon subjects.
Lumidisk
The Lumidisk measures illumination when pointed from the subject directly at an individual light source. It is often used for animation stand and light table work to measure light coming through back lit glass. The Lumidisk is also used to measure the difference between key and fill lights when trying to achieve specific contrast ratios as in close up, studio photography. Documenting these lighting ratios will allow you to control contrast for later duplication of the same scene or light quality. Knowing the contrast ratio is also important because photographic films have varying and limited light sensitivity ranges. Color film, for example, is limited to a four F-stop exposure range, the equivalent of a 16:1 contrast ratio. If the brightest area in a shot reads 160 foot candles, the darkest areas cannot read below 10 foot candles. Exceeding the 16:1 ratio would wash out highlights and blacken shadow details. To decrease contrast ratios, add light to dark areas and/or reduce light in bright areas.
High Slide
Under brightly lit conditions (when the meter needle pegs to the right) inserting the High Slide into the slot on the top of the swivel head will convert the Sekonic to ‘high illumination measurement’ and readings will be measured in using the ‘H’ pointer. When the High Slide is not in use, readings should be measured using the ‘L’ pointer. (Except when using the Lumigrid as previously explained.) When the High Slide is not being used, store it in the meter’s back.
Zeroing the Light Meter
Before taking a reading, make sure the meter is zeroed. To do this:
- Hold the light meter upright and eliminate all light reaching the sensor by covering the light port in the swivel head with your hand. This may be done with an accessory installed. Press the needle lock button and release it. The needle should point to zero on the incident light scale. If it doesn’t, return the meter to Media Loan and ask to have the meter zeroed.
Taking a Light Reading
Install the appropriate accessory by matching the white dots and turning the accessory clockwise until it stops. Select the film speed by turning the center dial until the appropriate ASA is indicated in the index window (ASA is the same as ISO). Point the Sekonic’s sensor from the area you want to be ideally exposed, on a line of axis with the camera lens. Be careful not to block light from the sensor. Push the needle lock button and release it. The needle will lock into reading position.
Reading the Meter
The needle will point to a foot candle number on the incident scale. Turn the outer dial until the white ‘L’ pointer corresponds to the foot candle number indicated by the needle. If the needle moves beyond the incident scale (pegs right), as mentioned in the accessories section, insert the High Slide re-measure the light, and line up the outer dial number with the red ‘H’ pointer. To determine the F-stop consult the Shutter Speed Scale on the bottom of the meter . Choose the shutter speed at which you will shoot. The correct F-stop will be located below the shutter speed.
Filter Adjustments
When using filters on your camera, the aperture may need to allow more light onto the film plane. Find out the factor for the filter you’re using and consult the X1/2, X2, and X4 symbols on both sides of the red ‘H’ and ‘L’ pointers to increase or decrease exposure. For instance, to double exposure for a filter factor of two, rest the X2 symbol (on the right side of the ‘L’ or ‘H’ pointer) under the foot candle number corresponding to your reading.
EV Window
Exposure Value or light Value
This number system is sometimes used to replace the traditional shutter speed and F-stop combinations and is used only with cameras equipped with an E.V.S. scale.
Sekonic Flashmate Digital Meters
Setting the Film Speed
Pressing down the ISO button, push up or down buttons to change setting.
Incident Light Measurement
For measuring ambient light, mount the lumisphere to swivel head. Switch the meter ON and point lumisphere to the camera from the position where subject is to be measured. Press measuring switch then measured value of F-stop or EV is displayed.
For measuring illumination contrast, mount the lumidisc and switch the meter ON. Point the lumidisc directly toward center of main light. Press measuring switch in EV mode and read-out the measured value. In the same manner, read the EV number of fill-in light. Difference between EV numbers of main and fill-in lights becomes contrast ratio.
For measuring luminance (Lux) set the ISO sensitivity to ISO 100 regardless of your film speed. Place the lumidisc parallel with the measured surface and read EV number in the same manner as for other measurements.
Reflected Light Measurement
Mount the lumigrid and switch the meter ON, then point the lumigrid directly toward part of subject to be measured. Measure reflected light from main point of subject as close as possible to the subject. Use adequate care in this case that the meter shadow does not interfere with the light to be measured.
Post Measurement Calculation
Calculation dependent upon change of film speed can be made by pressing either side of UP/DOWN key while depressing ISO selecting key.
Calculation dependent dupon change of shutter speed can be made by pressing either side UP/DOWN key only.
Conversion of measuring mode can be made by pressing F/EV selecting key.
Measuring Range
When measuring range is exceeded, F-stop or EV number will be replaced with E.o (error-over) or E.u (error-under) mark.
Measurement for Movie Camera
The procedure for taking measurements when using a movie camera is the same as for taking ambient light measurements.