Marantz PMD-660 Audio Recorder Operating Guide
A proficiency test is required to check out this recorder. Schedule a proficiency at the front desk of Media Loan or by calling 360-867-6253. Read this operating guide and the Zoom H4n Audio Recorder Operating Guide and complete the written portion of the Digital Audio Recorder Proficiency Test prior to your scheduled proficiency. Bring your answer sheet with you to the test, which should take approximately 30 - 45 minutes.
Contents
Quick Step Reference
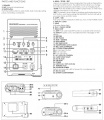
Marantz PMD660

Plug recorder into wall and turn it on. Once it boots up press the menu/store button while holding down SHIFT.
Troubleshooting Tip: If the screen does not come on, check your power source. If you are using batteries make sure they are in correctly and properly charged. Have extra batteries.
Formatting and Erasing Tracks
Before recording you need to format the CF card. This will erase any previously recorded tracks and prepares it for use in the Marantz. (If the CF card is formatted other than FAT16 or FAT 32 please format in your computer).
- Select the Format Edit menu choice. While in stop, push and hold the SHIFT button, then push MENU/STORE EDIT.
- Push the TRACK JUMP buttons until "Format" appears.
- Push ENTER twice (if you need to cancel, push CANCEL instead of ENTER.)
Setting Up to Record (Editing Presets)
Press MENU to access the preset menu. Use the following steps to adjust individual parameters:
Editing a Preset
- In the presets menu use TRACK JUMP to move between presets and hit ENTER to edit a selected preset.
- Use TRACK JUMP to move between preset parameters in the preset, hit ENTER to select the parameter you want.
- Use the TRACK JUMP buttons again to cycle through the options for the selected parameter, press ENTER to select the desired option.
- Once all the parameters are set to your liking, press the MENU/STORE/EDIT button to save your changes into the current preset. This is very important! If you forget to store your changes, you will have to start all over again!
| Preset | Options | Additional Info |
|---|---|---|
| Input | Mic, Line, Int Mic | Select either line for a mixer, stereo for microphones, or mono left channel only. |
| Output | Line, SP/HP, SP/HP +LINE | SP/HP +LINE is recommended since if you plug in headphones/speakers, the internal speaker automatically turns off. |
| Rec Format | PCM 48k & 44.1k, MP3-48k & 44.1k | PCM 48k is highest, 44.1k is CD quality and will give you more recording time. |
| Rec Channel | Mono, Stereo | Mono recording will allow you to record twice as long |
| Prerecord | On/Off | This will record 2 seconds before you hit record, recommended On |
| Manual Track | On/Off | Will create a new track with each press of REC. |
| Auto Track | On/Off 1,5,10, etc. | Sets a new track to be made on time increments |
| Auto Mark | On/Off, dB level | Sets a new mark automatically when paused or silent during recording NOTE: dB levels for automark and silent skip are the same |
| Silent Skip | On/Off, dB level | Pauses Rec if silent for 3 seconds, keep this Off as it can ruin temporal placement |
| Level Control | ALC, Manual, ALC & Manual | Manual recommended |
| Meter Mode | Peak, Average | Average shows all meterings |
| Mic Attenuation | 0dB, -20dB | Lets you reduce mic input sensitivity |
| Auto Power Off | On/Off | Shut down after 15 mins of no activity |
| Battery | Ni-HM, Alkaline | If you plan on using regular batteries you need to select alkaline. If you plan on using rechargeable batteries select Nihm. IT WILL NOT WORK unless this is set properly. It is recommended to have extra batteries and know how to switch this function. |
| Beep | On/Off | Controls trigger noises |
| Machine Id | *** | This will be added to the filename when saving |
| Defaults | OK? | Resets all presets to default settings |
- Note:The Marantz's at media loan comes with a 512MB flash card to record. DO NOT remove or replace the card. For approximate recording times, see chart below:
| MP3 128 kbps | PCM 44.1k Mono | PCM 44.1k Stero | PCM 48k Stereo | |
|---|---|---|---|---|
| 512MB | 8:52:00 | 1:36:00 | 0:48:00 | 0:44:00 |
Once out of the MENU, you are able to record. If Manual Track is on, a new track is created every time you hit REC.
Recording
Once you have stored your settings (see previous section), you are now ready to set the input level(s). Connect your source (microphone), press REC PAUSE and set your input levels using the dial and meters on the front edge of the Marantz. Press REC to begin recording.
Getting Your Data
Turn off the Marantz and turn on the computer.
- Connect the USB cable from the Marantz to your computer.
- Connect the AC power adapter to the Marantz. You cannot copy files using battery power.
- Press and hold the COPY button while turning the flash recorder on. Hold COPY until it boots up. The Marantz screen will display USB and you should see a drive on your desktop. Open it and only drag the audio files into your folder. Once you are done, format the CF card.
- FOR MORE INFORMATION SEE www.d-mpro.com/users/getdownload.asp?DownloadID=293 OR ASK FOR MEDIA LOAN ASSISTANCE