Sem II 3107 Seminar
From Help Wiki
SEM2 3107 rooms are seminar classrooms in the 3rd floor of Sem2 pod A and pod E only. Other 3105 rooms are not currently available.
Starting
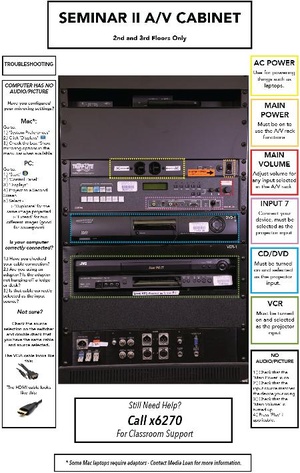
- Make sure the Main Power switch in the rack is turned ON
- To turn ON the projector press and hold the green Display Power button for 3 seconds, then let go.
- Press the Screen Down button to lower screen.
Laptop
- Connect the VGA or the HDMI cable below the rack into your laptop.
- If you connected the VGA cable, press the VGA Laptop, or if the HDMI cable, select HDMI Laptop on the Switcher.
- Turn on your laptop.
- If the resolution does not come up right, try using 1280x768 in Display Settings (Windows) or System preferences>Displays (Mac)
Video (VCR & DVD)
- Press the CD/DVD or VCR button on the Switcher.
- Put your media into the player.
- The remote control for each should be hanging on a spiral tether at the side of the rack, or on top of the rack.
- Using a Laptop disc drive (if available) to project DVDs is another option. Follow instructions for connecting your laptop.
Audio
- The DVD player can play CDs - just pick CD/DVD button on the Switcher, put in your CD and press play.
- The VGA cable can be used for to connect a 3.5mm headphone jack (press VGA button on the switcher)
- To use a Laptop for music or other sound, follow the laptop instructions.
Finishing Up
Remember to turn things off when you are done!
- Turn off the Projector by holding the Display Power button for 3 seconds.
- Turn off the rack power.
Troubleshooting:
No picture?:
- - Does laptop have power?
- - Is projector turned on?
- - Is VGA or HDMI cable plugged in all the way to the laptop (or adapter plugged in all the way to both the wire and the laptop?
No audio?:
- - Is room volume on the switcher turned up?
- - Laptop: Is the volume on your laptop turned up and output source correctly selected?
Assistive Listening Procedures
- This room does not have integrated listening technology installed, but there is a microphone input jack and XLR or phono plug outputs on the panel.
- These can be used to connect an extra microphone and listening equipment, or self-contained listening equipment can be used.
- Please work with [Access Services] to coordinate an extended checkout of suitable listening equipment from Media Loan.