Difference between revisions of "Sorting Data"
(→Extra Help) |
|||
| (14 intermediate revisions by the same user not shown) | |||
| Line 2: | Line 2: | ||
==Quick Sort== | ==Quick Sort== | ||
| − | |||
| + | The easiest, and quickest, way to sort data in Excel is to use the Quick Sort button in the Data tab. | ||
[[File:Excelsort01.png]] | [[File:Excelsort01.png]] | ||
| Line 9: | Line 9: | ||
==Sorting Multiple Columns== | ==Sorting Multiple Columns== | ||
| − | There are two ways to sort multiple columns: using a prescribed sorting method (preloaded conditions) or using a custom sorting method (conditions you enter yourself). | + | There are two ways to sort multiple columns: using a prescribed sorting method (preloaded conditions) or using a custom sorting method (conditions you enter yourself). Go to the Data tab and select the Sort macro key (shown below). This will Bring up the Dialogue Box. |
| − | |||
| − | + | [[File:Excelsort02.png|250px]] | |
| − | |||
| − | |||
| − | + | Next you'll need to change the Sort By option to suit what you want your data to be sorted by first. You can also choose what to sort the data on (Values, Cell Color, Font Color or Cell Icon) and whether to go from A to Z (for text), Largest to Smallest (for numbers), or vice verse. Once you have this figured, you can start to Add Levels to your sorting options, for example: | |
| − | |||
| − | + | [[File:Excelsort03.png|250px]] | |
| − | + | ||
| + | Now that all your filters are set, your data will be sorted as you see below: | ||
| + | |||
| + | [[File:excelsort04.png|250px]] | ||
==Sorting By Row== | ==Sorting By Row== | ||
| + | This is a simple procedure, with one or two very important minor details. First, get back into the Sort Dialogue Box, and go to the Options button. | ||
| + | |||
| + | |||
| + | [[File:excelsort05.png|250px]] | ||
| + | |||
| + | |||
| + | Then, simply select 'Sort left to right'. This will enable sorting by column. Now press OK. Only one more step. | ||
| + | |||
| + | |||
| + | [[File:excelsort06.png|250px]] | ||
| + | |||
| + | You should be back in the Sort Dialogue Box now, with some different options. In the Sort By drop down, you should be able to select rows (Row 1, Row 2, etc.) instead of other designators. Make sure you select the correct row. | ||
| − | + | [[category:Excel]] | |
Latest revision as of 19:12, 25 October 2011
Quick Sort
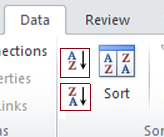
The easiest, and quickest, way to sort data in Excel is to use the Quick Sort button in the Data tab.
Sorting Multiple Columns
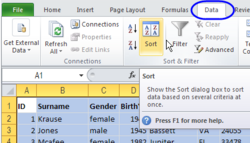
There are two ways to sort multiple columns: using a prescribed sorting method (preloaded conditions) or using a custom sorting method (conditions you enter yourself). Go to the Data tab and select the Sort macro key (shown below). This will Bring up the Dialogue Box.
Next you'll need to change the Sort By option to suit what you want your data to be sorted by first. You can also choose what to sort the data on (Values, Cell Color, Font Color or Cell Icon) and whether to go from A to Z (for text), Largest to Smallest (for numbers), or vice verse. Once you have this figured, you can start to Add Levels to your sorting options, for example:
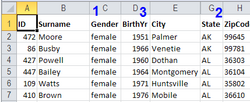
Now that all your filters are set, your data will be sorted as you see below:
Sorting By Row
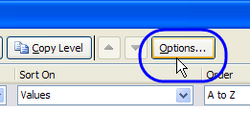
This is a simple procedure, with one or two very important minor details. First, get back into the Sort Dialogue Box, and go to the Options button.
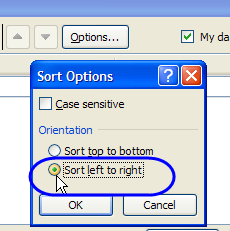
Then, simply select 'Sort left to right'. This will enable sorting by column. Now press OK. Only one more step.
You should be back in the Sort Dialogue Box now, with some different options. In the Sort By drop down, you should be able to select rows (Row 1, Row 2, etc.) instead of other designators. Make sure you select the correct row.


