Difference between revisions of "Animal Others - Photoshop"
From Help Wiki
m (→Animated GIFs) |
m (→Working with Layers) |
||
| (3 intermediate revisions by the same user not shown) | |||
| Line 11: | Line 11: | ||
located under '''Image > Adjustments''' | located under '''Image > Adjustments''' | ||
*'''Levels''' - set your black point | *'''Levels''' - set your black point | ||
| − | + | ||
===Working with Layers=== | ===Working with Layers=== | ||
| − | * | + | * Creating new layers |
| − | * | + | * Adjustment layers |
| + | |||
===Saving your work=== | ===Saving your work=== | ||
#'''File > Save as'''. Choose '''Photoshop''' as the file format. This will create a uncompressed Photoshop native image file format. It's a good idea to keep an uncompressed copy of your images. | #'''File > Save as'''. Choose '''Photoshop''' as the file format. This will create a uncompressed Photoshop native image file format. It's a good idea to keep an uncompressed copy of your images. | ||
#Saving for web: '''File > Save for Web & Devices''' | #Saving for web: '''File > Save for Web & Devices''' | ||
#*Choose the highest quality with the best (smallest) file size. Keep your images under 500K. JPG High Quality is usually a good choice. | #*Choose the highest quality with the best (smallest) file size. Keep your images under 500K. JPG High Quality is usually a good choice. | ||
| + | |||
| + | |||
===Animated GIFs=== | ===Animated GIFs=== | ||
Once you've created your image sequence, you can use Photoshop to output an animated Gif file. | Once you've created your image sequence, you can use Photoshop to output an animated Gif file. | ||
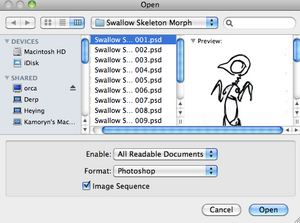
[[File:Animated-gif1.png|300px|thumb|right|Open an image sequence]] | [[File:Animated-gif1.png|300px|thumb|right|Open an image sequence]] | ||
| − | ====Open | + | ====Open an image sequence==== |
#From Photoshop go '''File > Open''' | #From Photoshop go '''File > Open''' | ||
#Select the first image in the sequence and check the "Image sequence" box | #Select the first image in the sequence and check the "Image sequence" box | ||
Latest revision as of 15:57, 22 May 2012
Contents
Scanning
Scanning from a Macintosh in the Computer Center
- Zoom: Cmd +/-
- Hand tool: Space Bar (used to move around an image)
Image size and resolution
- Image > image Size to see the overall size of your image
- Cropping - using the crop tool to remove portions of the image outside of the crop selection
- You can set the image size to crop to in the properties bar i.e. 100 px (remember the px)
Image adjustments
located under Image > Adjustments
- Levels - set your black point
Working with Layers
- Creating new layers
- Adjustment layers
Saving your work
- File > Save as. Choose Photoshop as the file format. This will create a uncompressed Photoshop native image file format. It's a good idea to keep an uncompressed copy of your images.
- Saving for web: File > Save for Web & Devices
- Choose the highest quality with the best (smallest) file size. Keep your images under 500K. JPG High Quality is usually a good choice.
Animated GIFs
Once you've created your image sequence, you can use Photoshop to output an animated Gif file.
Open an image sequence
- From Photoshop go File > Open
- Select the first image in the sequence and check the "Image sequence" box
- Choose your frame rate from the dialogue box
Output an animated GIF
- Go File > Save for Web and Devices
- Choose a GIF flavor from the Preset drop down menu
- You should now be able to preview the animation in the lower right
- Set your Loop options - once or forever
- Click Save and name your animated gif file


