Difference between revisions of "Printing Booklets (Mac) - InDesign"
From Help Wiki
(New page: Here are instructions for printing booklets from Indesign in the computer center: Image:ID5 InBooklet.pdf category:InDesign) |
m (→Printing booklets) (Tag: VisualEditor) |
||
| (56 intermediate revisions by 4 users not shown) | |||
| Line 1: | Line 1: | ||
| − | + | [[Image:Print settings.jpg|thumb|250px|right| Choose Print Settings]] | |
| − | [[Image: | + | [[Image:Printer options.jpg|thumb|250px|right|Click the Printer button]] |
| − | [[category:InDesign]] | + | [[Image:Screen Shot 2013-05-08 at 11.23.39 AM.png|thumb|250px|right|Set up short edge duplex printing]] |
| + | [[Image:Preview.jpg|thumb|250px|right|Preview your booklet before printing ]] | ||
| + | ===About Booklets=== | ||
| + | The process of creating '''printer spreads''' from layout spreads is called imposition. It is generally easier to work in Layout Spread where the pages are ordered sequentially. Converting your project to a printer spread should be done just before you’re ready to print. | ||
| + | |||
| + | For more on getting started with Booklets see: '''[[Booklet Document Setup - InDesign|Booklet Document Setup]]''' | ||
| + | |||
| + | |||
| + | ===Printing booklets=== | ||
| + | Once your InDesign booklet project is ready to print follow these steps: | ||
| + | #Open your document and go '''File > Print Booklet''' | ||
| + | #Under the Print Preset drop-down menu, select '''Default''' | ||
| + | #Choose your Booklet Type: 2-up Saddle Stitch is recommended | ||
| + | #Click the '''Print Settings''' button at the bottom of the window | ||
| + | #Check to make sure that '''Computer Center Printers''' is selected as your Printer | ||
| + | #Select the '''Setup''' menu (left hand column). Check your paper size and page orientation (should be US Letter landscape = 2x half letters side by side). | ||
| + | #Select the '''Marks and Bleed''' menu (optional) and uncheck the marks and bleeds unless you are planning to trim your printed document | ||
| + | #Click the '''Printer''' button at the bottom of the window. | ||
| + | #Click '''Show Details''' and choose from the '''Two-Sided''' drop down and choose '''Short-Edge binding''' | ||
| + | #Click '''Print''' to apply those setting changes (don't worry, it won't print yet) | ||
| + | #And again, click '''OK''' from the second Print window to apply setting changes (we're still not printing yet) | ||
| + | #From the Print Booklet window, click '''Preview''' in the left column to check on your formatting | ||
| + | #Double check that the preview looks how you want your booklet to print. | ||
| + | #If you're satisfied, click '''Print''' | ||
| + | |||
| + | |||
| + | |||
| + | See also: [[Printing Booklets (Windows) - InDesign]] | ||
| + | |||
| + | [[category:InDesign]] | ||
Latest revision as of 11:52, 16 May 2017
About Booklets
The process of creating printer spreads from layout spreads is called imposition. It is generally easier to work in Layout Spread where the pages are ordered sequentially. Converting your project to a printer spread should be done just before you’re ready to print.
For more on getting started with Booklets see: Booklet Document Setup
Printing booklets
Once your InDesign booklet project is ready to print follow these steps:
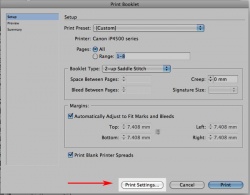
- Open your document and go File > Print Booklet
- Under the Print Preset drop-down menu, select Default
- Choose your Booklet Type: 2-up Saddle Stitch is recommended
- Click the Print Settings button at the bottom of the window
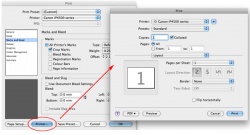
- Check to make sure that Computer Center Printers is selected as your Printer
- Select the Setup menu (left hand column). Check your paper size and page orientation (should be US Letter landscape = 2x half letters side by side).
- Select the Marks and Bleed menu (optional) and uncheck the marks and bleeds unless you are planning to trim your printed document
- Click the Printer button at the bottom of the window.
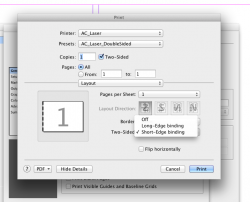
- Click Show Details and choose from the Two-Sided drop down and choose Short-Edge binding
- Click Print to apply those setting changes (don't worry, it won't print yet)
- And again, click OK from the second Print window to apply setting changes (we're still not printing yet)
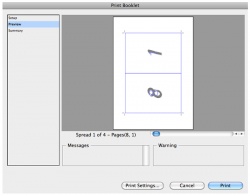
- From the Print Booklet window, click Preview in the left column to check on your formatting
- Double check that the preview looks how you want your booklet to print.
- If you're satisfied, click Print
See also: Printing Booklets (Windows) - InDesign


