Difference between revisions of "Exporting - Dragonframe"
From Help Wiki
Mediaintern5 (Talk | contribs) (→Transformation) (Tag: VisualEditor) |
|||
| Line 36: | Line 36: | ||
[[Category:Animation Labs]] | [[Category:Animation Labs]] | ||
[[Category:Dragonframe]] | [[Category:Dragonframe]] | ||
| + | [[Category:Dragonframes]] | ||
Revision as of 09:11, 18 July 2019
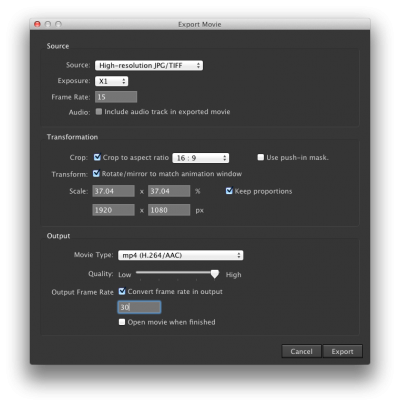
Go to File > Export Movie
Source
- Set Source to High-resolution JPG/TIFF
- Set Exposure to X1
- Set Frame Rate to the desired playback speed:
- 1's = 30 fps
- 2's = 15 fps
- 3's = 10 fps
Transformation
In the Transformation section adjust the crop aspect ratio to match your project settings.
- Check Crop to aspect ratio and set to 16:9 or 4x3 based on what you shot at.
- Uncheck Use push-in mask.
- Check Rotate/mirror to match animation window
- In the Scale section, set px to
- 4:3 = 1280 x 960
- 16:9 = 1920 x 1080
- Check Keep proportions
Output
- For Movie Type select
- mp4 (H.264/AAC) for uploading to the web.
- Quicktime ProRes 422 (lt) to use in editing software.
- Set the Quality slider to high if it is available.
- Check Convert frame rate in output
- Set the frame rate to 30
- Uncheck Open movie when finished.
- Click Export
- Name the file descriptively and choose to save into your folder with your original Dragonframe materials.
- Make sure the file you are about to export is save on the Desktop.
- Open the exported file into Quicktime.

