Difference between revisions of "Nissin Flashes for Rebel Quick Guide"
| (6 intermediate revisions by 2 users not shown) | |||
| Line 1: | Line 1: | ||
'''This flash is to be used only with the Canon Digital Rebel Cameras. It is the only external flash to be used with the Rebels.''' | '''This flash is to be used only with the Canon Digital Rebel Cameras. It is the only external flash to be used with the Rebels.''' | ||
| + | ===General Precautions=== | ||
| + | '''Care must be taken as burns can occur from touching hot parts.<br /> | ||
| + | '''Do not operate flash if it has been dropped or damaged until it has been examined by a Media Loan assistant.<br /> | ||
| + | '''Let flash cool before storing.<br /> | ||
| + | '''Do not get the flash wet.<br /> | ||
| + | '''The same care should be given to Canon speedlite flashes, with link for 430EX II at-http://learn.usa.canon.com/app/pdfs/quickguides/CDLC_Speedlite430EXII_QuickGuide.pdf, and for 580EX II at-http://learn.usa.canon.com/app/pdfs/quickguides/CDLC_580EXII_QuickGuide.pdf | ||
| + | <gallery> | ||
| + | File:mainviews.jpg|Nissin Rebel Flash | ||
| + | </gallery> | ||
| − | |||
| − | |||
| − | |||
| − | |||
| − | |||
===Batteries=== | ===Batteries=== | ||
| + | <gallery> | ||
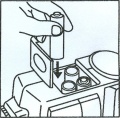
| + | File:batteries.jpg|Installing Batteries | ||
| + | </gallery> | ||
With the power off, slide the battery cover off and place batteries in as indicated by the marks inside the battery compartment. Use only AA alkaline batteries. | With the power off, slide the battery cover off and place batteries in as indicated by the marks inside the battery compartment. Use only AA alkaline batteries. | ||
| − | |||
===Attaching the Flash=== | ===Attaching the Flash=== | ||
| + | <gallery> | ||
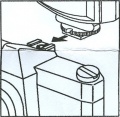
| + | File:hotshoe.jpg|Attaching Flash | ||
| + | </gallery> | ||
Loosen the lock ring, located at the bottom of the flash, and slide flash into hot shoe of camera. Make sure to tighten the lock ring before turning the flash on. | Loosen the lock ring, located at the bottom of the flash, and slide flash into hot shoe of camera. Make sure to tighten the lock ring before turning the flash on. | ||
===Using the Flash=== | ===Using the Flash=== | ||
Turn the power switch to the ON position, and the flash will begin charging. When the flash is charged the ready lamp will be steadily on. Adjust your camera’s settings for use with a flash. With the Rebel, you can set the camera to an automatic setting or in manual mode, set the shutter speed. You can set the shutter speed to anything slower than 1/200, but 1/60 is recommended for use with flash. Point camera at subject and press the shutter button half way down. The camera and flash will sync with camera. Once done adjusting press the shutter down fully to take the picture. | Turn the power switch to the ON position, and the flash will begin charging. When the flash is charged the ready lamp will be steadily on. Adjust your camera’s settings for use with a flash. With the Rebel, you can set the camera to an automatic setting or in manual mode, set the shutter speed. You can set the shutter speed to anything slower than 1/200, but 1/60 is recommended for use with flash. Point camera at subject and press the shutter button half way down. The camera and flash will sync with camera. Once done adjusting press the shutter down fully to take the picture. | ||
| − | ::If idle for 3 minutes, the flash will go into power saving mode and shut off. To turn the flash back on, press the shutter button. | + | ::'''If idle for 3 minutes, the flash will go into power saving mode and shut off. To turn the flash back on, press the shutter button.''' |
===Bounce Head=== | ===Bounce Head=== | ||
To avoid direct/harsh flash lighting, adjust the flash to reflect off a surface. Use a ceiling or wall that is white to avoid discoloring the image. | To avoid direct/harsh flash lighting, adjust the flash to reflect off a surface. Use a ceiling or wall that is white to avoid discoloring the image. | ||
| Line 21: | Line 30: | ||
Turn the power switch to the OFF position and loosen the lock ring. Pull the flash back from the hot shoe to remove. | Turn the power switch to the OFF position and loosen the lock ring. Pull the flash back from the hot shoe to remove. | ||
| − | [[category: | + | [[category:Digital Cameras and Accessories]] |
Latest revision as of 12:43, 21 January 2021
This flash is to be used only with the Canon Digital Rebel Cameras. It is the only external flash to be used with the Rebels.
Contents
General Precautions
Care must be taken as burns can occur from touching hot parts.
Do not operate flash if it has been dropped or damaged until it has been examined by a Media Loan assistant.
Let flash cool before storing.
Do not get the flash wet.
The same care should be given to Canon speedlite flashes, with link for 430EX II at-http://learn.usa.canon.com/app/pdfs/quickguides/CDLC_Speedlite430EXII_QuickGuide.pdf, and for 580EX II at-http://learn.usa.canon.com/app/pdfs/quickguides/CDLC_580EXII_QuickGuide.pdf
Batteries
With the power off, slide the battery cover off and place batteries in as indicated by the marks inside the battery compartment. Use only AA alkaline batteries.
Attaching the Flash
Loosen the lock ring, located at the bottom of the flash, and slide flash into hot shoe of camera. Make sure to tighten the lock ring before turning the flash on.
Using the Flash
Turn the power switch to the ON position, and the flash will begin charging. When the flash is charged the ready lamp will be steadily on. Adjust your camera’s settings for use with a flash. With the Rebel, you can set the camera to an automatic setting or in manual mode, set the shutter speed. You can set the shutter speed to anything slower than 1/200, but 1/60 is recommended for use with flash. Point camera at subject and press the shutter button half way down. The camera and flash will sync with camera. Once done adjusting press the shutter down fully to take the picture.
- If idle for 3 minutes, the flash will go into power saving mode and shut off. To turn the flash back on, press the shutter button.
Bounce Head
To avoid direct/harsh flash lighting, adjust the flash to reflect off a surface. Use a ceiling or wall that is white to avoid discoloring the image.
Zoom head
The zoom head should be adjusted to the focal length of the lens or wider. If too narrow the entire image will not be properly lit.
Removing the Flash
Turn the power switch to the OFF position and loosen the lock ring. Pull the flash back from the hot shoe to remove.


