Difference between revisions of "Sem II 4107 Class Lab"
From Help Wiki
(fixed lead text) |
|||
| (11 intermediate revisions by 4 users not shown) | |||
| Line 1: | Line 1: | ||
| − | + | __NOTOC__ | |
| − | == | + | {{TwoColumn |
| − | + | |lead= | |
| + | '''SEM2 C4107''' and '''SEM2 D4107''' are top-floor rooms in D and D pod. They are primarily used for the Catalyst program and theatre, respectively. | ||
| + | |content= | ||
| + | {{AVclassroom_template_podTLP350}} | ||
| + | {{AVclassroom_template_ALS-plug}} | ||
| − | |||
| − | |||
| − | |||
| − | |||
| − | |||
| − | |||
| − | + | |sidebar= | |
| − | + | {{GetAVHelp}} | |
| − | + | }} | |
| − | + | [[Category:Media Classrooms]] | |
| − | + | ||
| − | + | ||
| − | + | ||
| − | + | ||
| − | + | ||
| − | + | ||
| − | + | ||
| − | + | ||
| − | + | ||
| − | + | ||
Latest revision as of 15:45, 3 January 2020
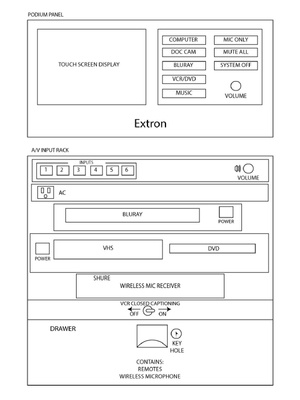
SEM2 C4107 and SEM2 D4107 are top-floor rooms in D and D pod. They are primarily used for the Catalyst program and theatre, respectively.
Starting
- Press any of the source buttons on the AV Control Panel to start the projector(s) and turn on the system
Computer
- Press the ‘Computer’ button on the AV Control Panel.
- Select the option you want from the touch screen on the AV Control Panel ‘Mac Mini,’ ‘VGA,’ or ‘HDMI’.
- Attach the VGA or HDMI cables to your laptop; make sure to plug in the audio plug on the VGA cable to the laptop's earphone jack for VGA.
Document Camera
- Press the ‘Document Camera’ button on the console attached to the podium.
- Turn on the Document Camera. Be patient, this can take up to a minute to warm up.
Bluray
- Press the ‘Bluray’ button on the console attached to the podium.
- On the Bluray player, press the open button to load your disc.
- The Bluray player can also play DVD and CD discs.
VCR/DVD
- Press the ‘VCR/DVD’ button on the console attached to the podium.
- Select either VCR or DVD from the touch screen on the AV Control Panel.
- Insert VHS or DVD.
- The DVD player will also play CDs.
- The DVD player will not toast round food.
Music
- Press the ‘Music’ button on the AV Control Panel.
- Attach the VGA audio cable to the headphone port on your device.
- Make sure the device volume is turned up, and while playing something, adjust listening level with the volume knob on the AV Control Panel.
Microphones
- Press the ‘Mic Only’ button on the AV Control Panel.
- Use either the wired or wireless microphone.
- Adjust the volume on the mics through the touch screen panel.
- Microphone volume is separate from the main volume for AV sources (control mics from 'mic only', control everything else with the volume knob.
- Muting microphones is done with the mutes on this screen
Mute All
- Press the ‘Mute All’ button on the AV Control Panel.
- The image should turn black and the accompanying sound become muted.
- Press ‘Mute All’ again to 'unmute'.
Finishing Up
Remember to turn things off when you are done!
- Press the ‘System Off’ button on the console attached to the podium.
- Press ‘Power Down’ to turn off the projector(s) and system.
Troubleshooting:
No picture?:
- - Try pressing 'Mute All' and then pressing again to unmute
- - Is data projector turned on? (try starting again, & call x6270)
- - Is the cable firmly connected to the laptop (or adapter, and adapter to laptop)
No audio?:
- - Is volume on AV control panel turned up enough to hear?
- - Laptop: Is the volume on the laptop turned up and source selected? (HDMI button for HDMI connection, etc?)
Assistive Listening Procedures
- This room does not have integrated listening technology installed, but there is a microphone input jack and XLR or phono plug outputs on the panel.
- These can be used to connect an extra microphone and listening equipment, or self-contained listening equipment can be used.
- Please work with [Access Services] to coordinate an extended checkout of suitable listening equipment from Media Loan.

