Difference between revisions of "Sem II E4115 Critique"
From Help Wiki
(→DVD/VHS) |
(added new template formatting for sidebar, etc.) |
||
| (3 intermediate revisions by 2 users not shown) | |||
| Line 1: | Line 1: | ||
| − | + | __NOTOC__ | |
| + | {{TwoColumn | ||
| + | |lead= | ||
| + | '''SEM2 E4115 room''' is the critique space on the 4th floor of the Sem2 pod E. It is an open room that hosts critiques, displays, and temporary exhibitions. | ||
| + | |content= | ||
| + | |||
| + | [[File:4115.pdf]] | ||
| − | |||
Turn on MAIN POWER on both racks (orange switches, top right) | Turn on MAIN POWER on both racks (orange switches, top right) | ||
| − | |||
| − | |||
| − | |||
| − | |||
| − | |||
| − | |||
| − | |||
| − | |||
===Computer=== | ===Computer=== | ||
| Line 28: | Line 25: | ||
*Select '''Wall Panel 2''' | *Select '''Wall Panel 2''' | ||
*Turn on your laptop | *Turn on your laptop | ||
| + | |||
| + | ===DVD/VHS=== | ||
| + | |||
| + | *Select the '''Screen Down''' button to lower the screen. | ||
| + | *Turn on the projector by pressing and holding the '''Display Power''' button for 3 seconds. | ||
| + | *Select the input '''CD/DVD''' or '''VHS''' on the switcher. | ||
| + | *Insert Media and press play. Navigate menus with remote. | ||
| + | *The volume knob is located at the upper right of the rack. | ||
===Using the Monitor=== | ===Using the Monitor=== | ||
| Line 43: | Line 48: | ||
:- Is room volume on media control panel turned up? | :- Is room volume on media control panel turned up? | ||
:- Laptop: Is the volume on your laptop turned up and output source correctly selected? | :- Laptop: Is the volume on your laptop turned up and output source correctly selected? | ||
| + | |||
| + | |||
| + | {{AVclassroom_template_ALS-plug}} | ||
| + | It may also be necessary to contact Classroom Support to integrate an assistive listening system. | ||
| + | |||
| + | |sidebar= | ||
| + | {{GetAVHelp}} | ||
| + | }} | ||
| + | [[Category:Media Classrooms]] | ||
Latest revision as of 08:34, 6 January 2020
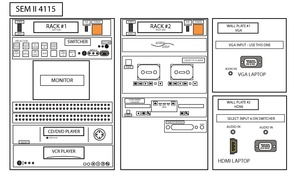
SEM2 E4115 room is the critique space on the 4th floor of the Sem2 pod E. It is an open room that hosts critiques, displays, and temporary exhibitions.
Turn on MAIN POWER on both racks (orange switches, top right)
Computer
- Select the Screen Down button to lower the screen.
- Turn on the projector by pressing and holding the Display Power button for 3 seconds.
- Continue instructions depending on use of a VGA or HDMI cable
VGA (Wall Panel 1)
- Connect your laptop to the VGA cable.
- Use a Ethernet cable to connect to the data jacks (Blue and Green jacks) around the room.
- Select Wall Panel 1
- Turn on your laptop
HDMI (Wall Panel 2)
- Connect your laptop to the HDMI cable.
- Use a Ethernet cable to connect to the data jacks (Blue and Green jacks) around the room.
- Select Wall Panel 2
- Turn on your laptop
DVD/VHS
- Select the Screen Down button to lower the screen.
- Turn on the projector by pressing and holding the Display Power button for 3 seconds.
- Select the input CD/DVD or VHS on the switcher.
- Insert Media and press play. Navigate menus with remote.
- The volume knob is located at the upper right of the rack.
Using the Monitor
You can use the monitor to cue your DVD or VHS media
- Turn on the monitor.
- Select image source.
- Audio can be cued using the right and/or left channel by selecting the source number.
Troubleshooting:
No picture?:
- - Does laptop have power?
- - Is data projector turned on?
- - Is VGA or HDMI cable connected to media control panel and laptop?
No audio?:
- - Is room volume on media control panel turned up?
- - Laptop: Is the volume on your laptop turned up and output source correctly selected?
Assistive Listening Procedures
- This room does not have integrated listening technology installed, but there is a microphone input jack and XLR or phono plug outputs on the panel.
- These can be used to connect an extra microphone and listening equipment, or self-contained listening equipment can be used.
- Please work with [Access Services] to coordinate an extended checkout of suitable listening equipment from Media Loan.
It may also be necessary to contact Classroom Support to integrate an assistive listening system.

