Difference between revisions of "Visual Editor - Mediawiki"
m (→Editing page settings) |
m (→Editing images and other media files) |
||
| (14 intermediate revisions by 2 users not shown) | |||
| Line 1: | Line 1: | ||
| + | __NOTOC__ | ||
===Opening the visual editor=== | ===Opening the visual editor=== | ||
{{2colrow|col1= | {{2colrow|col1= | ||
| Line 14: | Line 15: | ||
[[File:Mw-ve-edit.png]] | [[File:Mw-ve-edit.png]] | ||
}} | }} | ||
| + | |||
===Getting started: the visual editor's toolbar=== | ===Getting started: the visual editor's toolbar=== | ||
| − | + | ||
[[File:Mw-ve-toolbar.png]] | [[File:Mw-ve-toolbar.png]] | ||
| − | + | ||
| + | |||
| + | |||
The visual editor's toolbar appears at the top of the screen when you begin editing. It includes some familiar icons: | The visual editor's toolbar appears at the top of the screen when you begin editing. It includes some familiar icons: | ||
* '''Undo / redo''' | * '''Undo / redo''' | ||
| Line 30: | Line 34: | ||
| − | + | ---- | |
| − | + | ||
===Saving changes=== | ===Saving changes=== | ||
{{2colrow|col1= | {{2colrow|col1= | ||
| Line 42: | Line 45: | ||
}} | }} | ||
| + | |||
| + | ---- | ||
===Editing links=== | ===Editing links=== | ||
{{2colrow|col1= | {{2colrow|col1= | ||
| Line 49: | Line 54: | ||
---- | ---- | ||
| − | If you select (highlight) text and then press the "Link" button, that text will be used in creating the link. For a link that involves just one word, you can either select that word or just put the cursor | + | If you select (highlight) text and then press the "Link" button, that text will be used in creating the link. For a link that involves just one word, you can either select that word or just put the cursor on that word. |
---- | ---- | ||
| Line 59: | Line 64: | ||
}} | }} | ||
| + | |||
| + | ---- | ||
===Editing images and other media files=== | ===Editing images and other media files=== | ||
{{2colrow|col1= | {{2colrow|col1= | ||
| − | '''Important:''' Adding images to a page happens '''AFTER''' the image has been uploaded to the wiki. | + | '''Important:''' Adding images to a page happens '''AFTER''' the image has been uploaded to the wiki. See: [[Uploading Files - Mediawiki]] |
| − | + | ====To add a new image''' (or another type of media file) to the page==== | |
# Click the "Media" icon (a picture of mountains) in the "Insert" menu. The image will be added wherever your cursor is. | # Click the "Media" icon (a picture of mountains) in the "Insert" menu. The image will be added wherever your cursor is. | ||
# Clicking the "Media" icon opens a dialog that automatically searches the local wiki for media files related to the title of the page you're editing. | # Clicking the "Media" icon opens a dialog that automatically searches the local wiki for media files related to the title of the page you're editing. | ||
| Line 69: | Line 76: | ||
# To choose a file, click on its thumbnail image. | # To choose a file, click on its thumbnail image. | ||
# This places the image onto the page you are editing. | # This places the image onto the page you are editing. | ||
| + | |||
| Line 87: | Line 95: | ||
}} | }} | ||
| − | ===Editing images=== | + | |
| + | ---- | ||
| + | |||
| + | ===Editing existing images=== | ||
For an existing image, you can add or edit a caption or other settings by clicking on the image, then clicking on the "Media" icon that appears below the picture. | For an existing image, you can add or edit a caption or other settings by clicking on the image, then clicking on the "Media" icon that appears below the picture. | ||
You can resize an existing image by clicking on it, then moving the resize icon (the two-headed arrow on one or both bottom corners). | You can resize an existing image by clicking on it, then moving the resize icon (the two-headed arrow on one or both bottom corners). | ||
| Line 93: | Line 104: | ||
You can also drag and drop an image to a place higher or lower on the page. | You can also drag and drop an image to a place higher or lower on the page. | ||
| + | |||
| + | ---- | ||
===Uploading images=== | ===Uploading images=== | ||
Uploading images is currently still handled via the legacy [[Uploading Files - Mediawiki|File upload tool]] and not via the Visual Editor (look for this to change in later versions). | Uploading images is currently still handled via the legacy [[Uploading Files - Mediawiki|File upload tool]] and not via the Visual Editor (look for this to change in later versions). | ||
| + | |||
| + | ---- | ||
===Editing lists=== | ===Editing lists=== | ||
| − | You can use the visual editor to create lists | + | {{2colrow|col1= |
| + | You can use the visual editor to create lists or to change the format of an existing list. There are two types of lists: | ||
| + | * unordered (bullet) and | ||
| + | * ordered (numbered) | ||
| + | |||
To start a new list, just click on one of the two menu items shown here. Or, if you already have typed the list (on separate lines), select (highlight) the list you have typed, then click on one of the menu items. | To start a new list, just click on one of the two menu items shown here. Or, if you already have typed the list (on separate lines), select (highlight) the list you have typed, then click on one of the menu items. | ||
| + | |col2= | ||
| + | [[File:Mw-ve-lists.png|250px]] | ||
| + | }} | ||
| + | |||
| + | ---- | ||
===Editing tables=== | ===Editing tables=== | ||
You can use the visual editor to insert and change tables. | You can use the visual editor to insert and change tables. | ||
| Line 111: | Line 135: | ||
*You can add or delete a column or a row. | *You can add or delete a column or a row. | ||
*You can merge cells: Select them, then from the Table menu, click on "Merge cells". | *You can merge cells: Select them, then from the Table menu, click on "Merge cells". | ||
| + | |||
| + | |||
====Making Tables Accessible==== | ====Making Tables Accessible==== | ||
Please see [https://www.mediawiki.org/wiki/Help:Tables#Accessibility_of_table_header_cells Accessibility of table header cells] for instructions on making tables more accessible when rendered on non-visual media. | Please see [https://www.mediawiki.org/wiki/Help:Tables#Accessibility_of_table_header_cells Accessibility of table header cells] for instructions on making tables more accessible when rendered on non-visual media. | ||
| + | |||
| + | |||
| + | ---- | ||
===Editing categories=== | ===Editing categories=== | ||
| + | {{2colrow|col1= | ||
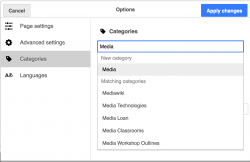
#To edit categories, on the "Page options" menu, click the "Categories" item. | #To edit categories, on the "Page options" menu, click the "Categories" item. | ||
#Clicking on "Categories" opens a dialog that lists existing categories and allows you to add new ones, and to delete existing categories. | #Clicking on "Categories" opens a dialog that lists existing categories and allows you to add new ones, and to delete existing categories. | ||
| + | |col2= | ||
| + | [[File:Mw-ve-categories.png|250px]] | ||
| + | }} | ||
| + | |||
| + | |||
| + | ---- | ||
===Editing page settings=== | ===Editing page settings=== | ||
{{2colrow|col1= | {{2colrow|col1= | ||
| Line 124: | Line 160: | ||
|col2= | |col2= | ||
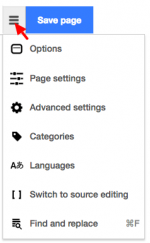
# To edit a page's settings, click to open the '''Page options''' menu, in the toolbar, and select the '''Page settings''' button. | # To edit a page's settings, click to open the '''Page options''' menu, in the toolbar, and select the '''Page settings''' button. | ||
| − | # The | + | # The '''Page settings''' button opens a dialog that shows several options. |
| − | # Click | + | # Click '''Apply changes''' when you're done editing the Page options to return to the page editor. |
}} | }} | ||
| + | |||
| + | ---- | ||
===Switching between the visual and wikitext editors=== | ===Switching between the visual and wikitext editors=== | ||
To switch from the visual editor to the wikitext editor, click the [ ] button '''Switch to Source Editor''' option in the Page Settings menu | To switch from the visual editor to the wikitext editor, click the [ ] button '''Switch to Source Editor''' option in the Page Settings menu | ||
Latest revision as of 09:51, 9 August 2019
Opening the visual editor
Getting started: the visual editor's toolbar
The visual editor's toolbar appears at the top of the screen when you begin editing. It includes some familiar icons:
- Undo / redo
- Headings pull-down menu
- Formatting: Clicking the "A" opens a menu
- Linking tool: The chain icon is the linking tool. Clicking on it (usually after selecting some text) opens the link dialog.
- Cite menu: The "Cite" menu is used to add inline citations (also called "footnotes" or "references").
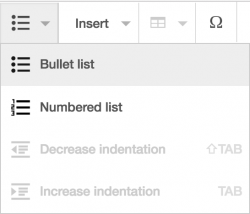
- Lists and indentation: The first two items allow you to format text as either a "Bullet list" or a "Numbered list". The last two items allow you to decrease or increase the indentation level of list items.
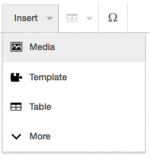
- Insert: The "Insert" menu allows you to add a few different types of objects (including images)
- The Page options menu is to the left of the Save page button. On this menu there are options to adjust page settings. This is also where you can switch to Source editing.
Saving changes
When you're done editing, click the blue Save page button in the toolbar. If you have made no changes, the button will be disabled (grayed out). To cancel all your editing changes, just close your browser window, or click use the "esc" button on your keyboard to cancel.
Pressing the blue "Save page" button opens a dialog. You can then enter a brief summary of your actions, mark your edit as minor, and add the page to your Watchlist.
Editing links
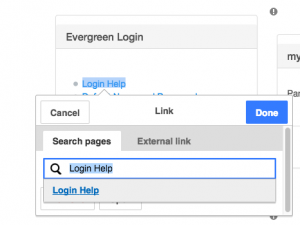
Links can be added through the "Link" icon (links in a chain) in the toolbar, or by using the shortcut Ctrl+K (or ⌘ Command+K on a Mac).
If you select (highlight) text and then press the "Link" button, that text will be used in creating the link. For a link that involves just one word, you can either select that word or just put the cursor on that word.
When you use either the button or the shortcut, a dialog will open in which you may type the link. The link tool will try to help with internal links by searching for likely matches.
Once you have entered or selected the link, you complete the linking process by pressing ↵ Enter or by pressing the "Done" button. Your link will immediately appear on the page, but as with other changes to the page, it will not be saved until you save the entire page.
Editing images and other media files
Important: Adding images to a page happens AFTER the image has been uploaded to the wiki. See: Uploading Files - Mediawiki
To add a new image (or another type of media file) to the page
- Click the "Media" icon (a picture of mountains) in the "Insert" menu. The image will be added wherever your cursor is.
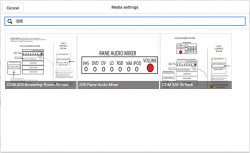
- Clicking the "Media" icon opens a dialog that automatically searches the local wiki for media files related to the title of the page you're editing.
- You can change the search by changing the text in the dialog's search box to locate previously uploaded media
- To choose a file, click on its thumbnail image.
- This places the image onto the page you are editing.
After the image you selected is inserted into the page
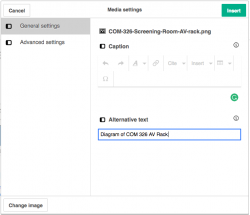
another dialog will open...
- This dialog allows you to add and edit the caption of the image. The caption can contain formatting and links.
- The media dialog also allows you to add alternative text captions, to help users who use screen readers, or who have disabled image display.
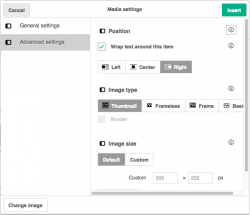
- You can also set various parameters for the image in the "Advanced settings" window. These include the alignment, the type, and size of the image.
- When you're done, click "Apply changes" to close the dialog and return to editing the page.
Editing existing images
For an existing image, you can add or edit a caption or other settings by clicking on the image, then clicking on the "Media" icon that appears below the picture. You can resize an existing image by clicking on it, then moving the resize icon (the two-headed arrow on one or both bottom corners).
You can also drag and drop an image to a place higher or lower on the page.
Uploading images
Uploading images is currently still handled via the legacy File upload tool and not via the Visual Editor (look for this to change in later versions).
Editing lists
You can use the visual editor to create lists or to change the format of an existing list. There are two types of lists:
- unordered (bullet) and
- ordered (numbered)
To start a new list, just click on one of the two menu items shown here. Or, if you already have typed the list (on separate lines), select (highlight) the list you have typed, then click on one of the menu items.
Editing tables
You can use the visual editor to insert and change tables. You can even import a table by dragging a comma-separated value (.csv) file from your computer into the main editing window.
When you click on "Table", in the "Insert" menu, the visual editor inserts a blank four-by-four table. Now the "Table" menu is available. From that menu, you can add a caption to the top of the table.
- To select a cell, click it once.
- To edit the contents of the cell (for example, to add content or to correct a spelling error), double click in the cell. Or you can select the cell and then press Return.
To end your editing of a cell, just click elsewhere.
- You can add or delete a column or a row.
- You can merge cells: Select them, then from the Table menu, click on "Merge cells".
Making Tables Accessible
Please see Accessibility of table header cells for instructions on making tables more accessible when rendered on non-visual media.
Editing categories
Editing page settings
Switching between the visual and wikitext editors
To switch from the visual editor to the wikitext editor, click the [ ] button Switch to Source Editor option in the Page Settings menu
References
This article was developed using materials from mediawiki.org Visual Editor User Guide.


