Difference between revisions of "Picturing Plants - Photoshop"
From Help Wiki
m |
m (→Save for Web) |
||
| Line 60: | Line 60: | ||
#Go '''File > Save for Web''' | #Go '''File > Save for Web''' | ||
#Choose 4-Up view | #Choose 4-Up view | ||
| − | #Under Image Size set you width to 800px | + | #Under Image Size set you width to 800px (let the height auto-adjust) |
#Select one of the four view frames | #Select one of the four view frames | ||
#From the Preset drop-down menu choose a file format (this will depend on the nature of your image | #From the Preset drop-down menu choose a file format (this will depend on the nature of your image | ||
Revision as of 15:13, 23 May 2013
Project overview
- Preparing digital images for print. Photo Quality prints need thousands of linear pixels. This means between 180 and 360 pixels per inch (ppi.) So, if a print is 10” long, you need 1800 – 3600 linear pixels for it to look good. (10” x 360=3600pixels).
- Prepare images for the web. By contrast, images for the web or email need to be sized for screen resolution. Depending on the monitor you’ll need 800-1920 pixels to fill the screen.
Best practices
- Start Big: larger image files (both in file size and in overal number of pixels) provide you with higher quality images. You can always scale the image down but you can't scale it up.
- Keep your original: These images are typically your highest quality image and you may need to go back to them from time to time.
- File naming is important: Come up with a naming convention that helps you quickly identify the image without having to open it up. Names should include descriptive info, version, size or intended use.
- Example: Rainier_sunrise_1200_BW.psd - this file name tells me about the subject of the photo, the image size typically its width and any processing I've done, this one is a black and white version, it's file format is Photoshop.
Scanning
Using the Epson scanners in the Computer Center. See: Scanning - Mac
- Scan one drawing from a station connected to a scanner
- Save as TIFF to your cubby on Orca. See: Connecting to Orca programs at File Space Overview
- Go back to your station and copy your scanned image to your local hard drive and open locally in Photoshop
Intro to Photoshop
- File > Open your scanned document in Photoshop
- Keyboard shortcuts for navigating your image
- Zoom in/out: Cmd +/-
- Hand tool: Space Bar
- Image > image Size to see the overall size and resolution of your image
- for print, image resolution should be at least 300 dpi
- File > Save as choose Photoshop as the file format. Note the .psd extension.
Editing your image
- If needed, rotate your image Image > Image Rotation
- Crop and set the horizontal/vertical alignment for your image using the crop/align tool
- Note what happens if you choose Not to "delete cropped pixels"
- this relates directly to you Canvas size found in Image > Canvas Size
Image Adjustments
- Image mode
- All images must be in RGB mode to print properly in the DIS. Go Image > Image mode and set the mode to RGB if it is not already
- Adjust the image density (overall brightness/darkness of an image)
- Image > Adjustments > Brightness and Contrast is the most basic way to do this
- Image > Adjustments > Levels give you even more control and can work to clean-up scanned drawings or bring added depth the dull snapshots
- Recommended: try using Levels as an Adjustment Layer - Layer > New Adjustment layers > Levels
Image Touch up
- Working with Layers
- Creating A New Layer
- Moving/reordering layers
- Selections can be made to fine-tune certain areas of your image. There are several tools that can be used to make a selection, all found on the tool bar.
- Try the Quick Selection Tool first.
- Techniques for correction
- Healing Brush Tool - easily paint over bad parts of your images with the parts you want
- Blur Tool - add a little extra blurriness to sections of your image
- Dodge and Burn tools to make areas of your image lighter or darker
Saving your work
- File > Save as choose Photoshop as the file format. Note the .psd extension.
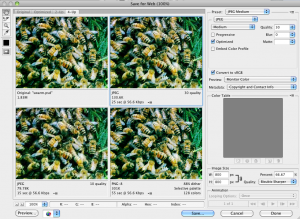
Save for Web
Here we're looking to save a compressed version of the image that will go on the web. Choose the highest quality image with the best (smallest) file size.
- Go File > Save for Web
- Choose 4-Up view
- Under Image Size set you width to 800px (let the height auto-adjust)
- Select one of the four view frames
- From the Preset drop-down menu choose a file format (this will depend on the nature of your image
- jpg for photographic images wiht much color variance
- .png or .gif for illustration or images with areas of the same color
- Dial in any additional settings for your file format: Quality (or number of colors)
- Select another view frame and change the settings for comparison. Look at the difference in quality versus the file size.
- Select the view frame for compression setting you want and click the Save... button

