Difference between revisions of "COM 320 & 323"
From Help Wiki
| Line 2: | Line 2: | ||
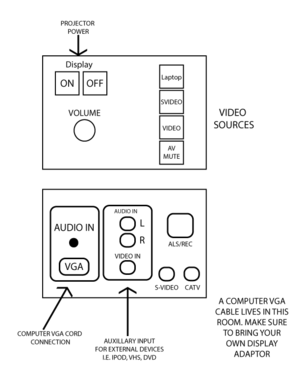
[[File:COM-AV-Wall-Panel.png|thumbnail]] | [[File:COM-AV-Wall-Panel.png|thumbnail]] | ||
| + | |||
| + | ===Computer=== | ||
| + | # Connect your computer using the VGA/audio cord to the VGA input panel. | ||
| + | # Turn on the projector by pressing the ON display power. | ||
| + | # Select Laptop for your video source. | ||
| + | # Use the volume knob and your computer volume to control the audio level. | ||
| + | |||
| + | ===Auxiliary Input=== | ||
| + | Can be used for external DVD, VHS, or IPOD like devices. | ||
| + | #Connect your RCA audio or Video input | ||
| + | #Select the VIDEO source | ||
| + | #Turn ON the projector by pressing the ON Display power | ||
| + | #Use the volume knob to control volume | ||
Revision as of 15:30, 7 October 2013
COM 320 & 323 are exactly the same. They only have simple wall panels and NO AV RACK.
Computer
- Connect your computer using the VGA/audio cord to the VGA input panel.
- Turn on the projector by pressing the ON display power.
- Select Laptop for your video source.
- Use the volume knob and your computer volume to control the audio level.
Auxiliary Input
Can be used for external DVD, VHS, or IPOD like devices.
- Connect your RCA audio or Video input
- Select the VIDEO source
- Turn ON the projector by pressing the ON Display power
- Use the volume knob to control volume

