Difference between revisions of "COM 326 Screening Room"
From Help Wiki
| Line 4: | Line 4: | ||
===Power=== | ===Power=== | ||
| − | #Turn on | + | #Turn on the main power in the orange rack located in the front of the room |
| − | #Turn on | + | #Turn on main power in the short black rack located in the front of the room |
| − | #Turn on the | + | #Turn on the '''Onkyo''' audio receiver and amplifier located in the 326A control room |
===Projector Remote=== | ===Projector Remote=== | ||
| − | #Turn on the projector by using the Panasonic | + | # Turn on the projector by using the Panasonic projector remote |
| − | + | # Press '''INPUT SELECT''' on projector remote | |
| − | + | #* Select '''COMPUTER IN''' to project all media in orange AV rack | |
| − | * | + | #* Select '''HDMI 3''' to project the blu-ray player |
| − | * | + | |
===Video Sources (orange rack)=== | ===Video Sources (orange rack)=== | ||
| − | #Select your video source on the top | + | #Select your video source on the top Extron switcher |
VHS, DVD, Laser Disc, Computer (using VGA cable) | VHS, DVD, Laser Disc, Computer (using VGA cable) | ||
[[File:326-Rane-Audio-Mixer.png|thumbnail]] | [[File:326-Rane-Audio-Mixer.png|thumbnail]] | ||
===Audio Sources=== | ===Audio Sources=== | ||
| − | #Use the | + | #Use the Rane audio mixer to individually control the volume of your media sources. |
===Volume=== | ===Volume=== | ||
There are 3 volumes that need to be adjusted depending on what media you are using. These 3 Main Volume controls need to be adjusted appropriately. | There are 3 volumes that need to be adjusted depending on what media you are using. These 3 Main Volume controls need to be adjusted appropriately. | ||
| − | *Volume on Rane | + | *Volume on the Rane mixer |
| − | *Volume on Onkyo receiver in the 326A Control Room | + | *Volume on the Onkyo receiver in the 326A Control Room |
*Volume on your laptop | *Volume on your laptop | ||
[[Category:Media Classrooms]] | [[Category:Media Classrooms]] | ||
Revision as of 13:51, 15 October 2013
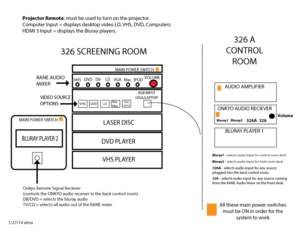
This room is mostly used by the advanced moving image programs. It has an AV rack up front and in the back. It also has a 5.1 system, blu-ray, laser disc, VHS, laptop VGA cord, and audio mixer which allows you to interchange both your video and audio signals.
Power
- Turn on the main power in the orange rack located in the front of the room
- Turn on main power in the short black rack located in the front of the room
- Turn on the Onkyo audio receiver and amplifier located in the 326A control room
Projector Remote
- Turn on the projector by using the Panasonic projector remote
- Press INPUT SELECT on projector remote
- Select COMPUTER IN to project all media in orange AV rack
- Select HDMI 3 to project the blu-ray player
Video Sources (orange rack)
- Select your video source on the top Extron switcher
VHS, DVD, Laser Disc, Computer (using VGA cable)
Audio Sources
- Use the Rane audio mixer to individually control the volume of your media sources.
Volume
There are 3 volumes that need to be adjusted depending on what media you are using. These 3 Main Volume controls need to be adjusted appropriately.
- Volume on the Rane mixer
- Volume on the Onkyo receiver in the 326A Control Room
- Volume on your laptop


