Difference between revisions of "Longhouse 1007B"
From Help Wiki
(→Combining) |
(→Combining) |
||
| Line 34: | Line 34: | ||
==Combining== | ==Combining== | ||
| − | * | + | * If you are using 1007A and 1007B as a single room, the combine switch must be set to ‘Combined’. |
| − | * | + | * Contact Electronic Media for assistance. X6270. |
====Dual Projection:==== | ====Dual Projection:==== | ||
Revision as of 12:58, 15 October 2013
Contents
Laptop: (You may play a DVD through your laptop.)
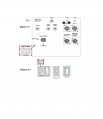
- Lower the projection screen using the Projector Screen switch. (Figure 2)
- Press the ON button to turn on the Data Projector. Projector will take 30 seconds to warm up. The ON button will stop blinking when projector is ready. (Figure 2)
- Press the PC button. (Figure 2)
- Insert the VGA cable from laptop into computer Input Jack. Insert audio cable into the Audio Input. (Figure 1)
- Turn on your laptop.
- Use the Volume knob to adjust audio levels. (Figure 2)
VCR/DVD:
- Using an RCA cable, connect the video and audio outputs of the VCR/DVD player to the Video, Left Audio and Right Audio inputs on the panel. (Figure 1)
- Press the Video button (Figure 2).
Microphones:
Wired Microphone(’s):
- Connect an XLR cable into either input, Mic 1 or Mic 2. (Figure 1)
- Connect a microphone into other end of the XLR cable.
- Adjust the volume by using the trim knobs above the mic inputs, (Figure 1)
- Additional volume can be controlled from the other panel’s volume control. (Figure 2)
Wireless Microphone(’s): This side is Red
* The Longhouse wireless microphones can be checked out from Media Loan (Faculty only).
* There are two microphones, one for each room. The microphone with yellow tape only works in 1007A.
* The microphone with red tape works in 1007B or can be combined to have audio in both rooms (see ‘combining’).
- To turn on the microphone hold down the red button on the bottom of the microphone.
- The “Mic” button on the side of the microphone is a mute switch. when illuminated red, the mic is on.
- The volume can be controlled using the volume knob on panel. (Figure 2)
Combining
* If you are using 1007A and 1007B as a single room, the combine switch must be set to ‘Combined’.
* Contact Electronic Media for assistance. X6270.
Dual Projection:
- Connect VGA cable from 1007B (The side with the combine switch) into your laptop. (Dual screen will not work if you are using the VGA cable in 1007A). (Figure 1)
- On the panels In both rooms select the PC inputs. (Figure 2)
Dual Room Wired Microphone:
- follow the same steps as a single room wired mic.
You must connect the mic into the panel in 1007B (The side with the combine switch).
Dual Room Wireless Microphone:
- Follow the same steps as a single room wireless microphone.
You must use the wireless mic labled B. RED TAPED MICROPHONE

