Difference between revisions of "COM 107 Recital Hall"
From Help Wiki
(→Lectern) |
(→LECTERN INSTRUCTIONS) |
||
| Line 63: | Line 63: | ||
*Lectern Wireless – wirelessly connects all data from the lectern to the AV rack | *Lectern Wireless – wirelessly connects all data from the lectern to the AV rack | ||
*Lectern Wired – you must plug in the black lectern cable located in the bottom of the lectern to the stage input | *Lectern Wired – you must plug in the black lectern cable located in the bottom of the lectern to the stage input | ||
| − | |||
| − | |||
| − | |||
| − | |||
| − | |||
| − | |||
| − | |||
| − | |||
===Lectern=== | ===Lectern=== | ||
Revision as of 08:46, 29 June 2015
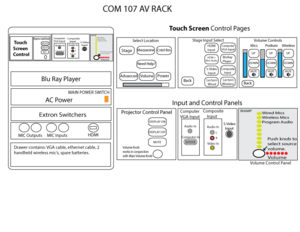
AV Rack Main Power
Need help? Call Media Services X 6270 for media help.
Turn ON MAIN POWER, orange switch located inside AV rack.
Location Page
- On the touch screen control panel select Stage
Stage Input Select Page
Select your media source
- HDMI Input (for external device)
- HDMI +Mini Audio (for external device)
- S-Video Input (for external device)
- Computer VGA Input (for your laptop)
- BluRay Player (located in rack)
- Composite Input (for external device)
- Lectern Wired - located in bottom drawer
- Lectern Wireless - located in bottom drawer
Projector Control Panel
Turn ON the projector by pressing the Display ON button
- Display ON
- Display OFF
- MUTE
Audio Control Panel
Press the knob to select what source you want to control the volume for
- Wired Mics - microphones that you plug into the front panel
- Wireless mics - these handheld wireless mics are located in the drawer, power them on
- Program Audio - all audio from other sources like laptops, bluray, ipod
Volume can also be controlled/simultaneously by using the touch screen Volume Controls screen
Laptop Instructions
- The VGA computer cable can be found in the bottom drawer of the AV rack
- Connect the VGA/audio cable to your laptop and the Computer VGA Input panel in the rack
- Select the Computer VGA Input option on the Stage Input Select page on the touch screen panel
- Press the Display ON button to turn on the projector
- Turn on your laptop
- Select Program Audio on the Volume Control panel and turn it up. Make sure your computer volume is up as well.
BluRay Instructions
- Select BluRay Player on the touch screen Stage Input Select page.
- Insert your media into the BluRay player located in the rack, Eject button is on the front of the player.
- Press the Display ON button to turn on the projector.
- Select Program Audio on the Volume Control panel and turn it up.
- Use the touch screen to control the BluRay player functions. Press Advanced to access special menu's.
- Press Enter to PLAY.
IPOD or other devices
- Use the MINI/RCA cable located in the drawer
- Connect your IPOD to the Composite Input panel
- Select Composite Input on the touch screen Stage Input Select page.
- Select Program Audio on the Audio Control Panel and turn it up.
LECTERN INSTRUCTIONS
AV RACK
- Open AV rack and turn ON the MAIN POWER
- On the Touch Screen select Lectern Wired or Lectern Wireless
- Lectern Wireless – wirelessly connects all data from the lectern to the AV rack
- Lectern Wired – you must plug in the black lectern cable located in the bottom of the lectern to the stage input
Lectern
- Power: make sure black AC power cable located on the bottom shelf of the Lectern is plugged into an AC outlet.
- AV connection: if using Lectern Wired, make sure black AV cable (black cable located at the bottom shelf of lectern) is plugged in to the Lectern wall connector located on the back wall of the stage.
- Unlock the lectern front panel.
- On the lectern press your source input: VGA, Video, HDMI, MAC
          *Mac mini – pull out the keyboard and mouse to use the built in computer
          *VGA and HDMI cables can be found in the bottom drawer of the AV rack. Plug in your source to the input located on the top of the lectern.

