Difference between revisions of "Animated GIFs"
From Help Wiki
m |
m (→Animated GIFs) |
||
| Line 9: | Line 9: | ||
#Set your frame rate 10 or 12 fps should suffice | #Set your frame rate 10 or 12 fps should suffice | ||
#Open the animation timeline in '''Window > Timeline''' | #Open the animation timeline in '''Window > Timeline''' | ||
| − | |||
#From the timeline "hamburger" button choose Set Timeline Frame Rate to adjust frame rate if needed | #From the timeline "hamburger" button choose Set Timeline Frame Rate to adjust frame rate if needed | ||
| Line 15: | Line 14: | ||
#In Photoshop CS 6 go '''File > Save for Web and Devices''' | #In Photoshop CS 6 go '''File > Save for Web and Devices''' | ||
#*In Photoshop CC 2015 go '''File > Export > Save for Web (Legacy) ...''' | #*In Photoshop CC 2015 go '''File > Export > Save for Web (Legacy) ...''' | ||
| − | |||
| − | |||
[[File:Animated-gif2.png|300px|thumb|right|Set your looping options]] | [[File:Animated-gif2.png|300px|thumb|right|Set your looping options]] | ||
| − | + | #Choose a GIF flavor from the Preset drop down menu | |
| − | #Choose a GIF flavor from the Preset drop down menu | + | #* note what happens to the file size and color table as you choose different GIF compression settings |
#You should now be able to preview the animation in the lower right | #You should now be able to preview the animation in the lower right | ||
#Set your Loop options - once or forever | #Set your Loop options - once or forever | ||
#Click '''Save''' and name your animated gif file | #Click '''Save''' and name your animated gif file | ||
| + | #Open the animated GIF with a browser to view and test see how it turned out | ||
[[category:Photoshop]] | [[category:Photoshop]] | ||
Latest revision as of 15:15, 11 May 2016
Animated GIFs
- Create an image sequence and name each file in order strarting with 001, 002, etc.
- Once you've created your image sequence, you can use Photoshop to output an animated Gif file.
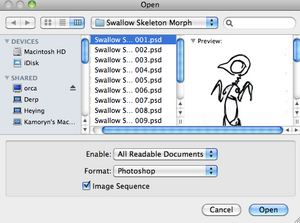
Open an image sequence
- Go File > Open and select the first image in your sequence
- Check the Image Sequence box and click Open
- Set your frame rate 10 or 12 fps should suffice
- Open the animation timeline in Window > Timeline
- From the timeline "hamburger" button choose Set Timeline Frame Rate to adjust frame rate if needed
Output an animated GIF
- In Photoshop CS 6 go File > Save for Web and Devices
- In Photoshop CC 2015 go File > Export > Save for Web (Legacy) ...
- Choose a GIF flavor from the Preset drop down menu
- note what happens to the file size and color table as you choose different GIF compression settings
- You should now be able to preview the animation in the lower right
- Set your Loop options - once or forever
- Click Save and name your animated gif file
- Open the animated GIF with a browser to view and test see how it turned out


