Difference between revisions of "Adobe Student Licenses"
From Help Wiki
(→Installation Instructions for the Creative Cloud Desktop App) |
(→Installation Instructions for the Creative Cloud Desktop App) (Tag: VisualEditor) |
||
| Line 11: | Line 11: | ||
#* [[File:Select-account-adobe-2.png|175x175px]] | #* [[File:Select-account-adobe-2.png|175x175px]] | ||
# Enter your Evergreen password on the password page | # Enter your Evergreen password on the password page | ||
| + | # The Adobe website will open. | ||
| − | + | ==== Install The Creative Cloud Desktop App ==== | |
# Under '''Your Services''' it should list '''Creative Cloud'''. Click '''Open'''. | # Under '''Your Services''' it should list '''Creative Cloud'''. Click '''Open'''. | ||
# On the right side of the screen Below your account name click '''Install Creative Cloud App''' | # On the right side of the screen Below your account name click '''Install Creative Cloud App''' | ||
Revision as of 15:02, 23 March 2020
Adobe is making temporary at-home access to Creative Cloud available until May 31, 2020 for schools and colleges.
Contents
Installation Instructions for the Creative Cloud Desktop App
Sign In
- Go to Adobe.com
- Click the Sign In link in the top right corner
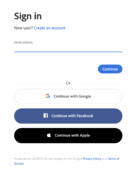
- In the new window enter your Evergreen email address and click Continue
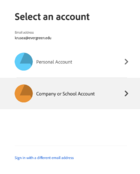
- Click on Company or School Account
- Enter your Evergreen password on the password page
- The Adobe website will open.
Install The Creative Cloud Desktop App
- Under Your Services it should list Creative Cloud. Click Open.
- On the right side of the screen Below your account name click Install Creative Cloud App
- If you see a window the says Permission may be required click OK
- The installer should download
- macOS: Creative_Cloud_Installer.dmg
- Windows: Creative_Cloud_Set-Up.exe
- Run the installer and enter and admin password if prompted
- On the Install Creative Cloud window click Continue
- A web browser window will prompt you to login like you did in step 3 above
- Click on Company or School Account
- Outside of the web browser the Creative Cloud Installer should be running
- When done the Creative Cloud Desktop App (CDDA) will open
- A tour window may appear. Click either the Skip or Take Tour button.
Installing the Adobe Apps
- In the CCDA you can choose to install individual apps as needed
- Click the Install button bellow the app name
- Some installations might trigger a second app to install
- For example installing Premiere Pro will also trigger the installation of Media Encoder
- Click the cloud icon in the top right of the CCDA to check the installation progress
- If your computer's operating system does not meet the minimum requirements for an app the last version that will work on your computer will be installed.
- Check the Adobe website for the system requirements for individual apps


