Difference between revisions of "Plant Chemical Ecology - WordPress"
From Help Wiki
(Created page with "__NOTOC__ ===Your Assignment=== ... ===Getting Started=== *'''Getting Started with WordPress''' - What is WordPress and how is it being used at Evergreen? *[https://sites...") |
m |
||
| Line 25: | Line 25: | ||
# Click the Toolbar Toggle icon [[File:Wp-toolbar-toggle.png|25px]] to expand a second row of editing tools | # Click the Toolbar Toggle icon [[File:Wp-toolbar-toggle.png|25px]] to expand a second row of editing tools | ||
# Insert the '''Read More''' break | # Insert the '''Read More''' break | ||
| + | # Beneath this Read More section we will be putting the rest of our content into sections. | ||
====Add a Plant Classification Table==== | ====Add a Plant Classification Table==== | ||
| − | + | # Use the insert Table icon to insert a table that is 2 columns wide by 6 rows long. | |
| − | # | + | # Add row headers similar to what you see on the demonstration profile |
| − | # | + | #*Plant Classification (table title) |
| − | # | + | #* Common Name: |
| − | # | + | #* Familiy: |
| − | # | + | #* Genus: |
| + | #* Species: | ||
| − | + | [[File:Plantchemeco-wp-categories.png|200px|right]] | |
| − | + | ||
| − | + | ||
| − | + | ||
| − | + | ||
| − | [[File: | + | |
====Categorize your post==== | ====Categorize your post==== | ||
*[[Categories and Tags|Categorize]] your post by Plant Family and/or Chemical Class. See the Category panel to the right when editing your post. | *[[Categories and Tags|Categorize]] your post by Plant Family and/or Chemical Class. See the Category panel to the right when editing your post. | ||
| − | |||
===Adding Images=== | ===Adding Images=== | ||
| − | You will be adding images to your | + | You will be adding images to your post. Original images taken by you are preferable, but if you don't have a high quality photo (or want to add additional photos), you can use images that are not your own they have been released in the Creative Commons and are properly attributed. See note about Creative Commons images below. |
:'''File management:''' we will all be sharing a single media library. Make sure to use a unique file naming convention. Start your files with your species and it will be easy to find all files related to your species. <br /> | :'''File management:''' we will all be sharing a single media library. Make sure to use a unique file naming convention. Start your files with your species and it will be easy to find all files related to your species. <br /> | ||
:'''Example:''' Amanita_muscaria1.jpg | :'''Example:''' Amanita_muscaria1.jpg | ||
Revision as of 10:52, 26 January 2017
Your Assignment
...
Getting Started
- Getting Started with WordPress - What is WordPress and how is it being used at Evergreen?
- Login to the Plant Profiles in Chemical Ecology site
Driving in WordPress
- Dashboard Overview - get comfortable navigating the Dashboard and moving between Admin and Public view
- Change your profile info: Name and Bio
Add a new plant profile
See the Example plant profile for details on what is to be included in each section of your post.
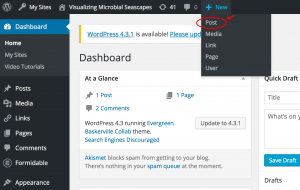
- Create a new Plant Profile Post using the New > Post button at the top of the Admin Bar or from the Dashboard > Posts > Add New menu
- Title your post
- Publish your Plant Profile and then View Post to see how it looks
Edit an existing post
- From the public view of your post, click the Edit Post button in the top Admin bar
- You can also navigate from your Dashboard to Posts > All Posts and hover over the post title to Edit
Create an opening abstract
- At the top of your post add an opening 1-2 sentences. This text will appear on the thumbnail view of your post n the home page and category pages.
- Click the Toolbar Toggle icon
 to expand a second row of editing tools
 - Insert the Read More break
- Beneath this Read More section we will be putting the rest of our content into sections.
Add a Plant Classification Table
- Use the insert Table icon to insert a table that is 2 columns wide by 6 rows long.
- Add row headers similar to what you see on the demonstration profile
- Plant Classification (table title)
- Common Name:
- Familiy:
- Genus:
- Species:
Categorize your post
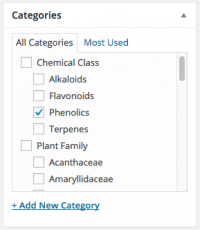
- Categorize your post by Plant Family and/or Chemical Class. See the Category panel to the right when editing your post.
Adding Images
You will be adding images to your post. Original images taken by you are preferable, but if you don't have a high quality photo (or want to add additional photos), you can use images that are not your own they have been released in the Creative Commons and are properly attributed. See note about Creative Commons images below.
- File management: we will all be sharing a single media library. Make sure to use a unique file naming convention. Start your files with your species and it will be easy to find all files related to your species.
- Example: Amanita_muscaria1.jpg
- Set your featured image for all posts. Featured images will appear on the at the top of each post and on category pages.
- Insert an image - add an image to the body of a post
- Adding captions to cite your image sources
- Creative Commons images from WikiMedia Commons is a great place to start. Once you find an image you'd like to use click the "Use this file on the web" link. Copy the "Attribution" (HTML) text and paste into your image's caption.
- Use the built-in image gallery tool to add an image gallery to the main content area of the post. This image gallery will be displayed at the bottom of the page.
Additional Resources
- Wordpress.com Getting Started Tutorials - these tutorials are for working on wordpress.com but is nearly identical to using WordPress at blogs.evergreen.edu
- Lynda.com WordPress 3 Essential Training - this is another training geared towards using Wordpress.com but if you skip the account setup portion most of the rest is relavent to blogs.evergreen.edu


