Difference between revisions of "Waitlists"
From Help Wiki
m (Tag: VisualEditor) |
|||
| Line 2: | Line 2: | ||
As we get closer to the beginning of the quarter, plans often change. Putting yourself on a waitlist ensures you are in the queue to be registered for that class if space becomes available. '''Your Evergreen email is how we will communicate with you about any registration changes.''' | As we get closer to the beginning of the quarter, plans often change. Putting yourself on a waitlist ensures you are in the queue to be registered for that class if space becomes available. '''Your Evergreen email is how we will communicate with you about any registration changes.''' | ||
| + | [[File:Waitlisted_Error.png|200px|thumb|right|Figure 1]] | ||
| + | [[File:Waitlist_Action.png|200px|thumb|right|Figure 2]] | ||
===Adding Yourself to a Waitlist=== | ===Adding Yourself to a Waitlist=== | ||
| + | |||
<big>You can also watch '''the [https://evergreen.hosted.panopto.com/Panopto/Pages/Viewer.aspx?id=a4934a0f-c363-4ffc-a82f-afff01692b1f Waitlists] video''', prepared by Registration and Records Staff.</big> | <big>You can also watch '''the [https://evergreen.hosted.panopto.com/Panopto/Pages/Viewer.aspx?id=a4934a0f-c363-4ffc-a82f-afff01692b1f Waitlists] video''', prepared by Registration and Records Staff.</big> | ||
| − | When you receive a “Closed- Waitlisted” error when attempting to add a class, it is because the class is full, but there is still room on the waitlist. | + | When you receive a “Closed- Waitlisted” error like in Figure 1 when attempting to add a class, it is because the class is full, but there is still room on the waitlist. |
| − | *Click on the Action drop-down menu | + | *Click "Ok" on the error message |
| + | *Click on the Action drop-down menu as shown in Figure 2 | ||
*Select Wait Listed | *Select Wait Listed | ||
*Click submit | *Click submit | ||
| Line 30: | Line 34: | ||
**In the top half of your screen, you will see all of the classes you are registered or waitlisted for in that term. | **In the top half of your screen, you will see all of the classes you are registered or waitlisted for in that term. | ||
*In the bottom half of your screen, click on the '''Schedule Details tab'''. This will show you detailed information about the classes you are registered and waitlisted for. | *In the bottom half of your screen, click on the '''Schedule Details tab'''. This will show you detailed information about the classes you are registered and waitlisted for. | ||
| − | *Look for the gray line of text under your waitlisted class. [[File:WLPosition.jpg|400px|thumb|right|Figure | + | *Look for the gray line of text under your waitlisted class. [[File:WLPosition.jpg|400px|thumb|right|Figure 3]] |
**If you do not see this gray line, click on the arrow to the right of the class title in Schedule Details to expand the available information. | **If you do not see this gray line, click on the arrow to the right of the class title in Schedule Details to expand the available information. | ||
| − | *The second to last bolded entry will contain your waitlist position, as highlighted in Figure | + | *The second to last bolded entry will contain your waitlist position, as highlighted in Figure 3. |
[[Category:Registration]] | [[Category:Registration]] | ||
Revision as of 08:38, 21 March 2024
Learn how to put yourself on a waitlist, use the waitlist preference form, and check your waitlist position.
As we get closer to the beginning of the quarter, plans often change. Putting yourself on a waitlist ensures you are in the queue to be registered for that class if space becomes available. Your Evergreen email is how we will communicate with you about any registration changes.
Adding Yourself to a Waitlist
You can also watch the Waitlists video, prepared by Registration and Records Staff.
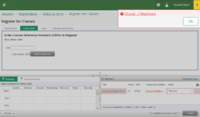
When you receive a “Closed- Waitlisted” error like in Figure 1 when attempting to add a class, it is because the class is full, but there is still room on the waitlist.
- Click "Ok" on the error message
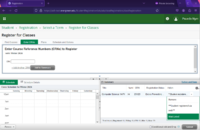
- Click on the Action drop-down menu as shown in Figure 2
- Select Wait Listed
- Click submit
Filling out the Waitlist Preference Form
You can also watch the Waitlist Preference Form video, prepared by Registration and Records Staff.
- Navigate back to the Student Self-Service Dashboard, either with the square menu in the top left corner of your screen, or by clicking on any of the links that say “Dashboard” on your my.evergreen account.
- Find the Waitlist Preference form under the Registration block of links
- Click on the quarter you would like to fill out the preference form for
- Select the total number of credits you would like to take in that term
- List the classes you are waitlisted for in order from your highest to lowest priority
- List the classes you would like to have dropped first if we need to drop something to keep you at your requested number of credits for the quarter
- In the additional Information box, you can give us any other details about your registration preferences or just describe your preferences in more detail.
- Click Submit
- If you change your mind, you can come back and change your preferences any time before the quarter begins. Just make sure you hit Submit to save your changes.
Checking your Waitlist Position
- Navigate to the Student Self-Service Dashboard, either with the square menu in the top left corner of your screen, or by clicking on any of the links that say “Dashboard” on your my.evergreen account.
- Choose Registration Dashboard from the Registration block of links
- Click on "View Registration Information"
- In the term drop down, select the quarter you are interested in.
- In the top half of your screen, you will see all of the classes you are registered or waitlisted for in that term.
- In the bottom half of your screen, click on the Schedule Details tab. This will show you detailed information about the classes you are registered and waitlisted for.
- Look for the gray line of text under your waitlisted class.
- If you do not see this gray line, click on the arrow to the right of the class title in Schedule Details to expand the available information.
- The second to last bolded entry will contain your waitlist position, as highlighted in Figure 3.


