Difference between revisions of "Pidgin Chat Client for Windows"
From Help Wiki
| Line 17: | Line 17: | ||
Once you've created an account you can join an existing group chat | Once you've created an account you can join an existing group chat | ||
#Launch Pidgin | #Launch Pidgin | ||
| − | # | + | #From the Buddy List window go '''Buddies > Join a Chat''' |
#Enter the Chat room name you'd like to join | #Enter the Chat room name you'd like to join | ||
#Handle is the name others will see when you're in the chat room | #Handle is the name others will see when you're in the chat room | ||
Revision as of 10:01, 11 June 2010
Add a new Account
- Download and install Pidgin
- Launch Pidgin and add an XMPP (jabber) account by going Accounts > Manage Accounts
- Click the Add button
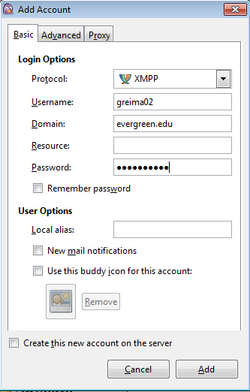
- Set the following for your new account Figure 1
- Protocol = XMPP
- Username = your_evergreen_login
- Domain = evergreen.edu
- Password = your evergreen password
- Click Add
Join a Group Chat
Once you've created an account you can join an existing group chat
- Launch Pidgin
- From the Buddy List window go Buddies > Join a Chat
- Enter the Chat room name you'd like to join
- Handle is the name others will see when you're in the chat room
- If the chat room is password protected you may need to enter the Chat Room password here. Note: This is NOT your evergreen password.
Update your chat profile/picture
- Go Accounts > Manage Accounts
- Select the account you'd like to manage and click Modify
- Check Use this buddy icon box and click the icon to choose a new image from your hard drive
Save chat transcripts or logs
Set preferences to log chats
- Go Tools > Preferences > Logging
- Choose General
- Check "Log all chats"
View chat logs
- Connect to the chat room you'd like to see the logs for (Buddies > Join a chat)
- From the top menu choose Conversation > View Log
- Click Browse logs folder to locate the .txt file of these logs.


