COM 110
From Help Wiki
The AV in this classroom is currently under remodel. The projector cart must be retrieved from the closet by the COM information office staff. The projector must be plugged into the back wall with power, 5 BNC cables, single RCA cable. The projector remote located on the cart must be used.
Power
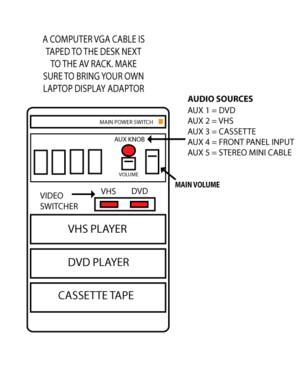
- Turn on the Main Power in the rack located at the front of the room
- Turn on the projector power with projector remote - orange bar on front of projector should turn green.
Computer
- Connect the VGA cable (taped to desk) to your computer.
- Plug in the stereo mini cable for computer sound.
- On the projector remote - select Computer
- On the audio mixer in the rack - select Aux 5 - bring up both the stereo and main faders.
Video (VHS, DVD)
- Turn on the projector with the projector remote.
- In AV rack, select DVD or VHS on video switcher
- In AV rack, on the audio mixer - move selector knob to AUX 1 = DVD or AUX 2 = VHS.
Cassette
- On the audio mixer select AUX 3.
- Bring up the stereo and main fader.
Plug In stereo source
- Use jack on front panel
- Select AUX 4
- Bring up stereo and main fader
External Microphone
- Plug in microphone on front panel
- Slowly bring up MIC fader 1!
- Slowly bring up stereo fader!
SHUTTING DOWN
- POWER DOWN RACK
- TURN OFF PROJECTOR AND LEAVE PROJECTOR REMOTE ON TABLE

