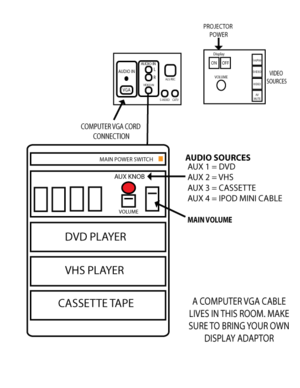
This classroom has an AV rack which includes VHS, DVD, Cassette, computer cord, and a 1/8 mini iPod cable.
Power
- Turn on the AV rack, orange Main Power switch located at the top right.
- Press the Display button on the wall panel to torn on the projector.
Media Sources
- DVD - Select VIDEO on wall panel - select AUX 1on Audio Mixer - Push up AUX stereo fader - Push up Main fader
- VHS - Select VIDEO on wall panel - select AUX 2 on Audio Mixer - Push up AUX stereo fader - Push up Main fader
- Cassette -Select AUX 3 on Audio Mixer - Push up stereo fader - Push up Main fader
- IPOD Cable 1/8 mini - Select AUX 4 - Push up stereo fader - Push up Main fader
- Turn up volume knob on wall panel.
Laptop
- Connect laptop to the VGA cable (video) and audio mini cable (audio) that is hanging next to the AV rack
- Turn on the projector by pressing Display button on the wall panel
- Select Laptop on the wall panel
- Turn on laptop last or restart your computer
- Choose 1024 X 768 for your display resolution
- Use both the volume controls on your computer and the wall panel
Shutdown
- Please turn off the projector and turn down volume when done.

