Booklet Document Setup - InDesign
Creating a Booklet
InDesign supports creating printer spreads for printing booklets. A printer spread refers to two or more pages that fall next to each other on a sheet of paper. For example, if you’re editing an 8-page booklet, the pages appear in sequential order in the layout window. However, in printer spreads, page 2 can be positioned next to page 7, so that when the two pages are printed on the same sheet, 3 folded, and collated, the pages end up in the appropriate order.
Note: The process of creating printer spreads from layout spreads is called imposition. It is generally easier to work in Layout Spread where the pages are ordered sequentially. Converting your project to a printer spread should be done just before you’re ready to print.
Document Setup (Layout Options)
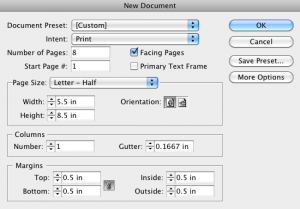
These setup instructions walk through creating an 8 page booklet printed doubled sided on 8.5 x 11 in paper. Each "page" will occupy half of the letter size paper.
To start a new booklet:
- Choose File > New > Document
- Type the Number of Pages in your field, in this case 8 (we’ll use 2 double sided 1/2 sheets of letter).
- Select Facing Pages—gives you left and right-hand pages in your document.
- Use the Page Size drop-down menu to set the size of your page, in this case Letter - Half (Width and Height will be set automatically unless set to Custom).
- Set orientation to Portrait.
- Setting the Margins: choose .5 in all around
- Enter 1 as the Number of Columns
- Click OK.
To access your layout settings in an exisiting document
If you’ve already started a document, choose
- File > Document Setup to adjust your page size and orientation
- Alert: Changing page size and orientation may require that you adjust the pre-existing content (type and graphics) in the document
- Layout > Margins and Columns to modify columns, margins and gutter
Export an open document to PDF
This is easier for printing
- Choose File > Export.
- Specify a name and location for the file.
- For Save As Type (Windows) or Format (Mac OS), choose Adobe PDF (Print), and then click Save.
- When you select the Adobe PDF (Print) option, you cannot include interactive elements in the PDF. To export an interactive document to PDF, see this Adobe help article (this will link to an external domain).
- Do one of the following:
- To use a predefined set of job options, choose a preset from the Adobe PDF Preset menu.
- To create a PDF/X file, either choose a PDF/X preset from the Adobe PDF Preset menu, or choose a predefined PDF/X format from the Standard menu.
- To customize options, select a category from the list on the left and then set the options.
- For Compatibility, choose the lowest PDF version necessary to open the files you create.
- Specify the following Accessibility Options under the Advanced tab, if necessary:
- Display Title: Choose what to display in the title bar of Acrobat when it opens your PDF. Available options are Document Title and File Name.
- Language: Choose the document language for the PDF. This determines the default language for the exported PDF. If the required language is not in the list, you can also type the standard language ISO code.
- Click Export (Windows) or Save (Mac OS).
Printing your Booklet from InDesign
See :


