Difference between revisions of "35mm SLR Camera Gear Guide"
m (Zornesn moved page 35mm SLR Camera Operating Guide to 35mm SLR Camera Gear Guide) |
|||
| Line 1: | Line 1: | ||
| + | {{Media Loan Covid Message}} | ||
| − | <div class="container-fluid" | + | <div class="container-fluid"> |
| − | + | ||
| − | + | ||
| − | + | ||
| − | + | ||
| − | + | ||
| − | + | <div class="row"> | |
| − | + | ||
| − | < | + | |
| − | = | + | |
| − | + | ||
| − | + | ||
| − | + | ||
| − | + | ||
| − | + | ||
| − | + | ||
| − | + | ||
| − | + | ||
| − | + | ||
| − | + | ||
| − | + | ||
| − | + | ||
| − | + | ||
| − | < | + | <div class="col-md-8"> |
| − | < | + | <div class="lead"> |
| − | = | + | <div class="lead">[[File:Media Loan Logo.png|left|frameless|90x90px]]A portable audio recorder that can use mics or it's built-in mics. </div> |
| − | + | ||
| − | + | <div class="pull-right"></div> | |
| − | < | + | |
| − | + | </div> | |
| − | </ | + | |
| − | < | + | [[File:35mm-top.jpg|thumb|none]] |
| − | + | ||
| − | + | ||
| − | + | ||
| − | + | ||
| − | + | ||
| + | ==Overview== | ||
| + | Media Loan has three basic manual 35mm SLR camera models: Pentax K1000, Vivitar V3800N, and the Promaster. All models have: built-in through-the-lens light meter; bayonet K mount 50mm lens and hot shoe for flash. Adjustable for ASA/ISO film speeds 20 to 3200. Shutter speeds range from 1 to 1/1000 second and B (for "bulb", timed exposures). No self-timer is built in, but an adaptor is available for check out. | ||
| + | ==How to Use It== | ||
| + | ===Basic operation=== | ||
| + | Set the ISO, also called ASA (the film's sensitivity to light) by lifting the outer right ring of the shutter speed dial and rotate it until the ASA/ISO number of your film is opposite the orange dot. Always load film in shade or subdued light. | ||
====Load the film==== | ====Load the film==== | ||
<small>[[File:input.gif|load film]]</small> | <small>[[File:input.gif|load film]]</small> | ||
| − | + | Remove the protective case; open the back of the K1000 by pulling up the rewind crank; place the film cassette in the cassette chamber (left side); push down the rewind knob. Insert the film leader into the slot of the take-up spool (right side of chamber). Advance the film by alternately turning the advance lever and pressing the shutter button until both sprockets engage the film perforations, top and bottom. Close the back by pressing it firmly. Cock the film advance lever (and release the shutter) until the exposure counter reads "1." The film is advancing properly if the rewind crank turns counterclockwise while the film advance lever is being wound. | |
====Shutter speed==== | ====Shutter speed==== | ||
| − | + | Set shutter speed by turning the shutter speed dial. Generally, you should use the fastest possible shutter speed to avoid blurred pictures caused by camera movement. When using slow shutter speeds of 1/30th of a second or slower (such as in low light situations or for purposely blurring a moving object) it is advisable to use a tripod (available from Media Loan). If using a flash set the shutter speed at 1/60th of a second. (See the Media Loan Vivitar Guide for flash instructions.) | |
====Focus==== | ====Focus==== | ||
| − | + | While looking through the viewfinder, turn the focusing ring until your subject comes into '''Sharp Focus'''. | |
Another way of setting the focus is to | Another way of setting the focus is to | ||
# Measure or estimate the distance from the camera to the subject. | # Measure or estimate the distance from the camera to the subject. | ||
| − | # Turn the focus ring to the number of feet. | + | # Turn the focus ring to the number of feet. |
| − | + | ||
| − | + | ||
| − | + | ||
| − | + | ===== Cross-Microprism Focusing System ===== | |
| − | + | If your camera uses a cross-microprism focusing system, when your subject is in focus, the image in the microprism center will be sharp. If your subject in not in focus, the microprism will break the image up into many small dots. | |
| − | + | ||
| − | + | ||
| − | + | ||
| − | + | ===== Split-Image Focusing System ===== | |
| − | + | With the split-image focusing system, when the camera is held horizontally and the image is not in sharp focus, all vertical lines seen through the viewfinder will be divided into upper and lower potions. When they are in sharp focus, vertical lines will appear straight. | |
| − | + | ||
| − | + | ||
| − | + | ||
| − | + | ||
| − | + | ||
| − | + | ||
| − | + | ||
====Taking a Photograph==== | ====Taking a Photograph==== | ||
| − | + | # Turn on '''light meter''' by removing the lens cap. | |
# While looking through the viewfinder, turn the '''focusing ring''' (on the lens) until subject comes into '''sharp focus'''. | # While looking through the viewfinder, turn the '''focusing ring''' (on the lens) until subject comes into '''sharp focus'''. | ||
# Set the '''exposure''' by rotating the aperture ring (f stop) ring of the lens until the needle on the right side of the viewfinder image is at the center position. | # Set the '''exposure''' by rotating the aperture ring (f stop) ring of the lens until the needle on the right side of the viewfinder image is at the center position. | ||
| − | # Hold the camera firmly and release the '''shutter''' and then '''advance the film''' advance lever for the next picture. | + | # Hold the camera firmly and release the '''shutter''' and then '''advance the film''' advance lever for the next picture. |
====Rewind the film==== | ====Rewind the film==== | ||
<small>[[File:output.gif|unload film]]</small> | <small>[[File:output.gif|unload film]]</small> | ||
| − | + | You've exposed the last frame of film when the counter is on 20, 24 or 36 and the advance lever will not move. | |
# Press the black film '''Rewind Button''' on the bottom of the camera. | # Press the black film '''Rewind Button''' on the bottom of the camera. | ||
# '''Crank Your Film''' back into its cassette by flipping the rewind crank out and turning it slowly in the '''Direction of the Arrow''' (clockwise). | # '''Crank Your Film''' back into its cassette by flipping the rewind crank out and turning it slowly in the '''Direction of the Arrow''' (clockwise). | ||
| Line 88: | Line 55: | ||
# Push the rewind crank back down. | # Push the rewind crank back down. | ||
# Close the back of the camera. | # Close the back of the camera. | ||
| − | # Make sure the lens cap is back on.</ | + | # Make sure the lens cap is back on. |
| + | |||
| + | ===Lens Information=== | ||
| + | <gallery> | ||
| + | File:35mm-Front-View.jpg| | ||
| + | File:35mm-Top-View.jpg| | ||
| + | </gallery> | ||
| + | The SMC Pentax-A Lens has an "A" setting located on the lens aperture ring next to "22" which does not function with the K1000 body. If you accidentally get the ring locked in the "A" (auto) position, push the small black button next to the "A" and rotate the ring to the aperture scale. | ||
| + | Media Loan has a few lenses available with the K mount: several 28mm (wide angle); a couple of zoom lenses (28 - 105mm) and macro lenses. If you wish to use other focal length lenses, you must use the K to S adapter (available separately) and you must use only S (screw) mount lenses.<br /> | ||
| + | |||
| + | '''WARNING!''': Installing and removing the adapter is tricky. Have the procedure demonstrated for you when first using the adapter or follow the included instructions. The adapter and the camera lens coupling mechanism are easily damaged. Use care to avoid touching the mirror behind the lens. Permanent damage can result. Please keep the adapter and instructions in the protective pouch when not in use!<br /> | ||
| + | |||
| + | Depth of field preview is not possible with the K1000 when equipped with the standard SMC Pentax-A K mount lens. You will see depth-of-field focus when using accessory lenses in combination with the K to S adapter. The adapter does not couple to the automatic diaphragm feature, therefore optional S Mount lenses read and operate in the manual stop-down mode. | ||
| + | |||
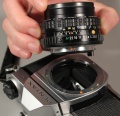
| + | ====Changing the Lens==== | ||
| + | <gallery> | ||
| + | File:35mm-Lens-Change-Hand.jpg|Changing the Lens | ||
| + | </gallery> | ||
| + | '''To remove the Lens''' | ||
| + | # Press the '''Lens Release Lever''' toward the camera body. | ||
| + | # Turn the lens '''Counter-Clockwise'''. | ||
| + | '''To mount a Lens''' | ||
| + | # '''Match the red dot''' on the camera body with the red dot on the lens. | ||
| + | # '''Insert the lens''' into the body and '''Turn it Clockwise''' until the lens locks with a click. | ||
| + | |||
| + | ==Similar Models at Media Loan== | ||
| + | The 35mm is the smallest film format we have. Our other sizes of film camera are classified as Medium Format and Large Format in reference to the size of film that they use and therefore the body size of the camera increase as well. | ||
| + | |||
| + | [[Olympus LS-100 Multi-Track PCM Recorder Operating Guide]] | ||
| + | |||
| + | <!-- Technical note for source editors: end col-md-8 --> | ||
| + | |||
| + | </div> | ||
| + | |||
| + | <div class="col-md-1"></div> | ||
| + | |||
| + | <div class="col-md-3 sidebar"> | ||
| + | |||
| + | {{GA Proficiency Information | ||
| + | |||
| + | |Testlink= [[Zoom H4n Audio Recorder Proficiency Test|Zoom H4n Audio Recorder Proficiency Test]] | ||
| + | |||
| + | }} | ||
| + | |||
| + | <!--GA Proficiency Information is the template for the top of the side bar. There is also one for APS called APS Proficiency Information. To edit the proficiency test link, "edit source" for this page for for the keyword "Testlink"--> | ||
| + | |||
| + | {{Precautions, Help, and Other Wikis for all Media Loan Gear | ||
| + | |||
| + | |Exceptions= | ||
| + | |||
| + | *'''For This Gear Specifically''' | ||
| + | **Always wear the neck strap. | ||
| + | **Don't expose the camera to dust, dirt, extreme heat/cold, or mechanical shocks. | ||
| + | |||
| + | **Don' clean the lens with anything but lens tissue and a tiny amount of lens cleaner (or bring back to Media Loan for cleaning). Never touch or clean the reflex mirror inside the camera. | ||
| + | *Keep the camera in its case and in a camera bag—especially around salt water (salt air mist will corrode the camera in a short period, resulting in expensive repair bills). | ||
| + | :::'''Please Note:''' The exposure meter is activated every time you remove the lens cap. It is important you keep the lens cap on except when operating the camera. Leaving the lens cap off will gradually drain the battery, resulting in inaccurate exposure measurements. The lens cap also protects the lens from scratches. | ||
| + | |||
| + | }} | ||
| + | |||
| + | <!--Precautions, Help, and Other Wikis for all Media Loan Gear is the template for the bottom of the sidebar. To edit the precautions for this gear specifically, "edit source" for this page for the keyword "Exceptions". be sure to write in the title for the exceptions similar to the title for what they all have.--> | ||
| + | |||
| + | <!-- Technical note for source editors: end col-md-3--> | ||
| + | |||
| + | </div> | ||
| + | |||
| + | <!-- Technical note for source editors: end row--> | ||
| + | |||
| + | </div> | ||
| − | + | <!-- Technical note for source editors: end container--> | |
| − | < | + | |
| − | + | </div> | |
| − | + | ||
| + | <!-- Technical note for source editors: Generator=Template:TwoColumn --> | ||
| − | + | __NOEDITSECTION__ | |
| − | + | ||
| − | + | ||
| − | + | ||
| − | + | ||
| − | |||
| − | |||
| − | |||
| − | |||
| − | |||
| − | |||
| − | |||
| − | |||
| − | |||
| − | |||
[[category:Film Cameras and Accessories]] | [[category:Film Cameras and Accessories]] | ||
Revision as of 11:48, 26 March 2021

Overview
Media Loan has three basic manual 35mm SLR camera models: Pentax K1000, Vivitar V3800N, and the Promaster. All models have: built-in through-the-lens light meter; bayonet K mount 50mm lens and hot shoe for flash. Adjustable for ASA/ISO film speeds 20 to 3200. Shutter speeds range from 1 to 1/1000 second and B (for "bulb", timed exposures). No self-timer is built in, but an adaptor is available for check out.
How to Use It
Basic operation
Set the ISO, also called ASA (the film's sensitivity to light) by lifting the outer right ring of the shutter speed dial and rotate it until the ASA/ISO number of your film is opposite the orange dot. Always load film in shade or subdued light.
Load the film
 Remove the protective case; open the back of the K1000 by pulling up the rewind crank; place the film cassette in the cassette chamber (left side); push down the rewind knob. Insert the film leader into the slot of the take-up spool (right side of chamber). Advance the film by alternately turning the advance lever and pressing the shutter button until both sprockets engage the film perforations, top and bottom. Close the back by pressing it firmly. Cock the film advance lever (and release the shutter) until the exposure counter reads "1." The film is advancing properly if the rewind crank turns counterclockwise while the film advance lever is being wound.
Shutter speed
Set shutter speed by turning the shutter speed dial. Generally, you should use the fastest possible shutter speed to avoid blurred pictures caused by camera movement. When using slow shutter speeds of 1/30th of a second or slower (such as in low light situations or for purposely blurring a moving object) it is advisable to use a tripod (available from Media Loan). If using a flash set the shutter speed at 1/60th of a second. (See the Media Loan Vivitar Guide for flash instructions.)
Focus
While looking through the viewfinder, turn the focusing ring until your subject comes into Sharp Focus. Another way of setting the focus is to
- Measure or estimate the distance from the camera to the subject.
- Turn the focus ring to the number of feet.
Cross-Microprism Focusing System
If your camera uses a cross-microprism focusing system, when your subject is in focus, the image in the microprism center will be sharp. If your subject in not in focus, the microprism will break the image up into many small dots.
Split-Image Focusing System
With the split-image focusing system, when the camera is held horizontally and the image is not in sharp focus, all vertical lines seen through the viewfinder will be divided into upper and lower potions. When they are in sharp focus, vertical lines will appear straight.
Taking a Photograph
- Turn on light meter by removing the lens cap.
- While looking through the viewfinder, turn the focusing ring (on the lens) until subject comes into sharp focus.
- Set the exposure by rotating the aperture ring (f stop) ring of the lens until the needle on the right side of the viewfinder image is at the center position.
- Hold the camera firmly and release the shutter and then advance the film advance lever for the next picture.
Rewind the film

You've exposed the last frame of film when the counter is on 20, 24 or 36 and the advance lever will not move.
- Press the black film Rewind Button on the bottom of the camera.
- Crank Your Film back into its cassette by flipping the rewind crank out and turning it slowly in the Direction of the Arrow (clockwise).
- When you feel the tension release, Turn the Crank Several Additional Turns.
- Pull Up on the Rewind Crank until the back pops open.
- Remove the film cassette.
- Push the rewind crank back down.
- Close the back of the camera.
- Make sure the lens cap is back on.
Lens Information


The SMC Pentax-A Lens has an "A" setting located on the lens aperture ring next to "22" which does not function with the K1000 body. If you accidentally get the ring locked in the "A" (auto) position, push the small black button next to the "A" and rotate the ring to the aperture scale.
Media Loan has a few lenses available with the K mount: several 28mm (wide angle); a couple of zoom lenses (28 - 105mm) and macro lenses. If you wish to use other focal length lenses, you must use the K to S adapter (available separately) and you must use only S (screw) mount lenses.
WARNING!: Installing and removing the adapter is tricky. Have the procedure demonstrated for you when first using the adapter or follow the included instructions. The adapter and the camera lens coupling mechanism are easily damaged. Use care to avoid touching the mirror behind the lens. Permanent damage can result. Please keep the adapter and instructions in the protective pouch when not in use!
Depth of field preview is not possible with the K1000 when equipped with the standard SMC Pentax-A K mount lens. You will see depth-of-field focus when using accessory lenses in combination with the K to S adapter. The adapter does not couple to the automatic diaphragm feature, therefore optional S Mount lenses read and operate in the manual stop-down mode.
Changing the Lens
Changing the Lens

To remove the Lens
- Press the Lens Release Lever toward the camera body.
- Turn the lens Counter-Clockwise.
To mount a Lens
- Match the red dot on the camera body with the red dot on the lens.
- Insert the lens into the body and Turn it Clockwise until the lens locks with a click.
Similar Models at Media Loan
The 35mm is the smallest film format we have. Our other sizes of film camera are classified as Medium Format and Large Format in reference to the size of film that they use and therefore the body size of the camera increase as well.
Olympus LS-100 Multi-Track PCM Recorder Operating Guide