Difference between revisions of "APS/AS Zoom H6n Audio Recorder Operating Guide"
m (Williaas moved page Zoom H6n Audio Recorder Operating Guide to APS/AS Zoom H6n Audio Recorder Operating Guide) |
(Tag: VisualEditor) |
||
| (12 intermediate revisions by 2 users not shown) | |||
| Line 1: | Line 1: | ||
| − | + | {{Media Loan Covid Message}} | |
| − | + | ||
| − | + | ||
| − | + | ||
| − | + | ||
| − | + | ||
| − | + | ||
| − | = | + | <div class="container-fluid"> |
| − | + | ||
| − | = | + | <div class="row"> |
| − | + | ||
| − | + | ||
| − | + | ||
| − | + | ||
| − | + | ||
| − | + | ||
| − | + | ||
| − | + | ||
| − | + | ||
| − | + | ||
| − | < | + | <div class="col-md-8"> |
| − | < | + | <div class="lead"> |
| − | + | ||
| − | + | ||
| − | + | ||
| − | + | ||
| − | + | ||
| − | ===Power=== | + | <div class="lead">[[File:Media Loan Logo.png|left|frameless|90x90px]] A portable audio recorder with 6 channels, 4 are for XLR inputs.</div> |
| − | ==== | + | |
| − | The Zoom H6n uses alkaline batteries or nickel metal hydride batteries. | + | <div class="pull-right"></div> |
| + | |||
| + | </div>[[File:Zoom_H6_right_view.jpg|right|400x400px]][[File:Zoom_H6_Accessories.jpg|right|400x400px]] | ||
| + | |||
| + | ==Overview== | ||
| + | The Zoom H6n is a versatile and extremely portable 6 track field recorder for use in the field for sound collection, studio recording, and audio for video shoots. The H6n comes with one XY stereo field microphone and one mid-side capsule. Both of these capsules fit on the top slot on the recorder. There are also 4 XLR/Line in ports, each with their own individual volume, pad controls, and phantom power (+12V/ +24V/ +48V). It also features a headphone out jack and a 3.5mm line out jack that can hook up directly to a DSLR camera. Finally, the recorder features a metronome, chromatic tuner, and playback speed/pitch adjustments. | ||
| + | ==Kit Contents== | ||
| + | * Recorder | ||
| + | * XY stereo mic attachment | ||
| + | * MS stereo mic attachment | ||
| + | * USB cable | ||
| + | * Power adapter | ||
| + | |||
| + | ==How to Use It== | ||
| + | ===POWER=== | ||
| + | ====USING BATTERIES==== | ||
| + | The Zoom H6n uses alkaline batteries or nickel metal hydride batteries. | ||
[[File:Replace batteries H6.png]] | [[File:Replace batteries H6.png]] | ||
| − | + | ||
'''To place/replace batteries:''' | '''To place/replace batteries:''' | ||
# Turn the power off and then remove the battery. | # Turn the power off and then remove the battery. | ||
| Line 41: | Line 35: | ||
# Install the batteries. | # Install the batteries. | ||
# Replace the battery cover. | # Replace the battery cover. | ||
| − | #Select the correct type of battery you are using (Menu >> System >> Battery >> Alkaline or Ni-Mh) | + | #Select the correct type of battery you are using (Menu >> System >> Battery >> Alkaline or Ni-Mh) |
| − | If the battery indicator becomes empty, turn the power off immediately and install new batteries. | + | If the battery indicator becomes empty, turn the power off immediately and install new batteries. |
====Using an AC adapter==== | ====Using an AC adapter==== | ||
| − | #Connect a USB cable to the USB jack. | + | #Connect a USB cable to the USB jack. |
| − | #Plug the adapter into an outlet. | + | #Plug the adapter into an outlet. |
| − | === | + | ===OPERATIONS=== |
| − | ==== | + | ====SCROLL WHEEL==== |
| − | Just like in the previous model, the Zoom H6n uses a scroll wheel to navigate through the menus. | + | Just like in the previous model, the Zoom H6n uses a scroll wheel to navigate through the menus. |
| − | To navigate up and down, gently push up and down the scroll wheel. | + | To navigate up and down, gently push up and down the scroll wheel. |
| − | To validate your option choices (in this article we refer to it as"OK"), PRESS DOWN on the scroll wheel. | + | To validate your option choices (in this article we refer to it as"OK"), PRESS DOWN on the scroll wheel. |
[[File:Scroll wheel.gif]] | [[File:Scroll wheel.gif]] | ||
| − | ==== | + | ====ATTACHABLE MICROPHONE OVERVIEW==== |
| − | The Zoom H6N kit comes with two attachable microphones, one is a stereo XY microphone and the other is a cardioid capsule, each has a L/R output. | + | The Zoom H6N kit comes with two attachable microphones, one is a stereo XY microphone and the other is a cardioid capsule, each has a L/R output. |
| − | =====XY | + | =====XY MICROPHONE===== |
<gallery> | <gallery> | ||
File:Zoom H6n YX mic.jpg|XY Mic | File:Zoom H6n YX mic.jpg|XY Mic | ||
| Line 66: | Line 60: | ||
</gallery> | </gallery> | ||
| − | |||
| − | |||
| − | =====MS | + | The XY microphone has two crossing directional microphones which can be set for either 90 degrees or 120 degrees, dependent upon the field you wish to capture. Best for close/medium range recording (chamber music, live concert, interview, field recording, etc). |
| + | |||
| + | =====MS MICROPHONE===== | ||
<gallery> | <gallery> | ||
File:Zoom H6n MS mic.jpg|MS Mic | File:Zoom H6n MS mic.jpg|MS Mic | ||
File:MS mic.png|MS Mic | File:MS mic.png|MS Mic | ||
</gallery> | </gallery> | ||
| − | |||
| − | |||
| − | + | This microphone has a unidirectional mid-range microphone for central recording capture and a bidirectional microphone build in that can be adjusted to change the stereo field. This mic can capture a fairly accurate and crisp stereo field. Best for mono recording (interviews, narrations, and meetings). | |
| − | ''' | + | ====CONNECTING AND DISCONNECTING ATTACHABLE MICROPHONES==== |
| − | # Remove the protective caps from the | + | |
| + | '''CONNECTION''' | ||
| + | # Remove the protective caps from the H6n main unit and the microphone. | ||
# While Pressing the buttons on the sides of the mic, connect it to the main unit, inserting the connector completely. | # While Pressing the buttons on the sides of the mic, connect it to the main unit, inserting the connector completely. | ||
| − | + | ||
| − | ''' | + | '''DISCONNECTION''' |
# While pressing the buttons on the sides of the mic, pull it gently out of the main unit. | # While pressing the buttons on the sides of the mic, pull it gently out of the main unit. | ||
| − | |||
| − | |||
| − | ==== | + | ====CONNECTING EXTERNAL MICROPHONES/ OTHER DEVICES TO inputs 1-4 ==== |
| − | ''' | + | '''CONNECTING EXTERNAL MICROPHONES''' |
| − | Connect dynamic and condenser microphones to the Input 1-4 XLR jacks. | + | Connect dynamic and condenser microphones to the Input 1-4 XLR jacks. |
| − | If a Condenser Microphone without dedicated power, set the onboard phantom power to (+12V/+24V/+48V) | + | If a Condenser Microphone without dedicated power, set the onboard phantom power to (+12V/+24V/+48V) |
| − | ''' | + | '''CONNECTING INSTRUMENTS/OTHER DEVICES''' |
| − | Connect keyboards and mixers directly in the input 1-4 TRS jacks. | + | Connect keyboards and mixers directly in the input 1-4 TRS jacks. |
| − | Direct input of passive guitars and basses is not supported. | + | Direct input of passive guitars and basses is not supported. |
| − | Set PAD to -20dB when connecting a mixer or other device with standard output level. | + | Set PAD to -20dB when connecting a mixer or other device with standard output level. |
| − | ''' | + | '''STEREO INPUTS''' |
| − | By linking tracks 1 and 2 (tracks 3 and 4) as stereo tracks, these can be used as stereo inputs. | + | By linking tracks 1 and 2 (tracks 3 and 4) as stereo tracks, these can be used as stereo inputs. |
| − | In this case, input 1 and 3 become the left channels and 2 and 4 become the right channels. | + | In this case, input 1 and 3 become the left channels and 2 and 4 become the right channels. |
| − | ==== | + | ====CONNECTION EXAMPLES==== |
| − | The Zoom H6n allows you to record in a variety of configurations. | + | The Zoom H6n allows you to record in a variety of configurations. |
| − | ===== | + | =====INTERVIEW SET UP===== |
| − | ''' | + | '''WHILE FILMING:''' |
| − | L/R input mic: Main subject | + | L/R input mic: Main subject |
| − | Shotgun/lapel mics connected to Inputs 1/2: Performer | + | Shotgun/lapel mics connected to Inputs 1/2: Performer |
| − | Mics connected to Inputs 3/4: Ambient sound | + | Mics connected to Inputs 3/4: Ambient sound |
| − | [[File:Interview setting H6n.png]] | + | [[File:Interview setting H6n.png]] |
| − | ===== | + | =====CONCERT SET UP===== |
| − | ''' | + | '''CONCERT RECORDING:''' |
| − | L/R input mic: Performance on stage | + | L/R input mic: Performance on stage |
| − | Inputs 1/2: Line outputs from mixer | + | Inputs 1/2: Line outputs from mixer |
| − | Mics connected to Inputs 3/4: Audience sound | + | Mics connected to Inputs 3/4: Audience sound |
| − | [[File:Concert setup H6n.png]] | + | [[File:Concert setup H6n.png]] |
| − | ==== | + | ====TURNING DEVICE ON/OFF==== |
| − | ''' | + | '''TO TURN ON''' |
| − | Slide the hold button to the right (Where the power symbol is). | + | Slide the hold button to the right (Where the power symbol is). |
| − | ''' | + | '''TO TURN OFF''' |
| − | Slide the hold button the right again (Where the power symbol is). | + | Slide the hold button the right again (Where the power symbol is). |
| − | ==== | + | ====SETTING DATE AND TIME==== |
# Press the menu button. | # Press the menu button. | ||
# Use the scroll wheel to select “SYSTEM” and press the scroll wheel down. | # Use the scroll wheel to select “SYSTEM” and press the scroll wheel down. | ||
| Line 133: | Line 125: | ||
# Press the menu button again to return to the home screen. | # Press the menu button again to return to the home screen. | ||
| − | ==== | + | ====SETTING THE RECORDING FORMAT==== |
| − | Set the format according to the desired audio quality and file size. | + | Set the format according to the desired audio quality and file size. |
| − | # Press Menu and use scroll wheel to select “REC”, and press OK. | + | # Press Menu and use scroll wheel to select “REC”, and press OK. |
| − | # Use Scroll wheel to select “Rec Format”, and press OK. | + | # Use Scroll wheel to select “Rec Format”, and press OK. |
| − | # Use Scroll wheel to select the desired format, and press OK. | + | # Use Scroll wheel to select the desired format, and press OK. |
<gallery> | <gallery> | ||
| Line 147: | Line 139: | ||
</gallery> | </gallery> | ||
| − | '''NOTES:''' | + | '''NOTES:''' |
* Use the WAV format for recording high-quality audio. | * Use the WAV format for recording high-quality audio. | ||
* The MP3 format reduces file size through compression, which also reduces the audio quality. Use this format if you need to conserve space on the SD card to store many recordings, for example. | * The MP3 format reduces file size through compression, which also reduces the audio quality. Use this format if you need to conserve space on the SD card to store many recordings, for example. | ||
* When recording in MP3 format, a single stereo MP3 file will be created regardless of the number of tracks selected. You can use the monitoring mixer to adjust the balance of all the tracks in the stereo mix. | * When recording in MP3 format, a single stereo MP3 file will be created regardless of the number of tracks selected. You can use the monitoring mixer to adjust the balance of all the tracks in the stereo mix. | ||
| − | |||
| − | ==== | + | |
| − | ===== | + | ====DISPLAY OVERVIEW==== |
| − | [[File:Home recording screen.png]] | + | =====HOME RECORDING SCREEN===== |
| − | ===== | + | [[File:Home recording screen.png]] |
| + | =====PLAYBACK SCREEN===== | ||
[[File:Playback screen.png]] | [[File:Playback screen.png]] | ||
| − | ==== | + | ====LOADING AN SD CARD==== |
| − | # Turn the power off and then open the SD card slot cover. | + | # Turn the power off and then open the SD card slot cover. |
| − | # Insert card into the slot. | + | # Insert card into the slot. |
| − | # To eject an SD card: Push the card further into the slot and then pull it out. | + | # To eject an SD card: Push the card further into the slot and then pull it out. |
| − | ==== | + | ====FORMATTING AN SD CARD==== |
| − | # Press the menu button. | + | # Press the menu button. |
| − | # Use the scroll wheel to select “SD CARD” and press down on the wheel. | + | # Use the scroll wheel to select “SD CARD” and press down on the wheel. |
| − | # Using the wheel to select “SD CARD Remain” and press the scroll wheel button to see the amount of remaining open space on a card. | + | # Using the wheel to select “SD CARD Remain” and press the scroll wheel button to see the amount of remaining open space on a card. |
| − | # To being the formatting process, press the menu button. | + | # To being the formatting process, press the menu button. |
| − | # Use the scroll wheel to select “SD CARD” and press the scroll button. | + | # Use the scroll wheel to select “SD CARD” and press the scroll button. |
| − | # Use the scroll wheel to select “Format” and press the scroll wheel button. | + | # Use the scroll wheel to select “Format” and press the scroll wheel button. |
| − | # Use the scroll wheel to select “Yes” and press down on the scroll wheel to format the SD card. | + | # Use the scroll wheel to select “Yes” and press down on the scroll wheel to format the SD card. |
| − | ==== | + | ====RECORDING==== |
| − | When recording with the Zoom H6n Audio Recorder, the following file structure/folders and files are created on the SD card: | + | When recording with the Zoom H6n Audio Recorder, the following file structure/folders and files are created on the SD card: |
| − | [[File:Screen Shot 2016-11-21 at 3.11.48 PM.png]] | + | [[File:Screen Shot 2016-11-21 at 3.11.48 PM.png]] |
| − | ===== | + | =====AUTOMATIC===== |
| − | # Press the menu button. | + | # Press the menu button. |
| − | # Use the scroll wheel to select “REC” and press the scroll button down. | + | # Use the scroll wheel to select “REC” and press the scroll button down. |
| − | # Use the scroll wheel to select “Auto Rec” and press the button down. | + | # Use the scroll wheel to select “Auto Rec” and press the button down. |
| − | # Use the scroll wheel to select on/off and press the button. | + | # Use the scroll wheel to select on/off and press the button. |
| − | # Select “On” and press the button down. | + | # Select “On” and press the button down. |
| − | # Return to the Home Screen, and press the record button and put the recorder in standby. | + | # Return to the Home Screen, and press the record button and put the recorder in standby. |
| − | # Press the record button again to exit standby and stop recording. | + | # Press the record button again to exit standby and stop recording. |
| − | ===== | + | =====PRE-RECORD===== |
| − | # Press the menu button. | + | # Press the menu button. |
| − | # Use the scroll to select “REC” and press Ok. | + | # Use the scroll to select “REC” and press Ok. |
| − | # Use the scroll wheel to select “Pre-Rec” and press the scroll button down. | + | # Use the scroll wheel to select “Pre-Rec” and press the scroll button down. |
| − | # Select “On” and press Ok. | + | # Select “On” and press Ok. |
| − | ===== | + | =====BACK UP RECORDING===== |
| − | When using the L/R input, in addition to the recording at the set input level, the recorder can also record a separate file at a level 12dB below. This backup can be used if the recording level was set too high, causing distortion, for example. | + | When using the L/R input, in addition to the recording at the set input level, the recorder can also record a separate file at a level 12dB below. This backup can be used if the recording level was set too high, causing distortion, for example. |
<gallery> | <gallery> | ||
| Line 201: | Line 193: | ||
</gallery> | </gallery> | ||
| − | # Press the menu button | + | # Press the menu button |
| − | # Use the scroll wheel to select “REC” and press Ok. | + | # Use the scroll wheel to select “REC” and press Ok. |
| − | # Use the scroll wheel to select “Backup Rec” and press Ok. | + | # Use the scroll wheel to select “Backup Rec” and press Ok. |
| − | # Select “On” and press Ok. | + | # Select “On” and press Ok. |
| − | HINT: If the name of the original file is, for example, “ZOOM0001_LR.wav”, the name of the backup file will be “ZOOM0001_BU.wav”. | + | HINT: If the name of the original file is, for example, “ZOOM0001_LR.wav”, the name of the backup file will be “ZOOM0001_BU.wav”. |
| − | ===== | + | =====OVERDUBBING===== |
| − | This recording option will only work with external microphones. | + | This recording option will only work with external microphones. |
| − | The X/Y and DS mic capsules will not work with the overdubbing mode. | + | The X/Y and DS mic capsules will not work with the overdubbing mode. |
| − | # Press the menu button. | + | # Press the menu button. |
| − | # Use the scroll wheel to select “PROJECT MENU” and press Ok. | + | # Use the scroll wheel to select “PROJECT MENU” and press Ok. |
| − | # Use the scroll to select “Overdub” and press Ok. | + | # Use the scroll to select “Overdub” and press Ok. |
| − | # Press the track button until the indicator lights red for the track to be overdubbed. | + | # Press the track button until the indicator lights red for the track to be overdubbed. |
| − | # Turn the volume knob to make adjustments. | + | # Turn the volume knob to make adjustments. |
| − | # To monitor already recorded tracks, press their track buttons so their indicators light green. | + | # To monitor already recorded tracks, press their track buttons so their indicators light green. |
| − | # Press the record button to begin recording. | + | # Press the record button to begin recording. |
| − | # Press the record button to stop recording. | + | # Press the record button to stop recording. |
| − | # Press the menu button to stop overdubbing. When you play back or edit an overdubbed project, the last selected take will be used. | + | # Press the menu button to stop overdubbing. When you play back or edit an overdubbed project, the last selected take will be used. |
| − | ==== | + | ====PLAYBACK==== |
| − | ===== | + | =====NORMAL PLAYBACK===== |
| − | # Press the menu button. | + | # Press the menu button. |
| − | # Use the scroll wheel to select “PROJECT LIST”, and press Ok. | + | # Use the scroll wheel to select “PROJECT LIST”, and press Ok. |
| − | # Use the scroll wheel to select desired folder and press Ok. | + | # Use the scroll wheel to select desired folder and press Ok. |
| − | # Use the scroll wheel to select the desired project and press Ok. Playback will begin. | + | # Use the scroll wheel to select the desired project and press Ok. Playback will begin. |
| − | ===== | + | =====CHANGING THE PLAYBACK SPEED===== |
| − | # Press the menu button. | + | # Press the menu button. |
| − | # Use the scroll wheel to select “PROJECT MENU” and press Ok. | + | # Use the scroll wheel to select “PROJECT MENU” and press Ok. |
| − | # Select “Playback Speed” and press Ok, | + | # Select “Playback Speed” and press Ok, |
| − | # Use the scroll wheel to adjust playback speed, press Ok. | + | # Use the scroll wheel to adjust playback speed, press Ok. |
| − | === | + | ===FILE MANAGEMENT=== |
| − | ==== | + | ====DELETE PROJECT==== |
| − | # To delete one project, press the menu button. | + | # To delete one project, press the menu button. |
| − | # Use the scroll wheel to select “PROJECT MENU”, Press Ok. | + | # Use the scroll wheel to select “PROJECT MENU”, Press Ok. |
| − | # Select “Trash” and press Ok. | + | # Select “Trash” and press Ok. |
| − | # Select “Delete” and press Ok. | + | # Select “Delete” and press Ok. |
| − | # Select “Yes” and press Ok. | + | # Select “Yes” and press Ok. |
| − | # To delete all projects in a folder, select “Delete All Projects” instead, and press Ok. | + | # To delete all projects in a folder, select “Delete All Projects” instead, and press Ok. |
| − | # Note: Deletion of a project cannot be reversed! | + | # Note: Deletion of a project cannot be reversed! |
| − | ==== | + | ====FILE TRANSFERS==== |
| − | # Press menu. | + | # Press menu. |
| − | # Use scroll wheel to select “USB” and press Ok. | + | # Use scroll wheel to select “USB” and press Ok. |
| − | # Select “SD Card Reader” and press Ok. | + | # Select “SD Card Reader” and press Ok. |
| − | # Connect the H6N to the computer using a USB cable. | + | # Connect the H6N to the computer using a USB cable. |
| − | # Make sure to safely disconnect the H6N from the computer when finished to avoid damage to the files and the recorder! | + | # Make sure to safely disconnect the H6N from the computer when finished to avoid damage to the files and the recorder! |
| − | === | + | ===USING THE H6n RECORDER AS AN AUDIO INTERFACE=== |
| − | # Press the menu button. | + | # Press the menu button. |
| − | # Use scroll wheel to select “USB” and press Ok. | + | # Use scroll wheel to select “USB” and press Ok. |
| − | # Select “Audio Interface” and press Ok. | + | # Select “Audio Interface” and press Ok. |
| − | # Select either “Stereo Mix” or “Multi Track” and press Ok. | + | # Select either “Stereo Mix” or “Multi Track” and press Ok. |
| − | # Select either: “PC/Mac”, “PC/MAC using battery power” or “iPad using battery power”, and press Ok. | + | # Select either: “PC/Mac”, “PC/MAC using battery power” or “iPad using battery power”, and press Ok. |
| − | # Connect the H6N to the computer or iPad using a USB cable. | + | # Connect the H6N to the computer or iPad using a USB cable. |
| − | # Press the menu to disconnect. | + | # Press the menu to disconnect. |
| − | # Select “EXIT” and press Ok. | + | # Select “EXIT” and press Ok. |
| − | # Select “Yes” and press Ok. | + | # Select “Yes” and press Ok. |
| − | # Disconnect the cable from the computer or iPad and the H6, and press the menu button. | + | # Disconnect the cable from the computer or iPad and the H6, and press the menu button. |
| − | === | + | ===H6n CHROMATIC TUNER=== |
| − | # Press the menu button. | + | # Press the menu button. |
| − | # Use the scroll wheel to select “TOOL”, press Ok. | + | # Use the scroll wheel to select “TOOL”, press Ok. |
| − | # Select “Tuner” and press Ok. | + | # Select “Tuner” and press Ok. |
| − | # Select preferred tuning type and press Ok. | + | # Select preferred tuning type and press Ok. |
| − | # Use the scroll wheel to adjust standard pitch. | + | # Use the scroll wheel to adjust standard pitch. |
| − | # For all tuner types besides chromatic, use the forward and rewind button to change pitch (For drop tuning) | + | # For all tuner types besides chromatic, use the forward and rewind button to change pitch (For drop tuning) |
| − | # Press a track button to select input to use. | + | # Press a track button to select input to use. |
| − | # Use the tuner according to the type. | + | # Use the tuner according to the type. |
| − | # Chromatic: shows pitch inaccuracies and note that the device is detecting. | + | # Chromatic: shows pitch inaccuracies and note that the device is detecting. |
| − | # Guitar/Bass Tuning: The number of strings being tuned is automatically detected, allowing for tuning one at a time. | + | # Guitar/Bass Tuning: The number of strings being tuned is automatically detected, allowing for tuning one at a time. |
| − | === | + | ===USING THE METRONOME=== |
| − | # Press the menu button. | + | # Press the menu button. |
| − | # Use the scroll wheel to select “TOOL” and press Ok. | + | # Use the scroll wheel to select “TOOL” and press Ok. |
| − | # Select “Metronome” and press Ok. | + | # Select “Metronome” and press Ok. |
| − | # Use the scroll wheel to select a menu item, and press Ok. | + | # Use the scroll wheel to select a menu item, and press Ok. |
| − | # Select “Click”, use the scroll wheel to set when the metronome is active, and press Ok. | + | # Select “Click”, use the scroll wheel to set when the metronome is active, and press Ok. |
| − | # Select “Precount”. | + | # Select “Precount”. |
| − | # Select “Tempo”. Use the scroll wheel to select the speed, and press the menu button. | + | # Select “Tempo”. Use the scroll wheel to select the speed, and press the menu button. |
| − | # Select “Sound”. Use the scroll wheel to set the sound and press Ok. | + | # Select “Sound”. Use the scroll wheel to set the sound and press Ok. |
| − | # Select “Pattern” use the scroll wheel to select desired musical pattern. | + | # Select “Pattern” use the scroll wheel to select desired musical pattern. |
| − | # Select “Level” and set to desired volume, press Ok. | + | # Select “Level” and set to desired volume, press Ok. |
| − | === | + | ===LINKING INPUTS=== |
You can link inputs so that they become one stereo track. Do this by holding down one input button and then press another. You will see on the screen that they have become linked and both lights will illuminate simultaneously.<br /> | You can link inputs so that they become one stereo track. Do this by holding down one input button and then press another. You will see on the screen that they have become linked and both lights will illuminate simultaneously.<br /> | ||
| Line 295: | Line 287: | ||
Use the same method to unlink inputs. | Use the same method to unlink inputs. | ||
| + | ==Troubleshooting== | ||
| + | |||
| + | See [[Troubleshooting Media Equipment]] Guide for general information. | ||
| + | |||
| + | ==Media Loan Gear it Connects With Well== | ||
| + | |||
| + | {{Collapsed| | ||
| + | |||
| + | See the [[Media Loan Catalog]] for more info about the below items. | ||
| + | |||
| + | * Any Microphone | ||
| + | * XLR Cable | ||
| + | |||
| + | }} | ||
| + | |||
| + | ==Similar Models at Media Loan== | ||
| + | |||
| + | The Zoom H4n is a General Access model that has 2 fewer XLR inputs and a built in stereo mic instead of the 2 attachable stereo mics of the H6n. | ||
| + | |||
| + | <!-- Technical note for source editors: end col-md-8 --> | ||
| + | </div> | ||
| + | |||
| + | <div class="col-md-1"></div> | ||
| + | |||
| + | <div class="col-md-3 sidebar"> | ||
| + | |||
| + | {{APS Proficiency Information | ||
| + | |||
| + | |Testlink= [https://helpwiki.evergreen.edu/wiki/index.php/APS/AS_Zoom_H6n_Audio_Recorder_Proficiency_Test APS Zoom H6n Audio Recorder Proficiency Test] | ||
| + | |||
| + | }} | ||
| + | |||
| + | <!--APS Proficiency Information is the template for the top of the side bar. There is also one for GA called GA Proficiency Information. To edit the proficiency test link, "edit source" for this page and add the proficiency link using the keyword "Testlink"--> | ||
| + | |||
| + | |||
| + | {{Precautions, Help, and Other Wikis for all Media Loan Gear | ||
| + | |||
| + | |Exceptions= | ||
| + | |||
| + | *'''For This Gear Specifically''' | ||
| + | **Don't listen at loud volumes for long periods of time. | ||
| + | |||
| + | }} | ||
| + | |||
| + | <!--Precautions, Help, and Other Wikis for all Media Loan Gear is the template for the bottom of the sidebar. To edit the precautions for this gear specifically, "edit source" for this page for the keyword "Exceptions". be sure to write in the title for the exceptions similar to the title for what they all have.--> | ||
| + | |||
| + | <!-- Technical note for source editors: end col-md-3--> | ||
| + | |||
| + | </div> | ||
| + | |||
| + | <!-- Technical note for source editors: end row--> | ||
| + | </div> | ||
| + | |||
| + | <!-- Technical note for source editors: end container--> | ||
| + | </div> | ||
| + | |||
| + | <!-- Technical note for source editors: Generator=Template:TwoColumn --> | ||
| + | __NOEDITSECTION__ | ||
| − | [[ | + | [[category:APS Gear Guides]] |
Latest revision as of 19:20, 22 November 2021


Contents
- 1 Overview
- 2 Kit Contents
- 3 How to Use It
- 3.1 POWER
- 3.2 OPERATIONS
- 3.2.1 SCROLL WHEEL
- 3.2.2 ATTACHABLE MICROPHONE OVERVIEW
- 3.2.3 CONNECTING AND DISCONNECTING ATTACHABLE MICROPHONES
- 3.2.4 CONNECTING EXTERNAL MICROPHONES/ OTHER DEVICES TO inputs 1-4
- 3.2.5 CONNECTION EXAMPLES
- 3.2.6 TURNING DEVICE ON/OFF
- 3.2.7 SETTING DATE AND TIME
- 3.2.8 SETTING THE RECORDING FORMAT
- 3.2.9 DISPLAY OVERVIEW
- 3.2.10 LOADING AN SD CARD
- 3.2.11 FORMATTING AN SD CARD
- 3.2.12 RECORDING
- 3.2.13 PLAYBACK
- 3.3 FILE MANAGEMENT
- 3.4 USING THE H6n RECORDER AS AN AUDIO INTERFACE
- 3.5 H6n CHROMATIC TUNER
- 3.6 USING THE METRONOME
- 3.7 LINKING INPUTS
- 4 Troubleshooting
- 5 Media Loan Gear it Connects With Well
- 6 Similar Models at Media Loan
- 7 APS Policy Sidebar
Overview
The Zoom H6n is a versatile and extremely portable 6 track field recorder for use in the field for sound collection, studio recording, and audio for video shoots. The H6n comes with one XY stereo field microphone and one mid-side capsule. Both of these capsules fit on the top slot on the recorder. There are also 4 XLR/Line in ports, each with their own individual volume, pad controls, and phantom power (+12V/ +24V/ +48V). It also features a headphone out jack and a 3.5mm line out jack that can hook up directly to a DSLR camera. Finally, the recorder features a metronome, chromatic tuner, and playback speed/pitch adjustments.
Kit Contents
- Recorder
- XY stereo mic attachment
- MS stereo mic attachment
- USB cable
- Power adapter
How to Use It
POWER
USING BATTERIES
The Zoom H6n uses alkaline batteries or nickel metal hydride batteries.

To place/replace batteries:
- Turn the power off and then remove the battery.
- Remove the battery cover.
- Install the batteries.
- Replace the battery cover.
- Select the correct type of battery you are using (Menu >> System >> Battery >> Alkaline or Ni-Mh)
If the battery indicator becomes empty, turn the power off immediately and install new batteries.
Using an AC adapter
- Connect a USB cable to the USB jack.
- Plug the adapter into an outlet.
OPERATIONS
SCROLL WHEEL
Just like in the previous model, the Zoom H6n uses a scroll wheel to navigate through the menus. To navigate up and down, gently push up and down the scroll wheel. To validate your option choices (in this article we refer to it as"OK"), PRESS DOWN on the scroll wheel.

ATTACHABLE MICROPHONE OVERVIEW
The Zoom H6N kit comes with two attachable microphones, one is a stereo XY microphone and the other is a cardioid capsule, each has a L/R output.
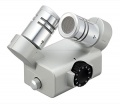
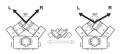
XY MICROPHONE
XY Mic
XY Mic


The XY microphone has two crossing directional microphones which can be set for either 90 degrees or 120 degrees, dependent upon the field you wish to capture. Best for close/medium range recording (chamber music, live concert, interview, field recording, etc).
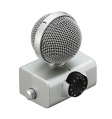
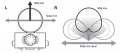
MS MICROPHONE
MS Mic
MS Mic


This microphone has a unidirectional mid-range microphone for central recording capture and a bidirectional microphone build in that can be adjusted to change the stereo field. This mic can capture a fairly accurate and crisp stereo field. Best for mono recording (interviews, narrations, and meetings).
CONNECTING AND DISCONNECTING ATTACHABLE MICROPHONES
CONNECTION
- Remove the protective caps from the H6n main unit and the microphone.
- While Pressing the buttons on the sides of the mic, connect it to the main unit, inserting the connector completely.
DISCONNECTION
- While pressing the buttons on the sides of the mic, pull it gently out of the main unit.
CONNECTING EXTERNAL MICROPHONES/ OTHER DEVICES TO inputs 1-4
CONNECTING EXTERNAL MICROPHONES Connect dynamic and condenser microphones to the Input 1-4 XLR jacks. If a Condenser Microphone without dedicated power, set the onboard phantom power to (+12V/+24V/+48V)
CONNECTING INSTRUMENTS/OTHER DEVICES Connect keyboards and mixers directly in the input 1-4 TRS jacks. Direct input of passive guitars and basses is not supported. Set PAD to -20dB when connecting a mixer or other device with standard output level.
STEREO INPUTS By linking tracks 1 and 2 (tracks 3 and 4) as stereo tracks, these can be used as stereo inputs. In this case, input 1 and 3 become the left channels and 2 and 4 become the right channels.
CONNECTION EXAMPLES
The Zoom H6n allows you to record in a variety of configurations.
INTERVIEW SET UP
WHILE FILMING:
L/R input mic: Main subject
Shotgun/lapel mics connected to Inputs 1/2: Performer
Mics connected to Inputs 3/4: Ambient sound

CONCERT SET UP
CONCERT RECORDING:
L/R input mic: Performance on stage
Inputs 1/2: Line outputs from mixer
Mics connected to Inputs 3/4: Audience sound

TURNING DEVICE ON/OFF
TO TURN ON Slide the hold button to the right (Where the power symbol is).
TO TURN OFF Slide the hold button the right again (Where the power symbol is).
SETTING DATE AND TIME
- Press the menu button.
- Use the scroll wheel to select “SYSTEM” and press the scroll wheel down.
- Use the scroll wheel, selected “Date/Time”, and press the scroll wheel down.
- Set date and time!
- Press the menu button again to return to the home screen.
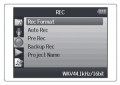
SETTING THE RECORDING FORMAT
Set the format according to the desired audio quality and file size.
- Press Menu and use scroll wheel to select “REC”, and press OK.
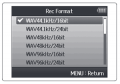
- Use Scroll wheel to select “Rec Format”, and press OK.
- Use Scroll wheel to select the desired format, and press OK.
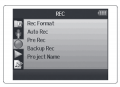
Recording Format Step 1
Recording Format Step 2
Recording Format Step 3
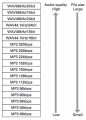
Recording Format Quality Chart


NOTES:
- Use the WAV format for recording high-quality audio.
- The MP3 format reduces file size through compression, which also reduces the audio quality. Use this format if you need to conserve space on the SD card to store many recordings, for example.
- When recording in MP3 format, a single stereo MP3 file will be created regardless of the number of tracks selected. You can use the monitoring mixer to adjust the balance of all the tracks in the stereo mix.
DISPLAY OVERVIEW
HOME RECORDING SCREEN

PLAYBACK SCREEN

LOADING AN SD CARD
- Turn the power off and then open the SD card slot cover.
- Insert card into the slot.
- To eject an SD card: Push the card further into the slot and then pull it out.
FORMATTING AN SD CARD
- Press the menu button.
- Use the scroll wheel to select “SD CARD” and press down on the wheel.
- Using the wheel to select “SD CARD Remain” and press the scroll wheel button to see the amount of remaining open space on a card.
- To being the formatting process, press the menu button.
- Use the scroll wheel to select “SD CARD” and press the scroll button.
- Use the scroll wheel to select “Format” and press the scroll wheel button.
- Use the scroll wheel to select “Yes” and press down on the scroll wheel to format the SD card.
RECORDING
When recording with the Zoom H6n Audio Recorder, the following file structure/folders and files are created on the SD card:

AUTOMATIC
- Press the menu button.
- Use the scroll wheel to select “REC” and press the scroll button down.
- Use the scroll wheel to select “Auto Rec” and press the button down.
- Use the scroll wheel to select on/off and press the button.
- Select “On” and press the button down.
- Return to the Home Screen, and press the record button and put the recorder in standby.
- Press the record button again to exit standby and stop recording.
PRE-RECORD
- Press the menu button.
- Use the scroll to select “REC” and press Ok.
- Use the scroll wheel to select “Pre-Rec” and press the scroll button down.
- Select “On” and press Ok.
BACK UP RECORDING
When using the L/R input, in addition to the recording at the set input level, the recorder can also record a separate file at a level 12dB below. This backup can be used if the recording level was set too high, causing distortion, for example.
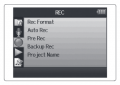
BackUp Recording Step 1
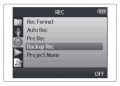
BackUp Recording Step 2
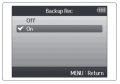
BackUp Recording Step 3


- Press the menu button
- Use the scroll wheel to select “REC” and press Ok.
- Use the scroll wheel to select “Backup Rec” and press Ok.
- Select “On” and press Ok.
HINT: If the name of the original file is, for example, “ZOOM0001_LR.wav”, the name of the backup file will be “ZOOM0001_BU.wav”.
OVERDUBBING
This recording option will only work with external microphones. The X/Y and DS mic capsules will not work with the overdubbing mode.
- Press the menu button.
- Use the scroll wheel to select “PROJECT MENU” and press Ok.
- Use the scroll to select “Overdub” and press Ok.
- Press the track button until the indicator lights red for the track to be overdubbed.
- Turn the volume knob to make adjustments.
- To monitor already recorded tracks, press their track buttons so their indicators light green.
- Press the record button to begin recording.
- Press the record button to stop recording.
- Press the menu button to stop overdubbing. When you play back or edit an overdubbed project, the last selected take will be used.
PLAYBACK
NORMAL PLAYBACK
- Press the menu button.
- Use the scroll wheel to select “PROJECT LIST”, and press Ok.
- Use the scroll wheel to select desired folder and press Ok.
- Use the scroll wheel to select the desired project and press Ok. Playback will begin.
CHANGING THE PLAYBACK SPEED
- Press the menu button.
- Use the scroll wheel to select “PROJECT MENU” and press Ok.
- Select “Playback Speed” and press Ok,
- Use the scroll wheel to adjust playback speed, press Ok.
FILE MANAGEMENT
DELETE PROJECT
- To delete one project, press the menu button.
- Use the scroll wheel to select “PROJECT MENU”, Press Ok.
- Select “Trash” and press Ok.
- Select “Delete” and press Ok.
- Select “Yes” and press Ok.
- To delete all projects in a folder, select “Delete All Projects” instead, and press Ok.
- Note: Deletion of a project cannot be reversed!
FILE TRANSFERS
- Press menu.
- Use scroll wheel to select “USB” and press Ok.
- Select “SD Card Reader” and press Ok.
- Connect the H6N to the computer using a USB cable.
- Make sure to safely disconnect the H6N from the computer when finished to avoid damage to the files and the recorder!
USING THE H6n RECORDER AS AN AUDIO INTERFACE
- Press the menu button.
- Use scroll wheel to select “USB” and press Ok.
- Select “Audio Interface” and press Ok.
- Select either “Stereo Mix” or “Multi Track” and press Ok.
- Select either: “PC/Mac”, “PC/MAC using battery power” or “iPad using battery power”, and press Ok.
- Connect the H6N to the computer or iPad using a USB cable.
- Press the menu to disconnect.
- Select “EXIT” and press Ok.
- Select “Yes” and press Ok.
- Disconnect the cable from the computer or iPad and the H6, and press the menu button.
H6n CHROMATIC TUNER
- Press the menu button.
- Use the scroll wheel to select “TOOL”, press Ok.
- Select “Tuner” and press Ok.
- Select preferred tuning type and press Ok.
- Use the scroll wheel to adjust standard pitch.
- For all tuner types besides chromatic, use the forward and rewind button to change pitch (For drop tuning)
- Press a track button to select input to use.
- Use the tuner according to the type.
- Chromatic: shows pitch inaccuracies and note that the device is detecting.
- Guitar/Bass Tuning: The number of strings being tuned is automatically detected, allowing for tuning one at a time.
USING THE METRONOME
- Press the menu button.
- Use the scroll wheel to select “TOOL” and press Ok.
- Select “Metronome” and press Ok.
- Use the scroll wheel to select a menu item, and press Ok.
- Select “Click”, use the scroll wheel to set when the metronome is active, and press Ok.
- Select “Precount”.
- Select “Tempo”. Use the scroll wheel to select the speed, and press the menu button.
- Select “Sound”. Use the scroll wheel to set the sound and press Ok.
- Select “Pattern” use the scroll wheel to select desired musical pattern.
- Select “Level” and set to desired volume, press Ok.
LINKING INPUTS
You can link inputs so that they become one stereo track. Do this by holding down one input button and then press another. You will see on the screen that they have become linked and both lights will illuminate simultaneously.
Example: To link inputs 1 and 2, hold down the input 1 button and then press 2.
Use the same method to unlink inputs.
Troubleshooting
See Troubleshooting Media Equipment Guide for general information.
Media Loan Gear it Connects With Well
Similar Models at Media Loan
The Zoom H4n is a General Access model that has 2 fewer XLR inputs and a built in stereo mic instead of the 2 attachable stereo mics of the H6n.