Difference between revisions of "Adding a Campus Printer - Mac OS"
| Line 55: | Line 55: | ||
| − | ''' | + | '''You're done!''' |
| − | If you are unable to print, please create a support ticket at [http://help.evergreen.edu help.evergreen.edu] or email '''support@evergreen.edu''' | + | If you are unable to print or need additional help, please create a support ticket at [http://help.evergreen.edu help.evergreen.edu] or email '''support@evergreen.edu''' |
Revision as of 16:05, 9 September 2022
Overview
These directions describe the correct way to add a networked/shared printer on a macOS computer. The entire process is easy and should only take 5-15 minutes. There are 4 parts to this guide and each part includes several smaller steps. Follow the instructions step by step to add the printer to your computer. If you get stuck, you can contact support@evergreen.edu or submit a support request at help.evergreen.edu for assistance.
Part 1: Gather Required Information
Gather the following information for the networked printer you will be adding:
- Print Server URL: At the time of this writing, the URL is: \\octopus
- Print queue name: Campus printers should have a label adhered to them indication the queue name. Usually, this is the printer's location and model. For example: HELPDESK_8600
- Printer location: Office or area where the printer is located. Library, Helpdesk, Payrool, etc.
- Printer model: Located on the printer itself. Examples: Canon C3530i, HP 8600, etc.
- Your Evergreen license plate: No, not the license plate from your car! This is a unique identifier associated with your evergreen.edu account. If you do not know your license plate, contact the IT department and they will provide it to you.
- (OPTIONAL) Printer features: Features can be found by performing a quick google search with the printer’s model. Examples: Duplex, Collated, Tray 2, etc. (You can ignore features you will not use)
- (OPTIONAL) Download and install the appropriate driver for the printer: This step is not usually required. If you encounter problems during PART 4: Print a Test Page, try installing the appropriate driver from the manufacturer’s website, then repeat the installation process.
Part 2: Locate the Advanced Printing Option
The advanced printing options are hidden by default. To reveal them, perform the following steps:
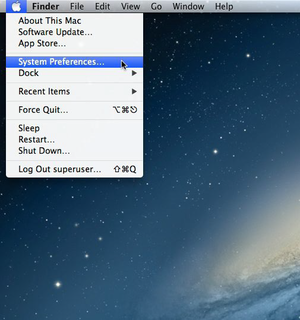
- Click the Apple icon located on the menu bar (by default this will be in the upper left-hand corner of your screen) and then select "System Preferences" from the drop-down menu.
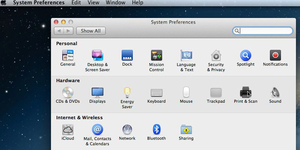
- From the System Preferences window, click on "Printers & Scanners" (on older versions of macOS this may be called "Print & Scan").
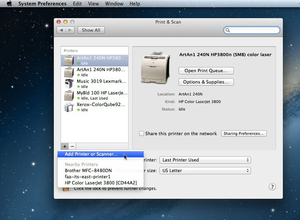
- Click on the "+" symbol below the list of printers. From the drop-down menu, select "Add Printer or Scanner..."
- A new window called "Add Printer" will appear (on older versions of macOS this may be called "Add"). If there is NOT an "Advanced" button in its toolbar (on top, alongside "Default", "Fax", "IP", etc.), then you will need to customize the toolbar (see step 5). If the toolbar already contains an "Advanced" button, skip ahead to PART 3: Add a Printer or Scanner.
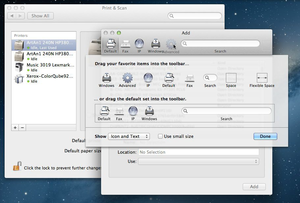
- While holding down the control button on your keyboard, click on an empty space in the toolbar area and select "Customize Toolbar..." from the drop-down menu.
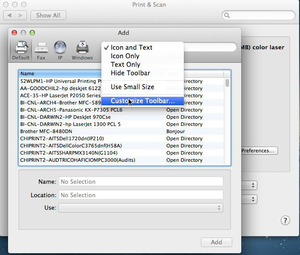
- Drag the "Advanced" button out onto the toolbar and drop it there. Then click "Done."


Part 3: Add a Printer or Scanner
- Click on the "Advanced" button.
- Input the following information into the corresponding fields.
- Type: Windows printer via spools
- Device: Another Device
- URL: smb://<print server URL here>/<print queue name here>
- Example: smb://octopus/HELPDESK_8600
- Name: Enter a descriptive name here.
- Suggestion: Use the print queue name.
- Location: Enter the printer's physical location for reference.
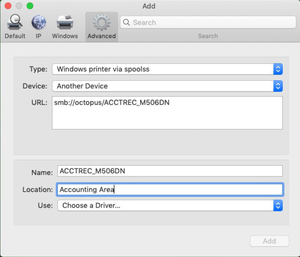
- Use: Choose the "Select Printer Software..." option.
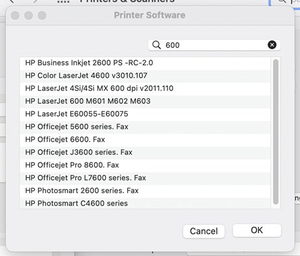
- A new window called "Printer Software" will appear.
- Use the search box to locate the printer software that matches your printer.
- Hint: Sometimes the printer’s driver is slightly different from the model. This is because the driver is used for a whole series of printers with similar model names.
For example: HP LaserJet M601, M602, and M603 all use the HP LaserJet 600 driver.
- Hint: Sometimes the printer’s driver is slightly different from the model. This is because the driver is used for a whole series of printers with similar model names.
- If no compatible driver appears in the list or you cannot determine which driver to use, close the Printer Software window and instead select “Generic PostScript Printer” from the drop-down menu.
- When you are finished, click "Add".
- You will be shown a list of features that the printer might support. Select the appropriate features for the printer, then click "OK". If you do not need any of the features listed, you can leave the boxes unchecked and click "OK".
* HINT: Duplex means double-sided.
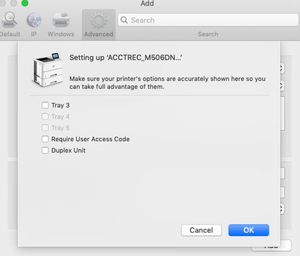
- Your printer should now appear in the list of available printers. A green dot next to it indicates the printer is ready to print. Try printing a test page to verify everything worked.


Part 4: Print a Test Page
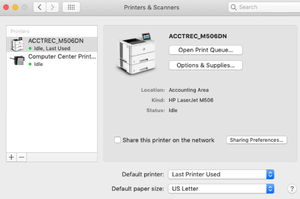
- Return to the Printers & Scanners window (See PART 2 - step 2).
- Select the printer you would like to test and click the “Open Print Queue” button.
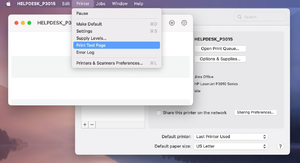
- A new window will appear with the name of the printer displayed across the top and a new option called “Printer” will appear on the menu bar.
- From the menu bar, click on “Printer” and from the drop-down menu select “Print Test Page.”
- You may be asked to authenticate with your name and password. For the name field, what the system wants is your license plate (See PART 1 - step 5). For the password, use your evergreen.edu password NOT your mac password.


You're done!
If you are unable to print or need additional help, please create a support ticket at help.evergreen.edu or email support@evergreen.edu
Printing Help
Get Help
Submit a technology support request
No account or having problems logging in?
Request help as a guest