Difference between revisions of "COM 107 Recital Hall"
From Help Wiki
(Partial rework of operation guide covering major equipment changes in the recital hall. at this edit new content is merely added on the beginning, and the old outdated remains as well) |
(updated for consistency and removed old recital hall info (pre-avrefresh)) |
||
| Line 1: | Line 1: | ||
| + | |||
[[File:4107.pdf]] | [[File:4107.pdf]] | ||
__NOTOC__ | __NOTOC__ | ||
| − | above image | + | above image has minor differences from the Recital Hall podium |
===Computer=== | ===Computer=== | ||
| − | # Press the ‘Computer’ button on the | + | # Press the ‘Computer’ button on the AV control panel. |
# Select any of the three options from the touch screen console ‘Mac Mini,’ ‘HDMI,' or ‘VGA’. | # Select any of the three options from the touch screen console ‘Mac Mini,’ ‘HDMI,' or ‘VGA’. | ||
# Attach the HDMI or VGA cable to your laptop, be sure to include the audio cable for VGA. | # Attach the HDMI or VGA cable to your laptop, be sure to include the audio cable for VGA. | ||
| Line 11: | Line 12: | ||
===Document Camera=== | ===Document Camera=== | ||
| − | # Press the ‘Document Camera’ button on the | + | # Press the ‘Document Camera’ button on the AV control panel |
# Turn on the Document Camera. Be patient, this can take up to a minute to warm up. Blue light = on, orangish = off, other color = call for help | # Turn on the Document Camera. Be patient, this can take up to a minute to warm up. Blue light = on, orangish = off, other color = call for help | ||
| Line 26: | Line 27: | ||
# Press the ‘VCR/DVD’ button on the console attached to the podium. | # Press the ‘VCR/DVD’ button on the console attached to the podium. | ||
# Insert your VHS or DVD into the tape slot or tray | # Insert your VHS or DVD into the tape slot or tray | ||
| − | # Use the | + | # Use the AV control panel to control playback |
# Closed Caption can be enabled via the toggle switch in the top of the podium equipment rack | # Closed Caption can be enabled via the toggle switch in the top of the podium equipment rack | ||
| Line 37: | Line 38: | ||
===Mic button=== | ===Mic button=== | ||
| − | # Press ‘Mic' (also seen as 'Mic Only’) button on the | + | # Press ‘Mic' (also seen as 'Mic Only’) button on the AV Control Panel. |
# Mute/UnMute and Volume for the podium mic, (2) handheld mics from the podium drawer, and wired mic inputs can be controlled here. | # Mute/UnMute and Volume for the podium mic, (2) handheld mics from the podium drawer, and wired mic inputs can be controlled here. | ||
===Mute=== | ===Mute=== | ||
| − | # Press the ‘Mute’ button on the | + | # Press the ‘Mute’ button on the AV Control Panel to dark the screen and silence the media sounds (mics are still live, those can be muted via the mic button) |
# If you press the button again the image and sound should come back. | # If you press the button again the image and sound should come back. | ||
| Line 52: | Line 53: | ||
## Turn off the projector (everything stays were it is, except the projector turns off - useful if you are reviewing audio or practicing to tracks but have no video, or just dont appreciate the bright spot from up above the mezzanine). | ## Turn off the projector (everything stays were it is, except the projector turns off - useful if you are reviewing audio or practicing to tracks but have no video, or just dont appreciate the bright spot from up above the mezzanine). | ||
| − | === | + | ===AV Control Panels=== |
| − | There are (3) | + | There are (3) AV control touchpanels: |
# One is on the stage podium | # One is on the stage podium | ||
# One is in 212A on the rack | # One is in 212A on the rack | ||
# The last is removable, and can be used in the Mezzanine, or stored in 212A on the rack shelf so wayward curiosity or trickster fingers don't lose a battle to temptation during a performance or presentation | # The last is removable, and can be used in the Mezzanine, or stored in 212A on the rack shelf so wayward curiosity or trickster fingers don't lose a battle to temptation during a performance or presentation | ||
| − | |||
| − | |||
| − | |||
| − | |||
| − | |||
| − | |||
| − | |||
| − | |||
| − | |||
| − | |||
| − | |||
| − | |||
| − | |||
| − | |||
| − | |||
| − | |||
| − | |||
| − | |||
| − | |||
| − | |||
| − | |||
| − | |||
| − | |||
| − | |||
| − | |||
| − | |||
| − | |||
| − | |||
| − | |||
| − | |||
| − | |||
| − | |||
| − | |||
| − | |||
| − | |||
| − | |||
| − | |||
| − | |||
| − | |||
| − | |||
| − | |||
| − | |||
| − | |||
| − | |||
| − | |||
| − | |||
| − | |||
| − | |||
| − | |||
| − | |||
| − | |||
| − | |||
| − | |||
| − | |||
| − | |||
| − | |||
| − | |||
| − | |||
| − | |||
| − | |||
| − | |||
| − | |||
| − | |||
| − | |||
| − | |||
| − | |||
| − | |||
| − | |||
| − | |||
| − | |||
| − | |||
| − | |||
| − | |||
| − | |||
| − | |||
| − | |||
| − | |||
| − | |||
| − | |||
| − | |||
| − | |||
| − | |||
| − | |||
| − | |||
| − | |||
| − | |||
| − | |||
[[Category:Media Classrooms]] | [[Category:Media Classrooms]] | ||
Revision as of 13:37, 3 January 2020
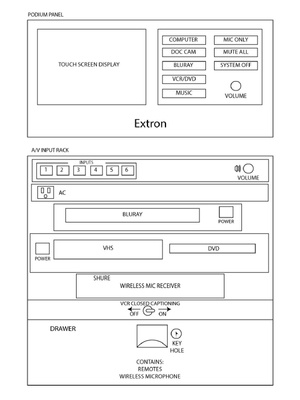
above image has minor differences from the Recital Hall podium
Computer
- Press the ‘Computer’ button on the AV control panel.
- Select any of the three options from the touch screen console ‘Mac Mini,’ ‘HDMI,' or ‘VGA’.
- Attach the HDMI or VGA cable to your laptop, be sure to include the audio cable for VGA.
Document Camera
- Press the ‘Document Camera’ button on the AV control panel
- Turn on the Document Camera. Be patient, this can take up to a minute to warm up. Blue light = on, orangish = off, other color = call for help
Bluray
- Press the ‘Bluray’ button on the console attached to the podium.
- Select the ‘Open’ button on the Bluray player.
- Insert your Bluray disc into the tray and close it.
- navigate the disc with the controls on the touch panel
VCR/DVD
- note: DVD only plays in 4:3 - use the Blu-ray player if you have a widescreen DVD
- Press the ‘VCR/DVD’ button on the console attached to the podium.
- Insert your VHS or DVD into the tape slot or tray
- Use the AV control panel to control playback
- Closed Caption can be enabled via the toggle switch in the top of the podium equipment rack
Auxiliary
- Auxiliary provides access to the Mezzanine and Projection Room (212A) source inputs
- Press the 'auxiliary' button to choose which source
Mic button
- Press ‘Mic' (also seen as 'Mic Only’) button on the AV Control Panel.
- Mute/UnMute and Volume for the podium mic, (2) handheld mics from the podium drawer, and wired mic inputs can be controlled here.
Mute
- Press the ‘Mute’ button on the AV Control Panel to dark the screen and silence the media sounds (mics are still live, those can be muted via the mic button)
- If you press the button again the image and sound should come back.
System Off
- The ‘System Off’ button gives you 3 options (that look like 4)
- Cancel (both cancel buttons go right back to whatever you were doing before)
- Turn off the system (set everything back to start and turn off the projector)
- Turn off the projector (everything stays were it is, except the projector turns off - useful if you are reviewing audio or practicing to tracks but have no video, or just dont appreciate the bright spot from up above the mezzanine).
AV Control Panels
There are (3) AV control touchpanels:
- One is on the stage podium
- One is in 212A on the rack
- The last is removable, and can be used in the Mezzanine, or stored in 212A on the rack shelf so wayward curiosity or trickster fingers don't lose a battle to temptation during a performance or presentation