Difference between revisions of "COM 209"
From Help Wiki
(→Select Your VIDEO Source) |
(→Select Your VIDEO Source) |
||
| Line 21: | Line 21: | ||
===Select Your VIDEO Source=== | ===Select Your VIDEO Source=== | ||
# Use the Projector Remote to turn on the Projector | # Use the Projector Remote to turn on the Projector | ||
| − | # ==Laptop:== | + | # ===Laptop:=== |
* Press Computer on the Projector Remote | * Press Computer on the Projector Remote | ||
* Plug your laptop into the VGA connector located at the bottom of the rack | * Plug your laptop into the VGA connector located at the bottom of the rack | ||
| Line 27: | Line 27: | ||
* Turn the AUX KNOB to 5 and turn up the volume faders. | * Turn the AUX KNOB to 5 and turn up the volume faders. | ||
* Turn up the volume on your computer | * Turn up the volume on your computer | ||
| − | # =VHS or DVD= | + | # ===VHS or DVD=== |
* Press VIDEO/S-VIDEO on the Projector Remote | * Press VIDEO/S-VIDEO on the Projector Remote | ||
* Select VHS or DVD on the video switcher located in the rack | * Select VHS or DVD on the video switcher located in the rack | ||
Revision as of 11:17, 18 April 2014
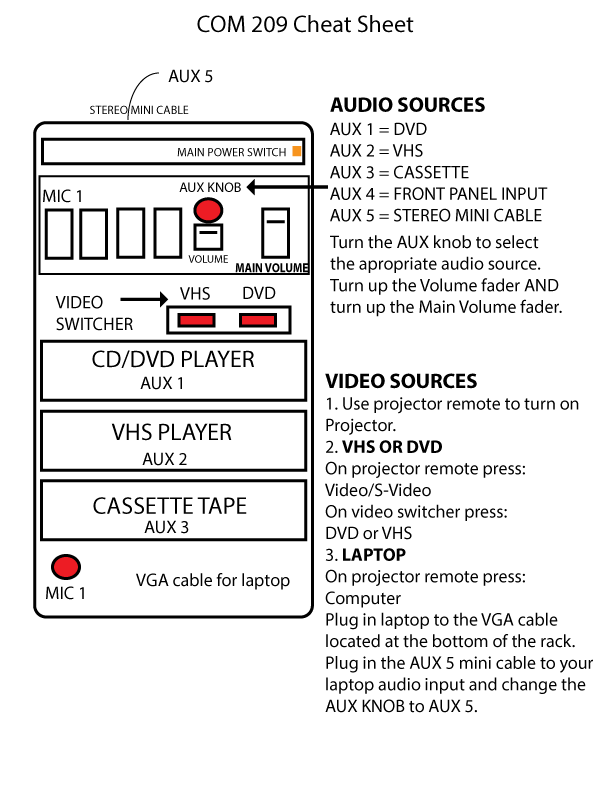
This is one of the main dance and performance studios in the communications building. It has a simple AV rack for audio and video playback. If you have a laptop then bring your own video adaptor to connect to the VGA cable.
Power
- Turn ON the Main Power to the rack, big orange switch on the top right of the rack.
Select Your AUDIO Source
Using the Auxiliary knob, select between the following sources:
- Aux 1 = DVD
- Aux 2 = VHS
- Aux 3 = Cassette
- Aux 4 = Front Panel Input
- Aux 5 = Stereo mini cable for laptop or other devices
Volume
- Push up the fader located underneath the Aux Knob
- Push up the Main Volume fader
Select Your VIDEO Source
- Use the Projector Remote to turn on the Projector
- ===Laptop:===
- Press Computer on the Projector Remote
- Plug your laptop into the VGA connector located at the bottom of the rack
- For laptop audio, connect the mini audio cable located in the rack to your laptop
- Turn the AUX KNOB to 5 and turn up the volume faders.
- Turn up the volume on your computer
- ===VHS or DVD===
- Press VIDEO/S-VIDEO on the Projector Remote
- Select VHS or DVD on the video switcher located in the rack
Microphone
- Plug in a microphone to the MIC 1 input panel located on the bottom left of the rack
- Push up the MIC 1 fader to control the volume of the Mic (go slowly to avoid feedback through the speakers and do not point the microphone at the speakers)
- Push up the Main Volume fader