Difference between revisions of "COM 308"
From Help Wiki
| (14 intermediate revisions by 4 users not shown) | |||
| Line 1: | Line 1: | ||
| − | [[File: | + | [[File:COM308-AV-Rack9-24-14.pdf]] |
| − | + | __NOTOC__ | |
| − | + | This classroom has a media cabinet. | |
| − | + | ||
| − | + | ||
| − | + | ||
| − | + | Need help? Call Media Services X 6270 for media assistance. | |
| − | + | ||
| − | + | ||
| − | + | ||
| − | + | ||
| − | + | ||
| − | + | ||
| − | Please power everything off when done | + | ===Exterior Wall Panel=== |
| + | # '''DISPLAY''' button turns on Projector | ||
| + | # Select your video source, '''HDMI''' or '''VGA''' | ||
| + | # Plug in your computer using either an HDMI or VGA cable | ||
| + | # Use the '''VOLUME''' control knob to adjust volume. | ||
| + | # DO NOT PLUG IN BOTH A VGA AND HDMI CABLE AT THE SAME TIME, the system will not work | ||
| + | # Note: there is a short delay in video switching (5-10 sec) | ||
| + | |||
| + | ===Exterior Wall Panel - Microphone Use=== | ||
| + | # Connect XLR cable from the microphone to the '''MIC''' input on the panel | ||
| + | # '''MIC UP''' & '''MIC DOWN''' buttons control the microphone volume | ||
| + | # Mic volume is independent of the Wall Panel '''Volume''' | ||
| + | |||
| + | ===AV Rack=== | ||
| + | # Press '''RACK''' button on external AV PANEL | ||
| + | # Press '''DISPLAY''' button on external AV PANEL to turn on projector | ||
| + | # Select your video source: '''VGA''' (Laptop), '''HDMI''', '''BLU RAY''', '''DVD/VCR''' or '''MAC''' | ||
| + | # Insert or plug in your media | ||
| + | # On the '''RANE''' audio mixer use the individual source knobs to control the volume. =====MAKE SURE '''OUTPUT''' VOLUME IS TURNED UP (Around 9:00)===== | ||
| + | # Turn down all unused volume knobs that are not in use. | ||
| + | # Return the individual source volume on RANE mixer to zero when finished. | ||
| + | |||
| + | |||
| + | ====Please power everything off when done & lock the AV Cabinet==== | ||
[[Category:Media Classrooms]] | [[Category:Media Classrooms]] | ||
Revision as of 14:53, 7 April 2017
This classroom has a media cabinet.
Need help? Call Media Services X 6270 for media assistance.
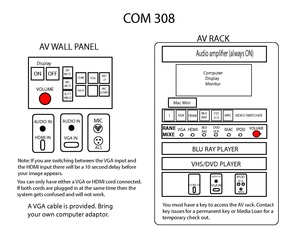
Exterior Wall Panel
- DISPLAY button turns on Projector
- Select your video source, HDMI or VGA
- Plug in your computer using either an HDMI or VGA cable
- Use the VOLUME control knob to adjust volume.
- DO NOT PLUG IN BOTH A VGA AND HDMI CABLE AT THE SAME TIME, the system will not work
- Note: there is a short delay in video switching (5-10 sec)
Exterior Wall Panel - Microphone Use
- Connect XLR cable from the microphone to the MIC input on the panel
- MIC UP & MIC DOWN buttons control the microphone volume
- Mic volume is independent of the Wall Panel Volume
AV Rack
- Press RACK button on external AV PANEL
- Press DISPLAY button on external AV PANEL to turn on projector
- Select your video source: VGA (Laptop), HDMI, BLU RAY, DVD/VCR or MAC
- Insert or plug in your media
- On the RANE audio mixer use the individual source knobs to control the volume. =====MAKE SURE OUTPUT VOLUME IS TURNED UP (Around 9:00)=====
- Turn down all unused volume knobs that are not in use.
- Return the individual source volume on RANE mixer to zero when finished.