Difference between revisions of "Create New Site - First Time in WordPress"
From Help Wiki
m |
|||
| (53 intermediate revisions by 7 users not shown) | |||
| Line 1: | Line 1: | ||
| − | |||
| − | |||
| − | |||
| − | |||
| − | |||
| − | |||
| − | |||
| − | |||
| − | |||
| − | |||
| − | |||
| − | |||
| − | |||
| − | |||
| − | |||
| + | <div class="container-fluid"> | ||
| + | <div class="row"> | ||
| + | <div class="col-md-8"> | ||
| + | <div class="lead"> | ||
| + | How to create a WordPress site at wordpress.evergreen.edu | ||
| + | </div> | ||
| − | + | ===I'm new to wordpress.evergreen.edu=== | |
| + | [[File:Screen Shot 2017-08-15 at 2.28.44 PM.png|200px|thumb|How to navigate to '''My Sites''']] | ||
| + | [[File:Screen Shot 2017-08-15 at 2.23.40 PM.png|200px|thumb|Create a new site from '''My Sites''']] | ||
| + | [[File:Screen Shot 2017-08-11 at 2.27.15 PM.png|200px|thumb|right|The final step in creating a live link]] | ||
| + | "wordpress.evergreen.edu" is Evergreen's WordPress instance primarily for students and community members looking to self-create a WordPress website for blogging, an academic journal, portfolio, project, or more. To create your own site, all you need is an Evergreen email address and login. | ||
| + | '''NOTE TO FACULTY:''' Requests for curricular WordPress sites (at '''sites'''.evergreen.edu) can be submitted at help.evergreen.edu. | ||
| + | |||
| + | ====Create a wordpress.evergreen.edu account and a new website==== | ||
| + | #Navigate a web browser to the '''[http://wordpress.evergreen.edu/ wordpress.evergreen.edu]''' and click '''Login''' - you should be automatically redirected to the Dashboard. | ||
| + | #To create a new WordPress site, select '''My Sites''' at top left, in the bar that runs across the top of the browser page, and click the '''Add New''' button. | ||
| + | #Enter the '''Site Name''' - this will become part of your unique URL or web address and cannot be changed. | ||
| + | #Enter the '''Site Title''' - this will be used as the title for your site, will display in the header section of your site and can be changed later | ||
| + | #Under the '''Site title''' section, there is a list of different privacy settings you can choose from. To avoid making your new site public (open to the world) select one of the following options: | ||
| + | *'''Visible only to registered users of this network'''- Only people with an Evergreen Username can see your site | ||
| + | *'''Visible only to registered users of this site''' - Only people you add to your site can see it | ||
| + | *'''Visible only to administrators of this site'''- Only admins can see the site | ||
| + | You can always change the visibility of your website later, when you're sure you'd like to share it publicly, for example, with family and friends. | ||
| + | |||
| + | <!-- end col-md-8 --> | ||
| + | </div> | ||
| + | <div class="col-md-1"></div> | ||
| + | <div class="col-md-3 sidebar"> | ||
| + | {{WordPress Tutorial Header}} | ||
| + | |||
| + | |||
| + | {{WordPress CreatingSite Sidebar}} | ||
| + | |||
| + | |||
| + | ---- | ||
| + | |||
| + | |||
| + | {{WordPress NavigatingWordPress Sidebar}} | ||
| + | |||
| + | |||
| + | ---- | ||
| + | |||
| + | |||
| + | {{WordPress Help Sidebar}} | ||
| + | |||
| + | <!-- end col-md-3--> | ||
| + | </div> | ||
| + | <!-- end row--> | ||
| + | </div> | ||
| + | <!-- end container--> | ||
| + | </div> | ||
| + | <!-- Generator=Template:TwoColumn --> | ||
| + | __NOTOC__ | ||
| + | __NOEDITSECTION__ | ||
[[category:Wordpress Tutorial]] | [[category:Wordpress Tutorial]] | ||
| + | [[category:Wordpress]] | ||
Latest revision as of 17:40, 3 February 2021
How to create a WordPress site at wordpress.evergreen.edu
I'm new to wordpress.evergreen.edu
"wordpress.evergreen.edu" is Evergreen's WordPress instance primarily for students and community members looking to self-create a WordPress website for blogging, an academic journal, portfolio, project, or more. To create your own site, all you need is an Evergreen email address and login.
NOTE TO FACULTY: Requests for curricular WordPress sites (at sites.evergreen.edu) can be submitted at help.evergreen.edu.
Create a wordpress.evergreen.edu account and a new website
- Navigate a web browser to the wordpress.evergreen.edu and click Login - you should be automatically redirected to the Dashboard.
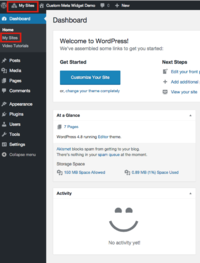
- To create a new WordPress site, select My Sites at top left, in the bar that runs across the top of the browser page, and click the Add New button.
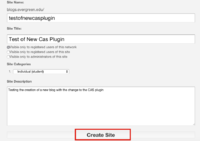
- Enter the Site Name - this will become part of your unique URL or web address and cannot be changed.
- Enter the Site Title - this will be used as the title for your site, will display in the header section of your site and can be changed later
- Under the Site title section, there is a list of different privacy settings you can choose from. To avoid making your new site public (open to the world) select one of the following options:
- Visible only to registered users of this network- Only people with an Evergreen Username can see your site
- Visible only to registered users of this site - Only people you add to your site can see it
- Visible only to administrators of this site- Only admins can see the site
You can always change the visibility of your website later, when you're sure you'd like to share it publicly, for example, with family and friends.


