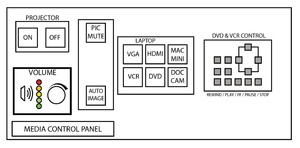
Images will be updated soon - source buttons depicted here are in a different order in the classroom.
- To turn ON the projector, press the display "ON" button.
The button will blink for 30 seconds while the projector warms up.
- On the Media Control Panel, press the button for your source. A solid light indicates which source is active.
- You may need to hold the button for 2 seconds.
HDMI Laptop
- Press the HDMI button on the Media Control Panel
- Plug in your laptop to the provided HDMI cable
- Sound comes through the HDMI connector; when playing sound, adjust the volume knob on the Media Control Panel to a comfortable level.
- If you need an adapter to connect your laptop to the podium, one can be checked out at Media Loan.
VGA Laptop
- Press the VGA button on the Media Control Panel
- Plug in your laptop to the provided VGA cable
- Sound comes through the mini plug (earphone) on the VGA cable. Connect it to your earphone jack & make sure the device volume is up. When playing sound, adjust the volume knob on the Media Control Panel to a comfortable level.
- If you need an adapter to connect your laptop to the podium, one can be checked out at Media Loan.
Mac Mini
- Press the Mac Mini button on the Media Control Panel
- Log in using the keyboard and mouse (if the keyboard and mouse are not on the desktop, check the keyboard tray)
- Sound level should be turned up on the mac, and the volume adjusted via the Media Control Panel volume knob. When playing sound, adjust the volume knob on the Media Control Panel to a comfortable level.
- Important: make sure the "Audio" switch on the right near the laptop wires in switched into "Normal" position (not "mixer")
VHS
- The VHS player is in the equipment rack (which must be unlocked with a key)
- Press the VHS button on the Media Control Panel
- Turn on the VCR and put your VHS tape in the player.
- Use the Media control panel buttons to operate the VCR, or the buttons on the VCR itself. A remote is also in the rack drawer.
- Closed Caption for the VCR is turned on and off by the "Close Caption" switch near the laptop wires.
Blu-ray / DVD
- The Blu-ray player is in the podium below the keyboard tray
- Press the BLU-RAY button on the Media Control Panel
- Press the eject button on the Blu-ray player and put your disc in the player.
- Use the Media control panel buttons to operate the Blu-ray, or the remote (keyboard tray or on top of the podium).
- Closed Caption for the Blu-ray can be turned on/off from the "subtitles" button on the remote, or from the menu system of your video disc.
The Blu-ray/DVD player eject button is just to the right of the main panel of the player, at the top (picture coming soon)
Document Camera
- Press "Doc Cam" on the Media Control Panel
- Locate the power button on the document camera and tap to turn it on (light turns blue).
- Adjust the camera arm and head to show your document or demonstration the way you want it on the screen.
- If you need light, there is a switch on the front of the camera head that sets the camera light to off/low/high light
- Important
- turning off the camera requires twice pressing the power button: the first asks for a confirmation, pressing again will turn it off.
Troubleshooting:
Are the power lights lit up? Is the plug fully seated into the connector Is the volume up Is the light on the Media Control Panel lit solid for the source you are using? Does a different source work? Is the Yamaha receiver turned on (in the rack)?
Need Help??
Want Training??
Call x6270 for Classroom Support