Difference between revisions of "Onionskin - Dragonframe"
From Help Wiki
Mediaintern5 (Talk | contribs) (→Settings) (Tag: VisualEditor) |
Mediaintern5 (Talk | contribs) (→Settings) (Tag: VisualEditor) |
||
| Line 11: | Line 11: | ||
== Settings == | == Settings == | ||
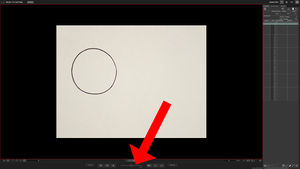
* When opening Dragonframe, you will find a tool called the Onion skin Opacity Slider which is located underneath the Live-View (see Fig. 1.0 & Fig. 1.1). | * When opening Dragonframe, you will find a tool called the Onion skin Opacity Slider which is located underneath the Live-View (see Fig. 1.0 & Fig. 1.1). | ||
| − | [[File:Screenshot Marking 1.jpg|centre|thumb]] | + | (Fig. 1.0)[[File:Screenshot Marking 1.jpg|centre|thumb]](Fig. 1.1) |
| − | + | [[File:Onionskin Opacity Slider.png|centre|thumb]] | |
| + | (Fig 1.2) | ||
| + | [[File:OpacitySliderGIF.gif|centre|thumb]] | ||
<gallery caption="Onionskin Examples" widths="180px" heights="120px"> | <gallery caption="Onionskin Examples" widths="180px" heights="120px"> | ||
File:onionskin5.png|No onionskin. | File:onionskin5.png|No onionskin. | ||
Revision as of 21:21, 14 November 2018
Intro
Onion skinning is a technique, accessible in the Dragonframe software, that enables animators to simultaneously see several of their most recent frames in Live View. Onion skinning is essential in accurately fluid animation.
Getting Ready
- Use the pegbar to secure your artwork when utilizing the main animation stand.
- Open up Dragonframe (for questions with opening Dragonframe and details, see Basic Animation 2D).
- Use Auto-Focus to focus the area where you placed your drawing or objects. (for questions on using Auto-Focus and details, see Focusing-Dragonframe).
- Click on X-Sheet in the upper right hand corner of Dragonframe (for questions about X-Sheet, see X-Sheet Dragonframe).
- Take several frames of your artwork and/or objects.
Settings
- When opening Dragonframe, you will find a tool called the Onion skin Opacity Slider which is located underneath the Live-View (see Fig. 1.0 & Fig. 1.1).
(Fig 1.2)
- Onionskin Examples


