Difference between revisions of "Shure Wireless Microphone Quick Guide"
(→Start Up) |
(→Busy Indicator) |
||
| Line 21: | Line 21: | ||
====Busy Indicator==== | ====Busy Indicator==== | ||
<gallery> | <gallery> | ||
| − | File: | + | File:Busyindicator.jpg|Busy Indicator |
</gallery> | </gallery> | ||
When selecting channels, a flashing dash indicates interference from the television broadcasts, electronic devices, or other wireless systems. if this occurs, change the channel. | When selecting channels, a flashing dash indicates interference from the television broadcasts, electronic devices, or other wireless systems. if this occurs, change the channel. | ||
| + | ====Changing Channels==== | ||
| + | Press and hold the channel button until the display starts flashing, press the channel button. The channel is active once the display stops flashing. | ||
| + | ::'''NOTE: RECEIVER AND TRANSMITTER CHANNELS SHOULD MATCH''' | ||
| + | ====Testing Audio==== | ||
| + | <gallery> | ||
| + | File:Testing-Audio.jpg|Testing Audio | ||
| + | </gallery> | ||
| + | Talk, sing, or play an instrument into the microphone. The audio '''LED''' on the receiver should flicker green or amber, if red adjust the '''Gain Switch'''. | ||
| + | ===Locking and unlocking Transmitter Controls=== | ||
| + | ====To lock controls==== | ||
| + | Turn transmitter off. | ||
| + | Remove Battery Cover. | ||
| + | Press and hold the Channel Button. | ||
| + | Press and release Power/Mute button. Power/Mute '''LED''' will flash red and green. | ||
| + | :Tip: Locking system controls prevents accidental muting. | ||
| + | ====To unlock controls==== | ||
| + | Press and hold Power/Mute button down until Power/Mute '''LED''' flashes red and green. | ||
| + | ===LED Status=== | ||
| + | ====Transmitter==== | ||
| + | {| class="wikitable" | ||
| + | |- | ||
| + | ! LED Color !! Status | ||
| + | |- | ||
| + | | Green || Ready | ||
| + | |- | ||
| + | | Amber || Mute On | ||
| + | |- | ||
| + | | Red || Battery Low | ||
| + | |- | ||
| + | | Flashing Red on Startup || Battery is Dead | ||
| + | |- | ||
| + | | Flashing Red and Green || Controls Locked | ||
| + | |- | ||
| + | | Flashing Amber and Red || Mute on and Battery Low | ||
| + | |- | ||
| + | |} | ||
| + | ====Receiver==== | ||
| + | {| class="wikitable" | ||
| + | |- | ||
| + | ! Audio LED Color !! Indicates | ||
| + | |- | ||
| + | | Green || Normal Signal Strength | ||
| + | |- | ||
| + | | Amber || Strong Signal | ||
| + | |- | ||
| + | | Red || Peak Signal | ||
| + | |} | ||
| + | ===Charging Battery=== | ||
| + | Expected life for a 9 volt battery is up to 8 hours. Total battery life will vary depending on battery type and manufacturer. Red ''LED''' signifies "Low Battery" with typically less than 60 minutes of remaining battery life. | ||
| + | ===Wearing the Body-Pack Transmitter=== | ||
| + | <gallery> | ||
| + | File:bodypackpicture.jpg|Body Pack | ||
| + | </gallery> | ||
| + | Clip the transmitter to the belt or guitar strap as shown. Make sure the antenna is unobstructed. | ||
| + | ===Multiple System Setup=== | ||
| + | To set up multiple systems, repeat the previous steps for each transmitter and receiver pair. Once transmitters have been set, leave them on. Be sure to set each transmitter and receiver pair to a different channel. | ||
| + | ===Troubleshooting=== | ||
| + | |||
[[category:Media Loan]] | [[category:Media Loan]] | ||
Revision as of 11:38, 26 July 2013
The Shure Wireless Microphones are restricted to Staff and Faculty
Contents
Start Up
Step 1
Step 2
Step 3
Step 4
Step 5
Step 6a
Step 6b
Step 7


- Turn OFF the microphone or body-pack. If left on, it will create a false busy indicator.
- Plug in the power supply. The channel display should illuminate. There is no power switch.
- Press and hold the channel button until the display begins flashing. If you see the Busy Indicator (A flashing dash) change the channel.
- Wait for the channel display to stop flashing.
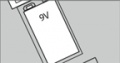
- If you haven't installed the battery, do it now and leave the cover off.
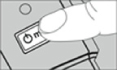
- Turn ON the handheld or body-pack transmitter by pressing the power button. Then channel display should illuminate. It turns off after ten seconds to conserve battery.
- Check to see that the transmitter and the receiver display the came channel. The ready LED on the receiver should be illuminated.
- Replace battery cover.
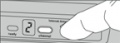
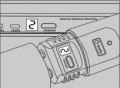
Busy Indicator

Busy Indicator

When selecting channels, a flashing dash indicates interference from the television broadcasts, electronic devices, or other wireless systems. if this occurs, change the channel.
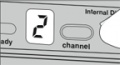
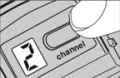
Changing Channels
Press and hold the channel button until the display starts flashing, press the channel button. The channel is active once the display stops flashing.
- NOTE: RECEIVER AND TRANSMITTER CHANNELS SHOULD MATCH
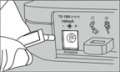
Testing Audio
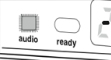
Testing Audio

Talk, sing, or play an instrument into the microphone. The audio LED on the receiver should flicker green or amber, if red adjust the Gain Switch.
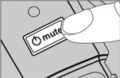
Locking and unlocking Transmitter Controls
To lock controls
Turn transmitter off. Remove Battery Cover. Press and hold the Channel Button. Press and release Power/Mute button. Power/Mute LED will flash red and green.
- Tip: Locking system controls prevents accidental muting.
To unlock controls
Press and hold Power/Mute button down until Power/Mute LED flashes red and green.
LED Status
Transmitter
| LED Color | Status |
|---|---|
| Green | Ready |
| Amber | Mute On |
| Red | Battery Low |
| Flashing Red on Startup | Battery is Dead |
| Flashing Red and Green | Controls Locked |
| Flashing Amber and Red | Mute on and Battery Low |
Receiver
| Audio LED Color | Indicates |
|---|---|
| Green | Normal Signal Strength |
| Amber | Strong Signal |
| Red | Peak Signal |
Charging Battery
Expected life for a 9 volt battery is up to 8 hours. Total battery life will vary depending on battery type and manufacturer. Red LED' signifies "Low Battery" with typically less than 60 minutes of remaining battery life.
Wearing the Body-Pack Transmitter
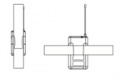
Body Pack

Clip the transmitter to the belt or guitar strap as shown. Make sure the antenna is unobstructed.
Multiple System Setup
To set up multiple systems, repeat the previous steps for each transmitter and receiver pair. Once transmitters have been set, leave them on. Be sure to set each transmitter and receiver pair to a different channel.