Difference between revisions of "State and Local Government- Separating Audio from Video Files"
From Help Wiki
(Created page with "== Using Adobe Media Encoder == Use this method if you are wanting to just separate a video and file. If you are wanting to make a selection and then export only the audio, y...") |
(→Using Adobe Media Encoder) (Tag: VisualEditor) |
||
| Line 1: | Line 1: | ||
== Using Adobe Media Encoder == | == Using Adobe Media Encoder == | ||
Use this method if you are wanting to just separate a video and file. If you are wanting to make a selection and then export only the audio, you will need to use Premiere Pro. | Use this method if you are wanting to just separate a video and file. If you are wanting to make a selection and then export only the audio, you will need to use Premiere Pro. | ||
| − | + | * Launch the Adobe Media Encoder application that is part of the Adobe Creative Cloud Suite. | |
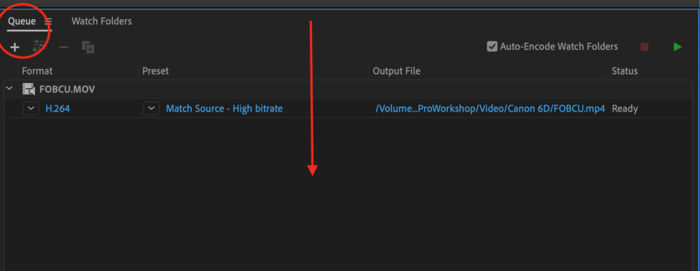
| − | + | * Locate the file you are wanting to separate the video from the audio and drag it into the '''Queue''' panel in the Media Encoder. | |
| − | + | [[File:MediaEncoder DragtoQueue.png|alt=Drag Files to Media Encoder Queue Panel |none|thumb|700x700px| | |
| + | * | ||
| + | ]] | ||
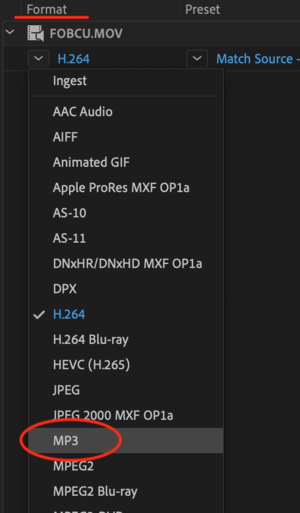
| + | * Toggle the triangle beside the blue text under '''Format''' and select '''mp3'''. | ||
| + | [[File:MediaEncoder Format.png|alt=Change your format to mp3. |none|thumb]] | ||
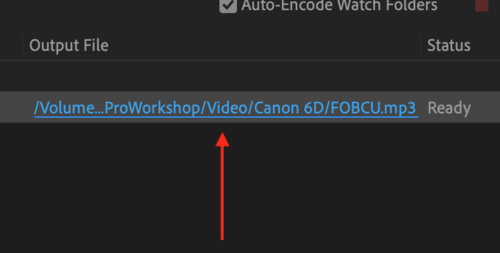
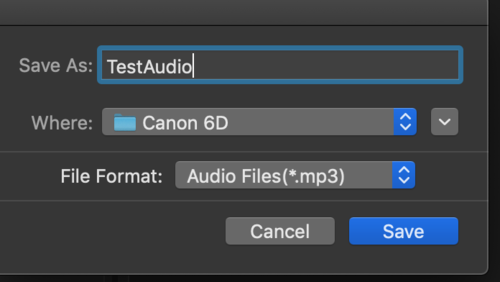
# Click on the blue text under the '''Output File''' and rename your file if needed and verify where the file is saving on your local computer. | # Click on the blue text under the '''Output File''' and rename your file if needed and verify where the file is saving on your local computer. | ||
| + | [[File:MediaEncoder Output.png|none|thumb|500x500px]] | ||
| + | [[File:MediaEncoder Save.png|none|thumb|500x500px]] | ||
# Start the export process by clicking the green triangle. | # Start the export process by clicking the green triangle. | ||
# After the export, open your file to verify that the export was successful. | # After the export, open your file to verify that the export was successful. | ||
# You can then import this audio file into '''Audacity'''. | # You can then import this audio file into '''Audacity'''. | ||
| − | |||
| − | |||
| − | |||
[[Category:2019-2020]] | [[Category:2019-2020]] | ||
Revision as of 12:33, 30 January 2020
Using Adobe Media Encoder
Use this method if you are wanting to just separate a video and file. If you are wanting to make a selection and then export only the audio, you will need to use Premiere Pro.
- Launch the Adobe Media Encoder application that is part of the Adobe Creative Cloud Suite.
- Locate the file you are wanting to separate the video from the audio and drag it into the Queue panel in the Media Encoder.
- Toggle the triangle beside the blue text under Format and select mp3.
- Click on the blue text under the Output File and rename your file if needed and verify where the file is saving on your local computer.
- Start the export process by clicking the green triangle.
- After the export, open your file to verify that the export was successful.
- You can then import this audio file into Audacity.


