Difference between revisions of "Visualizing Microbial Seascapes - WordPress"
From Help Wiki
m |
m |
||
| Line 16: | Line 16: | ||
# Click the Toolbar Toggle icon [[File:Wp-toolbar-toggle.png|25px]] to expand a second row of editing tools | # Click the Toolbar Toggle icon [[File:Wp-toolbar-toggle.png|25px]] to expand a second row of editing tools | ||
# Use the Special Characters [[File:Wp-special-characters.png|25px]] button to insert Greek letters if needed | # Use the Special Characters [[File:Wp-special-characters.png|25px]] button to insert Greek letters if needed | ||
| + | # Use the More button to set the excerpt text that is displayed on the category page | ||
Revision as of 11:57, 19 November 2015

Getting Started
- Access your site at https://sites.evergreen.edu/vms/ and login with your Evergreen login and password
- As Authors you have the ability to create and edit your own posts but not others
- Dashboard overview
Create a new Post
- From the Admin bar at the top click +New > Post to create a new post
- Title your post
- Begin writing in the content area or copy and paste from another word processing tool
Markup your content
Use the text editing toolbar to style or markup your text
- Add links to internal or external pages
- Click the Toolbar Toggle icon
 to expand a second row of editing tools
 - Use the Special Characters
 button to insert Greek letters if needed
 - Use the More button to set the excerpt text that is displayed on the category page

Categorize your post
- Categorize your post as either Phytoplankton or Zooplankton. See the Category panel to the right when editing your post.
Images, video and linked files
- Insert an image and add a caption.
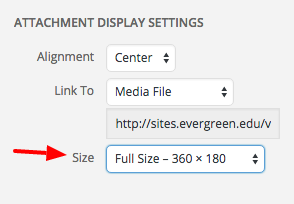
- Inserting Animated GIFs into your post is the same as adding an image - just make sure you choose Full Size
- Set the featured image for your post
- Image Galleries allow you to create a thumbnail grid of multiple images
- Embed video from Vimeo or YouTube by pasting the URL link into the content area of your page/post
- Link to a file

Change your profile's display name
Your chosen display name will be published with your post. To change what is displayed:
- Go to your Edit my profile in the upper right of the Admin Bar under Howdy
- Add a nickname if you want to use something not already listed
- Choose your Display Name from the drop down list
- Click Update Profile at the bottom of the page