Difference between revisions of "Vixia HD Camcorder Gear Guide"
(→LCD/TOUCHSCREEN) |
(→LCD/TOUCHSCREEN) |
||
| Line 58: | Line 58: | ||
<gallery> | <gallery> | ||
File:HF-M400-08-lcd-rotate.png|HF M400 Rotate LCD Screen | File:HF-M400-08-lcd-rotate.png|HF M400 Rotate LCD Screen | ||
| + | File:HF-M400-06-lcd-rotate.png|HF M400 Rotate LCD Screen | ||
File:HF-M400-09-lcd-backlight.png|HF M400 LCD Backlight | File:HF-M400-09-lcd-backlight.png|HF M400 LCD Backlight | ||
File:HF-M400-11-touchscreen-use.png|HF M400 Touchscreen | File:HF-M400-11-touchscreen-use.png|HF M400 Touchscreen | ||
Revision as of 10:48, 22 March 2013
Contents
- 1 About the Vixia's at Media Loan
- 2 Caring for Media Loan Equipment
- 3 Condensation
- 4 Name of Parts
- 5 BATTERY/AC POWER
- 6 LCD/TOUCHSCREEN
- 7 Using the Menus
- 8 Recording
- 9 Initialize the Memory Card
- 10 Using the zoom
- 11 Manual Focus
- 12 Exposure Compensation
- 13 White Balance
- 14 AE Mode
- 15 Image Stabilizer
- 16 Audio Recording Level
- 17 Connections
- 18 Uploading/Saving Footage
About the Vixia's at Media Loan
Media Loan has several models of Vixia HD camcorders. The menu functions of the HF 200 are accessed by a joystick control on the LCD panel. The HF M300, HF M400 and HF M500 are operated by the touch screen LCD panel. Each camera comes with a 32 G SDHC memory card for almost 3 hours of recording time. A proficiency test is required to check out this camcorder. The questions are located at the bottom of this guide.A proficiency test is required to check out this camcorder. Schedule a proficiency at the front desk of Media Loan or by calling 360-867-6253. Read this operating guide and complete the written portion of the proficiency test prior to your scheduled proficiency. Bring your answer sheet with you to the test, which should take approximately 30 - 45 minutes. (Please note: if you have a proficiency in the Canon ZR camcorders, you will still have to take the Vixia HD Camcorder Proficiency Test.)
Please Note: This operating guide is not a replacement for the complete manual. For complete operating instructions and information, please read the manual for the appropriate model camcorder. The manuals are available for checkout through Media Loan.
Download the PDF manual for these models: HF200 | HF M300 | HF M400 | HF M500
Caring for Media Loan Equipment
- Do not drop the camcorder!
- Do not leave the camcorder in excessive heat, such as a car!
- Do not subject the camcorder to moisture or water!
- Do not use excessive physical force!
- Do not store this camcorder in excessive cold or excessive heat!
- Never push objects of any kind into the camcorder through any opening!
- Do not leave the viewfinder exposed to direct sunlight as it may melt!
- You are 100% financially responsible for all equipment checked out from Media Loan.
Condensation
To avoid condensation, especially when taking the camera from indoors into colder weather, place the camcorder in an airtight plastic bag and let it adjust to temperature changes slowly before removing it from the bag. When condensation is detected the camcorder automatically shuts off, the warning message “CONDENSATION HAS BEEN DETECTED” appears for approx. 4 seconds and a water drop icon starts flashing. After the condensation warning stops flashing, wait for 1 more hour before resuming use.
Name of Parts
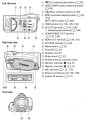
HF M400
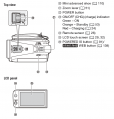
HF M400
HF M400
HF M400


BATTERY/AC POWER
Charging the Battery/Running Off AC
Turn off the camcorder and attach the battery pack to the camcorder by lightly pressing the battery pack and sliding it down until it clicks. Plug the power adaptor into a power outlet. Connect the power adaptor to the camcorder’s DC IN terminal. The CHARGE indicator should starts flashing. The indicator will stay on when the charging is completed. Also, when the power adapter is connected, the camera can function without a battery pack.
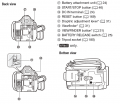
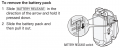
To Remove the Battery Pack
Locate the battery release. On the HF 200, the battery release is on the bottom of the camera under the battery. On the HF 400 and HFM 500, it is on the side of the camera visible when the LCD display is flipped out. Slide the battery release to release the battery pack. Lift and pull out the battery pack.

HF M400 Charge Battery
HF M400 Remove Battery


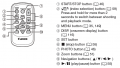
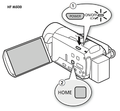
Battery Life
When the camcorder is off, press the BATT.INFO button (3) to display your battery’s state. It will display charge status as a percentage as well as approximate recording time on this charge. The small and large batteries should record at least 45 and 100 minutes, respectively.
Lithium batteries begin to discharge once removed from charger. Although we charge these batteries at Media Loan, you should make sure they are fully charged before you need to use them.
Battery Precautions
- Do not expose battery to excessive heat or fire (it might explode!)
- Do not try to disassemble or modify battery
- Do not drop or knock battery
- Do not get battery wet
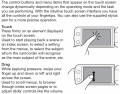
LCD/TOUCHSCREEN
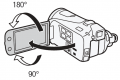
HF M400 Rotate LCD Screen
HF M400 Rotate LCD Screen
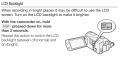
HF M400 LCD Backlight
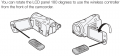
HF M400 Touchscreen


Using the Menus
HF200: The Function menu is accessed by pressing the function button from camera mode. A menu will appear containing options to adjust AE mode, white balance, image effects, digital effects, recording quality, and simultaneous recording. An icon is also present to access the “setup menu.” Navigation is done using the joystick. Scroll up and down the menu using the joystick, and then select the desired option by scrolling left and right. Certain options (like custom white balance) require triggering by pressing the joystick in (set).HF M300: The function menu is accessed by touching the [FUNC] key in camera mode.
HF M500: With the LCD display open, press the HOME button on the side of the camcorder to open the HOME menu. The available options vary according to whether the camcorder is in recording or playback mode.
- The Main Functions panel contains frequently used shooting functions and is available only when the camcorder is in recording mode. Alternatively, you can touch FUNC. in the upper-left portion of the recording screen. Touch the function you want to set or adjust.
- The Camera Mode menu, available only in recording mode, allows you to change whether you record movies in AUTO, Manual [M] mode or to use "cinema-look" filters.
- Recording Standard is also only available in recording mode. It allows you to select whether you will record in AVCHD or MP4 format.
HF M500 Home

Recording
HF 200: Make sure the camera is powered on and that the mode dial is set to the middle setting (video camera icon).HF M300: With the camera powered on, set the mode switch to [M]. Make sure the camera icon is at the top of the LCD screen. Otherwise, you can enter video mode by touching the camera icon at the bottom right corner of the screen.
HF M500: Press [START/STOP] to begin and pause recording.
Use the LCD display to compose, and press the record start/stop button to begin recording. Press again to stop recording. The recording time remaining is displayed at the top of the LCD screen.
Initialize the Memory Card
Each camcorder comes with a Class 10 32G SDHC memory card which should prove adequate for your recording needs. (If you choose to use your own memory cards, take care to return the original card, undamaged, with the camera. Failure to do so will result in a replacement charge being billed to your student account.)HF 200: Press the [HOME] button. Other Settings > Tool Icon > Initialize [card icon] > Initialize > [Complete Initialization] > [Yes] > [OK] > [X]
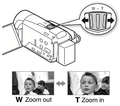
Using the zoom
The zoom lever, located on the top of the camera, is used to zoom in and out. Toggle it in either direction to zoom in or out. The “W” side of the toggle stands for wide angle or “zoomed out,” and the T side for telephoto or “zoomed in.” When menu settings are typical, you may vary the speed of zooming by using this toggle either gently (for slower zoom) or firmly (for faster zoom).
Zoom

Manual Focus
HF 200: In camera mode, press the joystick upwards or downwards to access the joystick menu. Navigate to the focus option and press joystick in (set) to select it. Pressing joystick in again will change the focus mode. In manual mode (M), moving the joystick to the left (towards person icon) will focus closer, while pushing it towards the right (mountain icon) will focus farther away. To revert to auto-focus mode, simply press the joystick in again to change back to auto-focus.
HFM300: With the touchscreen interface, the camera is able to focus on any part of the frame that the user touches while in record mode. The camera takes note of the pixel configuration of the subject you select, thus allowing it to track a moving subject, adjusting the focus to compensate for it’s changing position. If you would like to manually focus, touch the [FUNC] button at the top-right corner of the screen. Tap on the [FOCUS] button, then tap on the [MF] button at the bottom of the screen so the yellow indicator turns on. You are now in manual focus mode. You can either toggle focus using the two buttons that appear on the left, or touch the part of the screen you would like camera to focus on (this will lock the focus and will NOT track the subject).
Exposure Compensation
Exposure compensation is used to override how bright or dark the camera makes your shot. The camera usually takes in a medium-grey/average amount of light. This may be too much or too little light for your shot. To preserve the darkness of a night shot, or the glaring brightness of a backlit subject, for example, requires the use of exposure compensation.Exposure comp. is accessed similarly to the focus option mentioned previously:
HF200: Push the joystick up or down and navigate to the “exposure” setting. Then move the joystick to the left or right to make your shot darker or brighter, respectively.
HF M300: Touch the [FUNC] button at the top-right corner of the screen. Tap on the [EXPOSURE] button, then tap on the [M] button at the bottom of the screen so the yellow indicator turns on. You are now in manual exposure mode. You can either toggle exposure by sliding the “dial” that appears on the left, or touch the part of the screen you would like camera to focus on.
Make sure to change this option back to neutral position before your next shot!
White Balance
White balance determines what the camera sees as “white.” Because light sources have different colors, the camera must be “balanced” to prevent color casts in your footage. “WB” is the second option down in the function menu. Settings include automatic, sunlight, shade, flourescent, etc., as well as a custom setting. To use custom white balance, highlight the “custom WB” icon, point the camera at a white or color-neutral surface (such as a wall or sidewalk) and press [SET]. You will be able to see the color effect of your choice (or custom setting) on the LCD screen.
HF M500: [FUNC.] > [WB White Balance] > Desired option > [X]
AE Mode
AE mode is the first option in the function menu. It determines where the camera gets its light from. Options include Program AE (camcorder automatically adjusts the aperture and shutter speed), Tv (shutter priority - you set the shutter speed value and the camcorder sets the aperture value), Av (aperture priority - you set the aperture value and the camcorder sets the shutter speed), and scene mode, as well as a more image-altering mode called “Cine,” which achieves a cinematic look. Program is the more typically automatic setting, and recommended for new users. In some situations, Av and Tv modes may be useful. Another option is SCN or scene mode: highlighting this mode and pressing the joystick (set) will bring up a menu of different recording situations such as “sports” or “sunset.” Unlike P, Tv, Av, and Cine, Selecting one of these scene modes also sets other options like white balance, preventing the user from controlling these options manually.Aperture refers to a variable iris which opens up and stops down, letting more or less light into the camera. It has a side effect of altering “depth of field” or “depth of focus,” that is, how far the range of in-focus objects extends towards and away from the camera. Aperture priority mode (Av) takes advantage of this: the user specifies an aperture value to use and the camera automatically makes up the difference of light using other variables. To use Av mode, select it using the joystick. Then press the joystick (set), which will summon a sub-menu in which to select your desired aperture. Selecting a smaller number (e.g. f/2.0) will reduce depth of field. A larger number (e.g. f/8.0) will increase it. The icon will blink if your selection is too extreme for the camera to make up the difference in light, and this should be avoided.
Shutter speed is a second variable which lets more or less light in, and shutter priority mode (Tv) mode works similarly. Any changes made on these AE options will be visible on the LCD screen, including depth of field changes and loss of light from extreme selections. For a fuller discussion of these modes, as well as cine and portrait modes, refer to the full manual available on the Media Loan web site.
HF 200: Open the joystick guide by pushing up on the joystick. Using the joystick, navigate to [Exposure]. Push the joystick to the left or right to adjust the exposure. Press the joystick in gently to set.
HF M500: [FUNC.] > [Rec. Programs > [TV Shutter-Pri. AE] > or [AV Aperture-Pri. AE] > [Left Arrow] or [Right Arrow] to set the desired shutter speed (TV) or aperture value (AV) > [X]
Image Stabilizer
When image stabilizer is set to “on,” the lens elements in the camera float freely. This is useful to dampen motion from hand-holding the camera. When attached to a tripod this setting should be off. When this setting is on, after panning on a tripod, the image will “jitter” back and forth as the elements settle. Because the tripod offers a steadied image already, make sure to turn this option off when tripod-mounted.HF M500: Press [HOME]. Other Settings > Camera Icon > [Image Stabilizer] > Desired IS mode > [X]. Dynamic - compensates for a higher degree of shake, such as when shooting when walking. Standard - Compensates for a lower degree of shake. Off - use when mounted on tripod.
Audio Recording Level
You may change the audio levels which get recorded to your sound track, whether recording with the built-in microphone or an external one. If the signal is too low, your audio track will be faint, and will lose quality as you boost volume during playback. If the signal is too high, your audio track will “clip,” having too much data to record at once, and sound garbled. The default setting adjusts this audio level automatically, but it may sometimes be necessary to override this.This setting is changed similarly to exposure compensation and manual focus. On the HF M300, it is the second button in the right column of the Function Menu. For the HF 200: Move the joystick up or down, while in recording mode, to access the joystick menu. Navigate (using the joystick) to the “Mic. Level” option. Pressing the joystick in (set), at this point, will change to manual control mode, which can be adjusted by moving the joystick to the left or right. Pressing the joystick in once more will toggle back to automatic level control. Refer to p. 76 of the full manual for more information.
Connections
The camera can be connected to external microphones, TVs, headphones, VCRs, and some computer monitors.
Supplied with the camera are a component video cable, as well as an RCA (red, white, and yellow) A/V cable. The camera also has a HDMI port which can connect to newer computer monitors, LCD TVs, and other newer A/V devices. Media Loan does not supply this cable.The AV/headphones port is used to connect to RCA devices (such as many TVs and VCRs) via the supplied AV-RCA cable. It can also be used to provide audio only as a standard headphone jack. Because this port also contains a video connection, the headphone/AV option must be set correctly (HF200: located in the fourth tab of the setup menu, HFM300: Third tab in the Main Menu). When using headphones, set it to headphones, and, when connecting via RCA, set it to AV. If headphones are inserted while on the AV setting, they will pick up video signal and output it as garbled noise. If the RCA cable is connected but the option is set to headphones, you will get no video signal.
Component video (red, green, and blue jacks) transmits with higher quality than the (yellow) RCA video jack. A cable is supplied, which plugs into the camera through the component out port.
External microphones can be connected via the microphone terminal. Different microphones can be used to achieve different audio pickup patterns as well as increased sensitivity and flexibility in placement. Media Loan carries compatible microphones.
Uploading/Saving Footage
Power camera off and connect it to a computer via the supplied USB cable, then power on the camera. The camera’s memory should appear as a drive, from which your footage files can be copied to your computer. Never remove the camera’s memory card when connected via USB, and remember to safely eject the device before disconnecting it when using Apple computers.PLEASE NOTE!: When recording in AVCHD format your footage cannot be retrieved by simply putting the SD card into your computer. The file structure must be retained in order to access footage. The only alternatives to the steps outlined above are to A) create a disc image of the sd card, or B) copy EVERY file on the card, retaining the folders and file order.