Creating KML Files
Introduction
This tutorial covers the basics of creating KML files. We will be using Google Earth to create KML files containing points, lines, and polygons, the three basic geometries involved in vector-based GIS.
Geometry types
A quick description of the basic geometry of GIS will be helpful.
There are three primary geometric types in most GIS applications.
Point
A point is a single 'spot' in space. It has no dimension, i.e. no length, width, or height. Points are typically defined by a set of coordinates, also known as a coordinate tuple. Two examples of coordinate sets include:
- (X, Y)
- (Longitude, Latitude)
- (X, Y, Z)
- (Longitude, Latitude, Altitude)
Further reading: Wikipedia: Point
Line
A line is built of points. A sequence of points will form a line, or linestring. For example:
- ((X, Y), (X, Y), (X, Y))
Further reading: Wikipedia: Line
Polygon
A polygon is similar to a line, except that its start and end points are the same. In effect, polygons are closed loops. Polygons form an area, and can have loops cut out of them.
Further reading: Wikipedia: Polygon
Install Google Earth
Skip this step if you already have Google Earth installed.
- Visit the Google Earth website to download the installer.
- Follow the install instructions particular to your Operating System.
- Launch Google Earth and proceed to the next section.
Zoom to an Area
Use the Navigation Controls or your mouse to zoom in to a location. If you are unfamiliar with navigation in Google Earth, take a moment to go through the Navigation in Google Earth tutorial.
Create map geometry
A placemark is a point, line, or polygon that is used to indicate a specific, or general, location. We will look at the general procedure to create any type of placemark (point, line, or polygon).
Type
First, choose the type of placemark you would like to add.
-
 Placemark (Point)
 -
 Path (Line)
 -
 Polygon
If you choose a Placemark (Point), you simply click once on the map to add your mark.
If you choose a Path or Polygon you will click multiple times along the geometry you wish to add. Polygons are closed by default, while paths are open. With the path or polygon tools you can either
- click multiple times to define regular geometry, or
- click and drag to define free-form geometry.
Example Usage
- Points are good to indicate singular locations such as an address point, fire hydrant, or other small feature.
- Lines are useful to indicate roads, rivers, trails, etc..
- Polygons can be used for features such as building footprints, wildlife areas, bodies of water, etc..
Geometry attributes
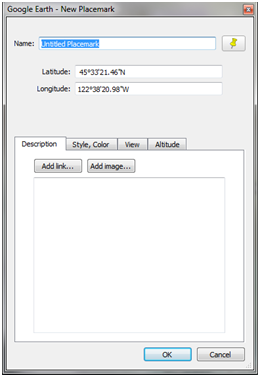
Once you begin adding geometry (a point, or points in a line or polygon), a dialogue box will appear. This dialogue box has several sections, depending on the geometry type you are creating.
Description
The description tab contains a large text area where you add notes about the geometry. Your description can be any length, and can contain some HTML tags, including accompanying styles (CSS), such as:
- Styles
- Font
- Size
- Color
- Tables (Table tag
)
- Images (Image tag <img ...>)
- Hyperlinks (Anchor tag <a ...>)
Style
You can change the display style for the geometry on the Style tab. Style attributes vary depending on the geometry type and include
- Marker style
- Line color
- Line width
- Fill color
Altitude
The Altitude tab enables you to
- declare the geometry altitude in several ways
- absolute
- relative to ground
- relative to sea floor
- clamp your geometry to the Earth's surface
- ground
- sea floor
Further reading: Google Earth: Setting altitude
Measurements
Lines and polygons have inherent measurements. The measurement tab allows you to see literal measurement values.
Line
- Distance
Polygon
- Perimeter
- Area
Exporting KML
OK, we've made it! We are this close ( -> | | <- ) to having a KML file.
Single Placemarker
To export a single placemarker as a KML file
- Click on the desired place
- On the top menu, click File > Save > Save Place As...
- Choose a location on disk
- Check the Filename
- Under Save as type select KML
- Click Save
Grouped Placemarkers
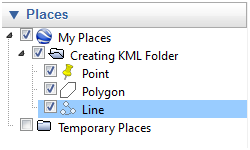
Create a folder
- Select My Places by clicking on it in the places sidebar
- On the top menu, click Add > Folder
- Name your folder and click OK
Drag and Drop Placemarkers
- Drag one or more placemarker geometries into the folder
- Select your folder by clicking on it
Export Folder as KML
- On the top menu, click File > Save > Save Place As...
- Choose a location on disk
- Check the Filename
- Under Save as type select KML
- Click Save
References

