Visualizing Microbial Seascapes - Intro to Photoshop
From Help Wiki
Scanning
- See step by step instructions: Scanning from a Macintosh
- Recommended scanning resolution for Zoetrope strips to Quicktime = 150dpi, for print = 300-600 dpi
- Opening a file File > Open and navigate to your file. Never open a file over the network (if your file is on Orca, first copy it to your local hard drive).
- Intro to basics Photoshop interface elements
- navigating an image
- Zoom: Cmd +/-
- Hand tool: Space Bar (used to move around an image)
Image size and resolution
- What is a pixel? Zoom all the way in on your image.
- What are the dimensions of your image?
- Go to Image > image Size to see the overall size in pixels of your image
- Resizing photos for various usages including: Web, email attachment, and print
- What is the resolution or pixel density of your image? Why does it matter? See more in discussion depth on resolution.
- Cropping - using the crop tool to remove portions of the image outside of the crop selection
- You can set the image size to crop to in the properties bar i.e. 400 px (remember the px)
Saving your work
File > Save as. Choose Photoshop as the file format. This will create a uncompressed Photoshop native image file format (.psd). It's a good idea to keep an uncompressed copy of your images.
Working with Layers
- Background layer is locked, you may need to copy it first before making adjustments
- Copying between layers and duplicating layers
- Layer visibility
- Adjustment layers - try adding a Levels adjustment to improve the contrast of your scanned image
Working with selections
- intro to selection tools: marquee, lasso, magic wand etc.
- Extract an object from the background
- adjusting selections
- copying selections to another layer
Animate your Zoetrope Strips into an animated GIF
Prep Your Image Sequence
- Scan the zoetrope strip. If you are working from a 3” x 36” 12 frame strip, you’ll need to make 4 scans to capture the entire strip. I recommend scanning at 150 dpi.
- Save each scan in a folder, numbered in the correct order, 1-4.
- In Photoshop, open the four images. Window > Arrange > 4 UP is a good view for this.
- If you need to make image adjustments, do that at this point.
- Try adding adjustment layers, start with levels and set black and white points.
- In 4-up view you can drag an adjustment layer to copy across documents.
- Try the Spot Healing tool to fix stray marks
- Once you've got your adjustment layers all dialed in Flatten the image by going Layer > Flatten Image
- Select the crop tool and straighten out and crop each of the four strip sections so they are the same height.
- From the crop tool settings choose Original Ratio and enter in a fixed value for the height that can be used across all images.
- Apply the Crop (Enter key) and move onto the next image, the crop settings will persist and can be reapplied
Break up the sequence into individual documents
- Select the marquee tool and set it for fixed aspect ratio, 450 x 450 pixels.
- Place the marquee over the first frame, line up the bottom left corner of the marquee with the bottom left corner of the frame. Copy it and paste it into a new photoshop document. #*Save the new document to a new folder, label the document “[title]001”.
- Repeat this action for all the frames in sequence, saving and labeling each new frame so you end up with images numbered from 001 to 012 in the new folder.
- Close all the images.
Open an image sequence
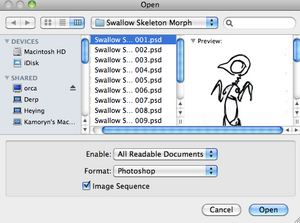
- Go File > Open and select the first image in your sequence
- Check the Image Sequence box and click Open
- Set your frame rate 10 or 12 fps should suffice
- Open the animation timeline in Window > Timeline
- From the timeline "hamburger" button choose Set Timeline Frame Rate to adjust frame rate if needed
Output an animated GIF
- In Photoshop CS 6 go File > Save for Web and Devices
- In Photoshop CC 2015 go File > Export > Save for Web (Legacy) ...
- Choose a GIF flavor from the Preset drop down menu
- note what happens to the file size and color table as you choose different GIF compression settings
- You should now be able to preview the animation in the lower right
- Set your Loop options - once or forever
- Click Save and name your animated gif file
- Open the animated GIF with a browser to view and test see how it turned out


