Difference between revisions of "Viewed Theme Setup - WordPress"
From Help Wiki
(Created page with "From your site's dashboard: ===Activate theme and dependent plugins=== #Activate theme: '''Appearance > Themes > Viewed''' and click '''Activate''' #Activate plugin: '''Plu...") |
m |
||
| (9 intermediate revisions by the same user not shown) | |||
| Line 1: | Line 1: | ||
| − | + | __NOTOC__ | |
| + | [[File:Wp-viewed-1.png|thumb| 300px|Set your permalinks]] | ||
| + | [[File:Wp-viewed-2.png|thumb|300px|Add a new gallery]] | ||
| + | [[File:Wp-viewed-3.png|thumb|300px|Add a new photo post]] | ||
| + | [[File:Wp-viewed-4.png|thumb|300px|Set your featured image]] | ||
| + | [[File:Wp-viewed-5.png|thumb|300px|Set the home page featured content]] | ||
| + | Please see the [http://blogs.evergreen.edu/viewedtheme/ demonstration site for the Viewed theme] | ||
| + | To get your WordPress site up and running with the Viewed Theme, from your site's dashboard: | ||
===Activate theme and dependent plugins=== | ===Activate theme and dependent plugins=== | ||
#Activate theme: '''Appearance > Themes > Viewed''' and click '''Activate''' | #Activate theme: '''Appearance > Themes > Viewed''' and click '''Activate''' | ||
#Activate plugin: '''Plugins > Options Framework''' and click '''Activate''' | #Activate plugin: '''Plugins > Options Framework''' and click '''Activate''' | ||
| + | |||
===Configure permalinks=== | ===Configure permalinks=== | ||
| Line 10: | Line 18: | ||
===Create an image gallery for the front page of site=== | ===Create an image gallery for the front page of site=== | ||
| − | Go Photos > Galleries | + | ====Create a gallery==== |
| + | #Go Photos > Galleries | ||
| + | #Add a new gallery by entering a Name and clicking '''Add New Gallery''' | ||
| + | |||
| + | ====Add Photo Posts to your Gallery==== | ||
| + | #Go Photos > Add New | ||
| + | #Title your post | ||
| + | #Choose a gallery to assign the photo to | ||
| + | #Click '''Set the featured image''' - this is where you will upload your image or choose from an image already uploaded to your media folder | ||
| + | #*Add Media file from your computer | ||
| + | #*Add a title for the image | ||
| + | #* Click '''Use as featured image''' and close out window | ||
| + | #Publish your post | ||
| + | |||
| + | ====Configure theme to display gallery on front page==== | ||
| + | #Go '''Appearance > Theme options > Featured Content''' | ||
| + | #Choose the Image Gallery you'd like to feature on the front page | ||
| + | #Click '''Save Options''' | ||
| − | === | + | ===Set widgets at top of page=== |
| − | + | #Go '''Appearance > Widgets''' | |
| + | #drag and drop available widgets into (to add) and away from (to remove) the '''Header Widget Area''' | ||
[[Category:Wordpress]] | [[Category:Wordpress]] | ||
Latest revision as of 14:56, 12 June 2013
Please see the demonstration site for the Viewed theme
To get your WordPress site up and running with the Viewed Theme, from your site's dashboard:
Activate theme and dependent plugins
- Activate theme: Appearance > Themes > Viewed and click Activate
- Activate plugin: Plugins > Options Framework and click Activate
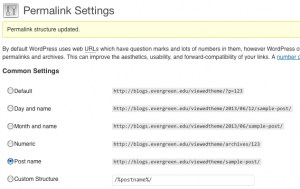
Configure permalinks
- Go Settings > Permalinks
- Choose Post name and hit Save changes
Create an image gallery for the front page of site
Create a gallery
- Go Photos > Galleries
- Add a new gallery by entering a Name and clicking Add New Gallery
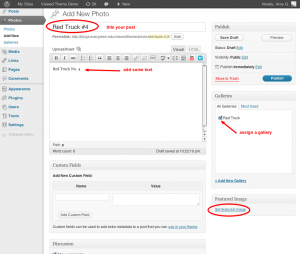
Add Photo Posts to your Gallery
- Go Photos > Add New
- Title your post
- Choose a gallery to assign the photo to
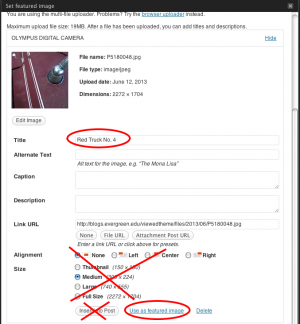
- Click Set the featured image - this is where you will upload your image or choose from an image already uploaded to your media folder
- Add Media file from your computer
- Add a title for the image
- Click Use as featured image and close out window
- Publish your post
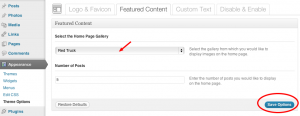
Configure theme to display gallery on front page
- Go Appearance > Theme options > Featured Content
- Choose the Image Gallery you'd like to feature on the front page
- Click Save Options
Set widgets at top of page
- Go Appearance > Widgets
- drag and drop available widgets into (to add) and away from (to remove) the Header Widget Area


