Difference between revisions of "Pentax 645Z Digital Medium Format Gear Guide"
(→QUICK EXPOSURE GUIDE) |
|||
| (19 intermediate revisions by 3 users not shown) | |||
| Line 1: | Line 1: | ||
| − | {{ | + | {{Media Loan Covid Message}} |
| − | + | ||
| − | + | ||
| − | + | ||
| − | + | ||
| − | + | ||
| − | + | ||
| − | + | ||
| − | + | ||
| − | + | ||
| − | + | ||
| − | + | ||
| − | + | ||
| − | + | ||
| − | + | ||
| − | + | ||
| − | + | ||
| − | + | ||
| − | + | ||
| − | + | ||
| − | + | ||
| − | + | ||
| − | + | ||
| − | + | ||
| − | + | ||
| − | + | ||
| + | <div class="container-fluid"> | ||
| + | <div class="row"> | ||
| + | <div class="col-md-8"> | ||
| + | <div class="lead"> | ||
| + | <div class="lead">[[File:Media Loan Logo.png|left|frameless|90x90px]]The highest quality camera available at Media Loan. </div> | ||
| + | <div class="pull-right"></div> | ||
| + | {{#ev:vimeo|156335553|750|center}} | ||
| + | </div> | ||
| + | [[file:IMG 0125.jpeg|thumb|350x350px]] | ||
| + | [[file:IMG 0130.jpg|thumb|350x350px]] | ||
| + | ==OVERVIEW== | ||
| + | The Pentax 645Z is a digital medium format camera. It is equipped with a 51.4MP censor, which was designed without an anti-aliasing filter to maximize sharpness and details. Its wide ISO range provides low noise, low light capability, and the image processor allows for fast image capture. | ||
| + | It is the only one of its kind at Media Loan, and access to it is very limited. Only certain approved photography classes are permitted to use it. A proficiency test is required to use it, after users obtained their DSLR camera and 6D Digital camera. | ||
===MEDIUM FORMAT=== | ===MEDIUM FORMAT=== | ||
| Line 38: | Line 26: | ||
Medium format cameras also have no perspective distortion - images taken more closely resemble the way the human eye sees the real world. The field of view is much wider than other cameras with standard cropped sensors. Let's say you're shooting on a 6x7 medium format camera with a 50mm lens. If you compare your images to a 35mm camera (also with a 50mm lens), the field of view will be different. The medium format pictures will actually see what a 24mm lens on a 35mm camera would see. Simply put: the larger the format, the wider angle your lenses become. You can shoot a wide scene but it will have the "real-world" look of a lens with a longer focal length. The subject remains proportional and not "stretched-out". | Medium format cameras also have no perspective distortion - images taken more closely resemble the way the human eye sees the real world. The field of view is much wider than other cameras with standard cropped sensors. Let's say you're shooting on a 6x7 medium format camera with a 50mm lens. If you compare your images to a 35mm camera (also with a 50mm lens), the field of view will be different. The medium format pictures will actually see what a 24mm lens on a 35mm camera would see. Simply put: the larger the format, the wider angle your lenses become. You can shoot a wide scene but it will have the "real-world" look of a lens with a longer focal length. The subject remains proportional and not "stretched-out". | ||
| − | ==SPECIFICATIONS== | + | ===SPECIFICATIONS=== |
'''Sensor'''<br /> | '''Sensor'''<br /> | ||
43.8 x 32.8 mm CMOS | 43.8 x 32.8 mm CMOS | ||
| Line 64: | Line 52: | ||
'''Lens Mount'''<br /> | '''Lens Mount'''<br /> | ||
Pentax 645AF2 | Pentax 645AF2 | ||
| − | |||
| − | |||
| − | |||
'''Shutter Speeds'''<br /> | '''Shutter Speeds'''<br /> | ||
| Line 72: | Line 57: | ||
Manual: 1/4000 to 30 sec.<br /> | Manual: 1/4000 to 30 sec.<br /> | ||
Bulb | Bulb | ||
| − | |||
| − | |||
| − | |||
| − | |||
| − | |||
| − | |||
| − | |||
| − | |||
| − | |||
'''Burst Rate'''<br /> | '''Burst Rate'''<br /> | ||
| Line 86: | Line 62: | ||
RAW: up to 10 frames<br /> | RAW: up to 10 frames<br /> | ||
TIFF: up to 12 frames | TIFF: up to 12 frames | ||
| − | |||
| − | |||
| − | |||
'''ISO Sensitivity'''<br /> | '''ISO Sensitivity'''<br /> | ||
100 – 204,800 | 100 – 204,800 | ||
| − | |||
==KIT CONTENTS== | ==KIT CONTENTS== | ||
| + | [[file:pentax_front.png|300px|thumb|right|Pentax Front Parts]] | ||
| + | [[file:pentax_back.jpg|300px|thumb|right|Pentax Back Parts]] | ||
| + | [[file:pentax_bottom.jpg|300px|thumb|right|Pentax Bottom Parts]] | ||
*Pentax 645Z Digital Medium Format Camera<br /> | *Pentax 645Z Digital Medium Format Camera<br /> | ||
*Batteries (2)<br /> | *Batteries (2)<br /> | ||
| Line 101: | Line 76: | ||
*Lens Hoods (2, Metal & Silicon)<br /> | *Lens Hoods (2, Metal & Silicon)<br /> | ||
*Battery Charger | *Battery Charger | ||
| − | + | ==How to Use It== | |
| − | == | + | ===PARTS=== |
| − | + | ====DIOPTER==== | |
| − | + | ||
| − | === | + | |
| − | + | ||
| − | + | ||
| − | + | ||
| − | + | ||
| − | + | ||
| − | + | ||
| − | + | ||
| − | + | ||
| − | + | ||
| − | + | ||
| − | + | ||
| − | + | ||
| − | + | ||
| − | + | ||
| − | + | ||
| − | == | + | |
| − | === | + | |
The diopter focuses the viewfinder to your individual eyesight to ensure that you obtain proper focus. '''YOU MUST PROPERLY ADJUST THE DIOPTER BEFORE FOCUSING WITH THE LENS.''' Also adjust the diopter for very operator.<br /> | The diopter focuses the viewfinder to your individual eyesight to ensure that you obtain proper focus. '''YOU MUST PROPERLY ADJUST THE DIOPTER BEFORE FOCUSING WITH THE LENS.''' Also adjust the diopter for very operator.<br /> | ||
| Line 131: | Line 87: | ||
# Turn the diopter adjustment ring until the focusing brackets in the viewfinder are in focus. Turn the ring clockwise for a negative value and counterclockwise for a positive value. | # Turn the diopter adjustment ring until the focusing brackets in the viewfinder are in focus. Turn the ring clockwise for a negative value and counterclockwise for a positive value. | ||
| − | === | + | ====MONITOR==== |
This monitor can be tilted to viewing preference. | This monitor can be tilted to viewing preference. | ||
# Hold the camera in one hand and the top of the monitor with the other. | # Hold the camera in one hand and the top of the monitor with the other. | ||
| Line 138: | Line 94: | ||
# Adjust the angle accordingly | # Adjust the angle accordingly | ||
| − | ===EXTERIOR CONTROLS=== | + | ====EXTERIOR CONTROLS==== |
| − | Click images to enlarge.<br /> | + | Click images to enlarge.<br />[[File:Pentax_controls_front.png|right|400x400px]][[File:Pentax_controls_back.png|right|400x400px]] |
| − | + | ||
| − | [[ | + | |
| − | [[ | + | |
# '''Shutter Release''' | # '''Shutter Release''' | ||
# '''ISO''' | # '''ISO''' | ||
| Line 171: | Line 124: | ||
# '''MENU''' | # '''MENU''' | ||
# '''Playback''' | # '''Playback''' | ||
| − | |||
====FOUR-WAY CONTROLLER==== | ====FOUR-WAY CONTROLLER==== | ||
| Line 181: | Line 133: | ||
*'''Left:''' White Balance | *'''Left:''' White Balance | ||
| − | ===INFO BUTTON=== | + | ====INFO BUTTON==== |
| − | In Standby or Live View, press the INFO button to access various camera settings, such as: | + | In '''Standby''' or '''Live View''', press the '''INFO''' button to access various camera settings, such as: |
| − | * Highlight Correction | + | * '''Highlight Correction:''' reduces occurence of overexposure. |
| − | * Shadow Correction | + | * '''Shadow Correction:''' reduces occurence of underexposure. |
| − | * Distortion Correction | + | * '''Distortion Correction:''' reduces distortion due to lens properties. |
| − | * Lat-Chromatic-Ab Adjustment | + | * '''Lat-Chromatic-Ab Adjustment:''' reduces lateral chromatic abberations due to lens properties. |
| − | * Peripheral Illumination Correction | + | * '''Peripheral Illumination Correction:''' reduces peripheral light fall-off occurring due to lens properties. |
| − | * Diffraction Correction | + | * '''Diffraction Correction:''' corrects the diffraction when the aperture is small. |
| − | * HDR | + | * '''HDR:''' takes three consecutive images at three different exposure levels to create a single composite picture. |
| − | * Memory card options | + | * '''Memory card options:''' selects one of the two inserted memory card (Media Loan only provides one). |
| − | * File format options | + | * '''File format options:''' change the file format. |
| − | * JPEG Resolutions | + | * '''JPEG Resolutions:''' change the JPEG resolution. |
| − | * Noise Reduction | + | * '''Noise Reduction:''' High-ISO NR sets the noise reduction setting when shooting with a high ISO. Slow Shutter Speed NR sets how the noise reduction setting functions during long exposures. |
| − | * AF Area | + | * '''AF Area:''' set the auto-focus area. |
| − | * Focus Peaking (only when Live View is activated)<br /> | + | * '''Focus Peaking (only when Live View is activated):''' emphasizes (sharpens) the outline of the subject in focus to make it easier to check for proper focus<br /> |
| − | |||
| − | ===MENU BUTTON=== | + | Press '''INFO''' again to exit screen. |
| + | |||
| + | Now that you are in viewing mode, press '''INFO''' button to be given the option to select a preferred display screen: | ||
| + | * Status Screen | ||
| + | * Electronic Level | ||
| + | * Display Off | ||
| + | |||
| + | ====MENU BUTTON==== | ||
Press the MENU button to change camera settings. Use the '''Four-Way Controller, Front e-dial''' and '''Rear e-dial''' to navigate. | Press the MENU button to change camera settings. Use the '''Four-Way Controller, Front e-dial''' and '''Rear e-dial''' to navigate. | ||
* Camera tabs: Here you can adjust settings such as memory card options, HDR, Preview settings, button customization, etc. | * Camera tabs: Here you can adjust settings such as memory card options, HDR, Preview settings, button customization, etc. | ||
| Line 206: | Line 164: | ||
* Wrench tabs: Make system adjustments such as date/time, LCD display options, etc. Also use to format memory cards. '''Always format the memory cards prior to return at Media Loan.''' | * Wrench tabs: Make system adjustments such as date/time, LCD display options, etc. Also use to format memory cards. '''Always format the memory cards prior to return at Media Loan.''' | ||
| − | ==LENS ATTACHMENT== | + | ===LENS ATTACHMENT=== |
# Make sure the camera is off. | # Make sure the camera is off. | ||
# Remove the body mount cap. Press down the '''Lens Unlock''' button (3) and remove cap. | # Remove the body mount cap. Press down the '''Lens Unlock''' button (3) and remove cap. | ||
| Line 214: | Line 172: | ||
'''To remove:''' Turn the lens counterclockwise while holding down the lens unlock button. | '''To remove:''' Turn the lens counterclockwise while holding down the lens unlock button. | ||
| − | ==QUICK EXPOSURE GUIDE== | + | ===QUICK EXPOSURE GUIDE=== |
There are many ways to change you exposure settings (shutter speed, aperture, ISO) with this camera. Use the below guide as a quick reference to control these settings. These can be used with or without '''Live View''' activated. | There are many ways to change you exposure settings (shutter speed, aperture, ISO) with this camera. Use the below guide as a quick reference to control these settings. These can be used with or without '''Live View''' activated. | ||
* Shutter Speed: '''Front e-dial'''<br /> | * Shutter Speed: '''Front e-dial'''<br /> | ||
| Line 223: | Line 181: | ||
'''Note:''' with the included lenses, the aperture can be changed on the aperture ring. To enable aperture manipulation in the camera, you must set the ring to A. To do this, press the button on the aperture ring and turn the ring to the green A position. | '''Note:''' with the included lenses, the aperture can be changed on the aperture ring. To enable aperture manipulation in the camera, you must set the ring to A. To do this, press the button on the aperture ring and turn the ring to the green A position. | ||
| − | ==AUTO-FOCUS== | + | ===AUTO-FOCUS=== |
'''Auto-Focus (AF) cannot be used with the 120mm lens included in the kit.''' To enable AF with the 75mm prime, turn the switch on the lens from MF (manual focus) to AF. | '''Auto-Focus (AF) cannot be used with the 120mm lens included in the kit.''' To enable AF with the 75mm prime, turn the switch on the lens from MF (manual focus) to AF. | ||
* To engage auto-focus, depress the '''Shutter Release''' halfway until the lens is done focusing. You can also use the '''AF button''' to auto-focus. | * To engage auto-focus, depress the '''Shutter Release''' halfway until the lens is done focusing. You can also use the '''AF button''' to auto-focus. | ||
| Line 229: | Line 187: | ||
* To change the position of the auto-focus without changing the AF area, press the '''AF Point Change''' button in Stand-by Mode and use the '''Four-Way Controller buttons'''. Press the '''AF Point Change''' button again to exit. | * To change the position of the auto-focus without changing the AF area, press the '''AF Point Change''' button in Stand-by Mode and use the '''Four-Way Controller buttons'''. Press the '''AF Point Change''' button again to exit. | ||
| − | ==FOCUS PEAKING== | + | ===FOCUS PEAKING=== |
When Focus Peaking is on, the outline of the subject in focus is emphasized (sharpened). This makes it easier to check the focus. Focus peaking works in both AF and MF modes. To turn on focus peaking, press the INFO button and navigate to "Focus Peaking" when Live View is activated. | When Focus Peaking is on, the outline of the subject in focus is emphasized (sharpened). This makes it easier to check the focus. Focus peaking works in both AF and MF modes. To turn on focus peaking, press the INFO button and navigate to "Focus Peaking" when Live View is activated. | ||
| − | ==WHITE BALANCE== | + | ===WHITE BALANCE=== |
This camera has multiple white balance presets. <br /> | This camera has multiple white balance presets. <br /> | ||
To change the white balance setting: | To change the white balance setting: | ||
| Line 242: | Line 200: | ||
Press '''INFO''' when in white balance to pull up the fine-tuning menu. You can adjust Green-Magenta with the top/bottom controller buttons, or Blue-amber with the left and right controller buttons. The '''Green''' button resets the adjustment value to default. Press OK when done. | Press '''INFO''' when in white balance to pull up the fine-tuning menu. You can adjust Green-Magenta with the top/bottom controller buttons, or Blue-amber with the left and right controller buttons. The '''Green''' button resets the adjustment value to default. Press OK when done. | ||
| − | ====CUSTOM WHITE BALANCE==== | + | =====CUSTOM WHITE BALANCE===== |
It is recommended to use custom white balance on any DSLR camera. The preset white balance options may come in handy, but only by setting a custom white balance can you be sure that the colors in your images will be accurate.<br /> | It is recommended to use custom white balance on any DSLR camera. The preset white balance options may come in handy, but only by setting a custom white balance can you be sure that the colors in your images will be accurate.<br /> | ||
| Line 249: | Line 207: | ||
# Push the '''Main Switch''' to the '''Preview''' selection. This will set your custom white balance using the white reference within the frame. | # Push the '''Main Switch''' to the '''Preview''' selection. This will set your custom white balance using the white reference within the frame. | ||
| − | ==CUSTOM IMAGE== | + | ===CUSTOM IMAGE=== |
You can utilize this feature to change the desired picture style with different colors. If you do not want the camera to change the color of your images, set this to "Natural" (no color manipulation). | You can utilize this feature to change the desired picture style with different colors. If you do not want the camera to change the color of your images, set this to "Natural" (no color manipulation). | ||
| Line 258: | Line 216: | ||
# Press '''OK'''. | # Press '''OK'''. | ||
| − | ==EXPOSURE MODES== | + | ===EXPOSURE MODES=== |
This camera has many exposure mode options. The recommended exposure mode for the majority of photography is '''M (Manual)'''. P, Sv, Tv, Av, and TAv are all semi-automatic exposure modes and, when engaged, the camera will make certain exposure decisions for you (refer to chart below).<br /> | This camera has many exposure mode options. The recommended exposure mode for the majority of photography is '''M (Manual)'''. P, Sv, Tv, Av, and TAv are all semi-automatic exposure modes and, when engaged, the camera will make certain exposure decisions for you (refer to chart below).<br /> | ||
| Line 265: | Line 223: | ||
[[file:exposure_modes.png|900px]] | [[file:exposure_modes.png|900px]] | ||
| − | ==DRIVE MODES== | + | ===DRIVE MODES=== |
The '''Drive Mode''' refers to the capturing mode that images are taken. This camera has many different drive modes. Use the chart below to select your desired drive mode.<br /> | The '''Drive Mode''' refers to the capturing mode that images are taken. This camera has many different drive modes. Use the chart below to select your desired drive mode.<br /> | ||
| Line 272: | Line 230: | ||
[[file:drive_modes.png|500px]] | [[file:drive_modes.png|500px]] | ||
| − | ==METERING MODES== | + | ===METERING MODES=== |
'''Metering''' refers to the built-in light meter in the camera. The light meter determines the amount of light coming into the lens. The Pentax 645Z has multiple metering modes. Use the chart below to select your desired metering mode.<br /> | '''Metering''' refers to the built-in light meter in the camera. The light meter determines the amount of light coming into the lens. The Pentax 645Z has multiple metering modes. Use the chart below to select your desired metering mode.<br /> | ||
| Line 278: | Line 236: | ||
[[file:Metering.png]] | [[file:Metering.png]] | ||
| + | ==Troubleshooting== | ||
| + | |||
| + | See [[Troubleshooting Media Equipment]] Guide for general information. | ||
| + | |||
| + | ==Similar Models at Media Loan== | ||
| + | |||
| + | This is more advanced than our other DSLRs like the Canon 6D and Canon Rebel T6i. You need to be proficient in those cameras before getting to become proficient and use the Pentax 645Z | ||
| + | |||
| + | <!-- Technical note for source editors: end col-md-8 --> | ||
| + | </div> | ||
| + | |||
| + | <div class="col-md-1"></div> | ||
| + | |||
| + | <div class="col-md-3 sidebar"> | ||
| + | |||
| + | {{APS Proficiency Information | ||
| + | |||
| + | |Testlink= [https://helpwiki.evergreen.edu/wiki/index.php/Pentax_645Z_Medium_Format_Proficiency_Test Pentax 645Z Proficiency Test] | ||
| + | |||
| + | }} | ||
| + | |||
| + | <!--GA Proficiency Information is the template for the top of the side bar. There is also one for APS called APS Proficiency Information. To edit the proficiency test link, "edit source" for this page for for the keyword "Testlink"--> | ||
| + | |||
| + | {{Precautions, Help, and Other Wikis for all Media Loan Gear | ||
| + | |||
| + | |Exceptions= | ||
| + | |||
| + | *'''For This Gear Specifically''' | ||
| + | **Don't attempt to clean sensitive parts of this camera, such as the mirror and sensor, yourself. If these need to be cleaned, please bring them to Media Loan so that we may assist you. | ||
| + | **Don't point towards the sun | ||
| + | **Don't expose to extreme weather conditions | ||
| + | **Don't store/use in extreme temperatures | ||
| + | **Don't store near corrosive chemicals | ||
| + | **Don't clean the censor or mirror yourself | ||
| + | **Don't use a blow dryer to blow dust from the camera | ||
| + | **Don't use excessive force | ||
| + | **Don't leave unattended | ||
| + | **Don't leave camera near a strong magnetic field | ||
| + | **Don't submerge this camera in water | ||
| + | }} | ||
| + | |||
| + | <!--Precautions, Help, and Other Wikis for all Media Loan Gear is the template for the bottom of the sidebar. To edit the precautions for this gear specifically, "edit source" for this page for the keyword "Exceptions". be sure to write in the title for the exceptions similar to the title for what they all have.--> | ||
| + | |||
| + | <!-- Technical note for source editors: end col-md-3--> | ||
| + | |||
| + | </div> | ||
| + | |||
| + | <!-- Technical note for source editors: end row--> | ||
| + | </div> | ||
| + | |||
| + | <!-- Technical note for source editors: end container--> | ||
| + | </div> | ||
| + | |||
| + | <!-- Technical note for source editors: Generator=Template:TwoColumn -->__NOEDITSECTION__ | ||
| + | |||
| + | [[category:APS Gear Guides]] | ||
Latest revision as of 11:28, 24 August 2023
Contents
OVERVIEW
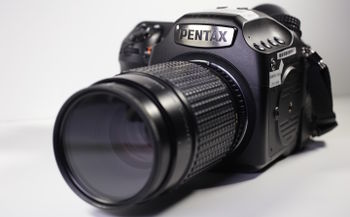
The Pentax 645Z is a digital medium format camera. It is equipped with a 51.4MP censor, which was designed without an anti-aliasing filter to maximize sharpness and details. Its wide ISO range provides low noise, low light capability, and the image processor allows for fast image capture.
It is the only one of its kind at Media Loan, and access to it is very limited. Only certain approved photography classes are permitted to use it. A proficiency test is required to use it, after users obtained their DSLR camera and 6D Digital camera.
MEDIUM FORMAT
Simply put, a medium format camera has a larger sensor than other standard DSLR cameras. A bigger sensor means bigger pixel size, which means better quality. The Pentax 645Z has 3-4x more frame surface than sensors equipped on Canon Rebel DSLRs, which means stills taken with the Pentax can be enlarged significantly without losing quality.
Medium format cameras also have no perspective distortion - images taken more closely resemble the way the human eye sees the real world. The field of view is much wider than other cameras with standard cropped sensors. Let's say you're shooting on a 6x7 medium format camera with a 50mm lens. If you compare your images to a 35mm camera (also with a 50mm lens), the field of view will be different. The medium format pictures will actually see what a 24mm lens on a 35mm camera would see. Simply put: the larger the format, the wider angle your lenses become. You can shoot a wide scene but it will have the "real-world" look of a lens with a longer focal length. The subject remains proportional and not "stretched-out".
SPECIFICATIONS
Sensor
43.8 x 32.8 mm CMOS
Color Depth
JPEG: 8 bits/channel
RAW: 14 bits/channel
Effective Pixels / Total Pixels
51.4MP / 52.99MP
File Formats
Stills: RAW (PEF/DNG), TIFF, JPEG (Exif 2.30), DCF2.0 compliant
Video: MPEG-4 AVC/H.264 (MOV) *Motion JPEG (AVI) for Interval Movie Record
Image Resolution
JPEG: L (51M: 8256 x 6192), M (36M: 6912 x 5184), S (21M: 5376 x 4032), XS (3M:1920 x 1440)
RAW: L (51M: 8256 x 6192)
TIFF: L (51M: 8256 x 6192)
Video Resolution
Full HD: (1920x1080, 60i/50i/30p/25p/24p)
HD: (1280x720, 60p/50p/30p/25p/24p)
Lens Mount
Pentax 645AF2
Shutter Speeds
Auto: 1/4000 to 30 sec.
Manual: 1/4000 to 30 sec.
Bulb
Burst Rate
3 fps, JPEG: up to 30 frames
RAW: up to 10 frames
TIFF: up to 12 frames
ISO Sensitivity
100 – 204,800
KIT CONTENTS
- Pentax 645Z Digital Medium Format Camera
- Batteries (2)
- 128GB Memory Card
- SMC Pentax-FA 645 1:2.8 75mm Prime Lens
- SMC Pentax-A 645 1:4 120mm Macro Lens
- Lens Hoods (2, Metal & Silicon)
- Battery Charger
How to Use It
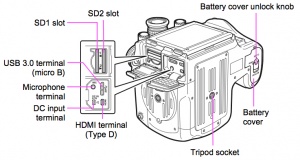
PARTS
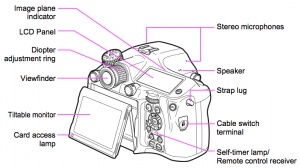
DIOPTER
The diopter focuses the viewfinder to your individual eyesight to ensure that you obtain proper focus. YOU MUST PROPERLY ADJUST THE DIOPTER BEFORE FOCUSING WITH THE LENS. Also adjust the diopter for very operator.
To adjust the diopter:
- Ensure no lens is attached (you may confuse the focus of the lens with the focus of the viewfinder)
- Point the camera at a bright object, but NOT THE SUN
- Look through the viewfinder
- Turn the diopter adjustment ring until the focusing brackets in the viewfinder are in focus. Turn the ring clockwise for a negative value and counterclockwise for a positive value.
MONITOR
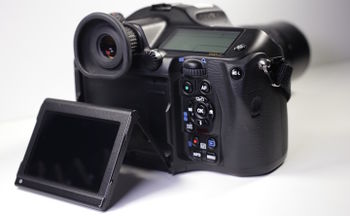
This monitor can be tilted to viewing preference.
- Hold the camera in one hand and the top of the monitor with the other.
- Slowly lower until it stops
- Hold the monitor to lift it upward
- Adjust the angle accordingly
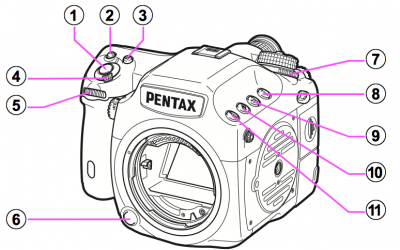
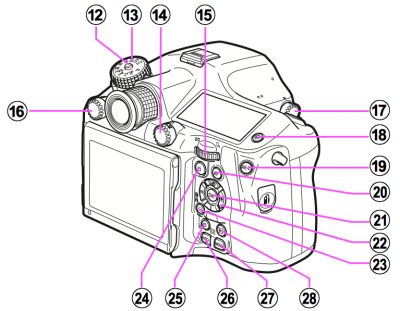
EXTERIOR CONTROLS
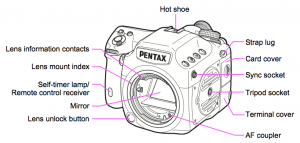
Click images to enlarge.- Shutter Release
- ISO
- EV Compensation
- Main switch: Move to turn the power on/off. The symbol of the right is Depth of Field Preview, and will display accurate focusing depending on aperture in the viewfinder.
- Front e-dial: Changes the values for camera settings such as exposure; switch menu categories; image selection
- Lens unlock: Press to detach the lens
- Metering Mode Dial: Changes the metering mode
- Lock: Temporarily disables e-dial and button operation
- AF (auto-focus) Area: Press to change the AF point
- Exposure Bracketing
- RAW/Fx: You can assign a function to this button
- Mode Dial Lock
- Mode Dial: Changes the exposure mode
- Stills/Movie Switch Dial: Switchings between still capture and move recording modes
- Rear e-dial: Changes the values to camera settings such as exposure; switch menu tabs; change camera settings; magnify images
- AF Mode Dial: Switches AF modes (AF.S/C)
- Mirror Up Dial: Enables shooting with the mirror raised
- Illumination: Illuminates LCD panel
- AE Lock: Locks exposure value; saves JPEG to RAW
- AF: Available for adjusting focus, instead of pressing shutter release halfway
- OK
- Four-way Controller: Displays the Drive Mode, Flash Mode, White Balance or Custom Image setup menu; move cursor or selected list item
- AF Point Change/Card Slow Switch: Press to enable changing AF point; switch memory cards in playback mode
- Green: Reset the values being adjusted; switches to ISO AUTO
- Live View/REC/Delete: Displays Live View image on monitor; stars/stops recording in movie move; delete images during playback
- INFO: Changes style of display on monitor
- MENU
- Playback
FOUR-WAY CONTROLLER
The Four-way Controller (22) is the main way to access major settings. Pressing the buttons on the Four-Way Controller will activate the following:
- Top: Drive Modes
- Bottom: Flash Modes
- Right: Custom Image
- Left: White Balance
INFO BUTTON
In Standby or Live View, press the INFO button to access various camera settings, such as:
- Highlight Correction: reduces occurence of overexposure.
- Shadow Correction: reduces occurence of underexposure.
- Distortion Correction: reduces distortion due to lens properties.
- Lat-Chromatic-Ab Adjustment: reduces lateral chromatic abberations due to lens properties.
- Peripheral Illumination Correction: reduces peripheral light fall-off occurring due to lens properties.
- Diffraction Correction: corrects the diffraction when the aperture is small.
- HDR: takes three consecutive images at three different exposure levels to create a single composite picture.
- Memory card options: selects one of the two inserted memory card (Media Loan only provides one).
- File format options: change the file format.
- JPEG Resolutions: change the JPEG resolution.
- Noise Reduction: High-ISO NR sets the noise reduction setting when shooting with a high ISO. Slow Shutter Speed NR sets how the noise reduction setting functions during long exposures.
- AF Area: set the auto-focus area.
- Focus Peaking (only when Live View is activated): emphasizes (sharpens) the outline of the subject in focus to make it easier to check for proper focus
Press INFO again to exit screen.
Now that you are in viewing mode, press INFO button to be given the option to select a preferred display screen:
- Status Screen
- Electronic Level
- Display Off
MENU BUTTON
Press the MENU button to change camera settings. Use the Four-Way Controller, Front e-dial and Rear e-dial to navigate.
- Camera tabs: Here you can adjust settings such as memory card options, HDR, Preview settings, button customization, etc.
- Video tab: Adjust movie capture settings, video exposure settings, etc.
- Playback tab: Adjust image display options in playback mode
- Wrench tabs: Make system adjustments such as date/time, LCD display options, etc. Also use to format memory cards. Always format the memory cards prior to return at Media Loan.
LENS ATTACHMENT
- Make sure the camera is off.
- Remove the body mount cap. Press down the Lens Unlock button (3) and remove cap.
- Align the lens mount index (red dots) on the body and lens, and turn the lens clockwise. Do not press the lens unlock at this time.
To remove: Turn the lens counterclockwise while holding down the lens unlock button.
QUICK EXPOSURE GUIDE
There are many ways to change you exposure settings (shutter speed, aperture, ISO) with this camera. Use the below guide as a quick reference to control these settings. These can be used with or without Live View activated.
- Shutter Speed: Front e-dial
- Aperture: Rear e-dial
- ISO: Press the ISO button, then adjust with Rear e-dial
Note: with the included lenses, the aperture can be changed on the aperture ring. To enable aperture manipulation in the camera, you must set the ring to A. To do this, press the button on the aperture ring and turn the ring to the green A position.
AUTO-FOCUS
Auto-Focus (AF) cannot be used with the 120mm lens included in the kit. To enable AF with the 75mm prime, turn the switch on the lens from MF (manual focus) to AF.
- To engage auto-focus, depress the Shutter Release halfway until the lens is done focusing. You can also use the AF button to auto-focus.
- To change the area in which the camera is auto-focusing, hold down the AF Area button during Stand-by Mode (Live View deactivated) and scroll through the options with the Rear e-dial. Release, and use the Four-Way Controller buttons to change the position of the auto-focus area with the selected AF setting.
- To change the position of the auto-focus without changing the AF area, press the AF Point Change button in Stand-by Mode and use the Four-Way Controller buttons. Press the AF Point Change button again to exit.
FOCUS PEAKING
When Focus Peaking is on, the outline of the subject in focus is emphasized (sharpened). This makes it easier to check the focus. Focus peaking works in both AF and MF modes. To turn on focus peaking, press the INFO button and navigate to "Focus Peaking" when Live View is activated.
WHITE BALANCE
This camera has multiple white balance presets.
To change the white balance setting:
- Press the left button on the Four-Way Controller. The White Balance setting screen will appear on the monitor.
- Select your White Balance. The different preset settings have various options.
Fine-tuning presets:
Press INFO when in white balance to pull up the fine-tuning menu. You can adjust Green-Magenta with the top/bottom controller buttons, or Blue-amber with the left and right controller buttons. The Green button resets the adjustment value to default. Press OK when done.
CUSTOM WHITE BALANCE
It is recommended to use custom white balance on any DSLR camera. The preset white balance options may come in handy, but only by setting a custom white balance can you be sure that the colors in your images will be accurate.
- With the camera on, fill the frame with a completely white object (such as a piece of paper) in the desired lighting.
- Access the white balance options as described above, and navigate to Custom.
- Push the Main Switch to the Preview selection. This will set your custom white balance using the white reference within the frame.
CUSTOM IMAGE
You can utilize this feature to change the desired picture style with different colors. If you do not want the camera to change the color of your images, set this to "Natural" (no color manipulation).
- Press the right button on the Four-Way Controller to pull up the Custom Image setting screen.
- Select the desired tone. Scroll through controller buttons to view options. You can engage the PREVIEW button to preview the background image with selected effect.
- Press INFO to pull up the parameter setting screen.
- Set the parameters. The top/bottom controller buttons selects parameter, the left/right controller buttons adjust the value, the Front e-dial switches contrast, the Rear e-dial switches sharpness, and the Green button resets the adjustment value to default.
- Press OK.
EXPOSURE MODES
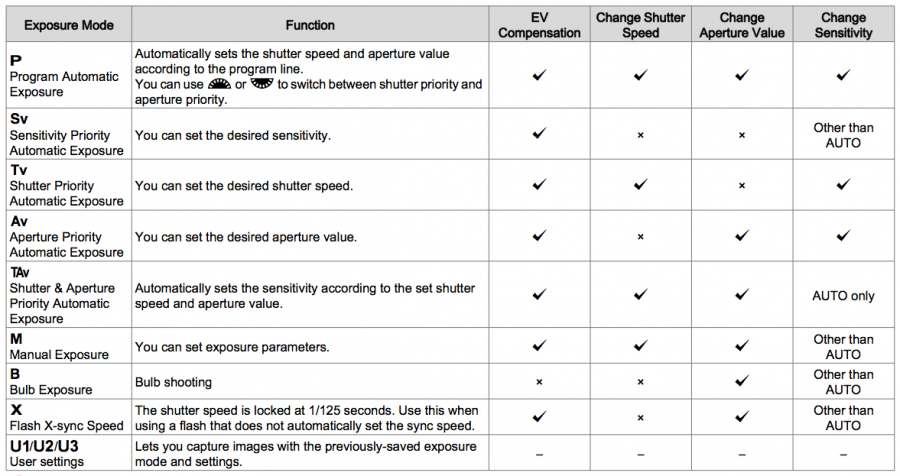
This camera has many exposure mode options. The recommended exposure mode for the majority of photography is M (Manual). P, Sv, Tv, Av, and TAv are all semi-automatic exposure modes and, when engaged, the camera will make certain exposure decisions for you (refer to chart below).
Use the Mode Dial to change the exposure mode setting.
DRIVE MODES
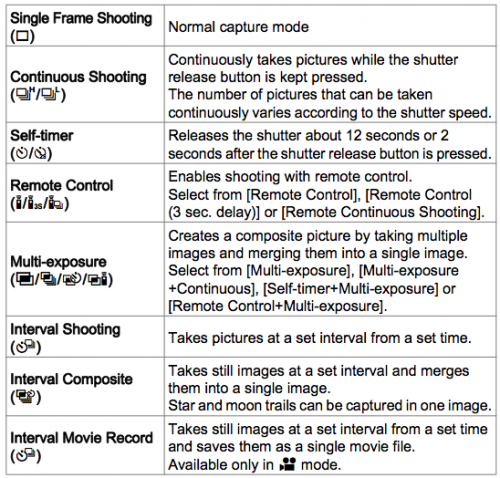
The Drive Mode refers to the capturing mode that images are taken. This camera has many different drive modes. Use the chart below to select your desired drive mode.
To change the drive mode, press the top button on the Four-way Controller and make your selection.
METERING MODES
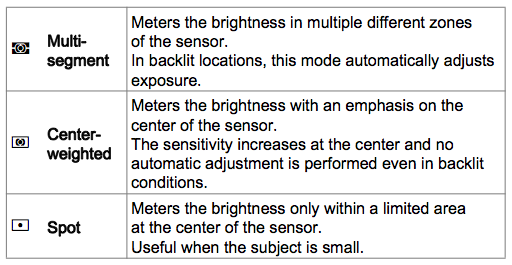
Metering refers to the built-in light meter in the camera. The light meter determines the amount of light coming into the lens. The Pentax 645Z has multiple metering modes. Use the chart below to select your desired metering mode.
Use the Metering Mode Dial, located near the Mode Dial, to switch between the three metering modes.
Troubleshooting
See Troubleshooting Media Equipment Guide for general information.
Similar Models at Media Loan
This is more advanced than our other DSLRs like the Canon 6D and Canon Rebel T6i. You need to be proficient in those cameras before getting to become proficient and use the Pentax 645Z


