Difference between revisions of "Mac OS X Fonts"
Cc alvina01 (Talk | contribs) |
m |
||
| (One intermediate revision by one other user not shown) | |||
| Line 2: | Line 2: | ||
In order to use a typeface or fonts in your document, it must be “installed” on the computer you’re working on. With Mac OSX fonts live can live in either of two locations; the local users’s fonts folder or the system’s fonts folder. | In order to use a typeface or fonts in your document, it must be “installed” on the computer you’re working on. With Mac OSX fonts live can live in either of two locations; the local users’s fonts folder or the system’s fonts folder. | ||
Using Font Book to preview fonts | Using Font Book to preview fonts | ||
| − | Font Book is an Apple utility to help manage fonts. You can preview, create collections, add or disable fonts all from within Font Book. | + | Font Book is an Apple utility to help manage fonts. You can preview, create collections, add or disable fonts all from within Font Book.<br> [[File:Screen shot 2010-05-28 at 8.02.54 AM.png]]<br> |
<BR> | <BR> | ||
Launch Font Book<BR><BR> | Launch Font Book<BR><BR> | ||
| Line 13: | Line 13: | ||
2. To modify the preview window, from the top menu go Preview > Custom. You can now type the txt you’d like to display during preview.<BR> | 2. To modify the preview window, from the top menu go Preview > Custom. You can now type the txt you’d like to display during preview.<BR> | ||
3. Arrow down your font list to see your text in various font styles. | 3. Arrow down your font list to see your text in various font styles. | ||
| + | <br> [[file:Screen shot 2010-05-28 at 8.08.52 AM.png]] | ||
<BR><BR> | <BR><BR> | ||
Finding and downloading more fonts<BR><BR> | Finding and downloading more fonts<BR><BR> | ||
| Line 21: | Line 22: | ||
<BR>2. Click the Plus sign to add a new font to that folder | <BR>2. Click the Plus sign to add a new font to that folder | ||
<BR>3. Locate the font file you just downloaded (usually ends with a .ttf for True Type Font) and click OK | <BR>3. Locate the font file you just downloaded (usually ends with a .ttf for True Type Font) and click OK | ||
| − | + | <BR><BR> | |
| − | + | ||
[[category:Software Help]] | [[category:Software Help]] | ||
| + | [[Category:Graphic Design]] | ||
Latest revision as of 11:12, 10 February 2011
Working with Type
In order to use a typeface or fonts in your document, it must be “installed” on the computer you’re working on. With Mac OSX fonts live can live in either of two locations; the local users’s fonts folder or the system’s fonts folder.
Using Font Book to preview fonts
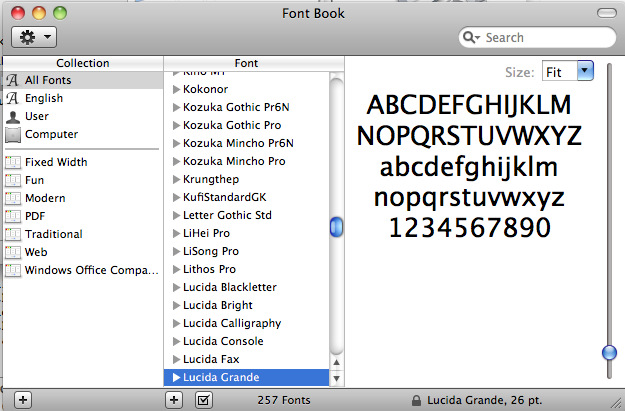
Font Book is an Apple utility to help manage fonts. You can preview, create collections, add or disable fonts all from within Font Book.

Launch Font Book
1. double click on your Mac Harddrive
2. Select the Applications folder
3. Doubleclick on the Font Book
Preview your fonts in Font Book
1. Select All Fonts to view the fonts installed in the User, Computer and Classic folders.
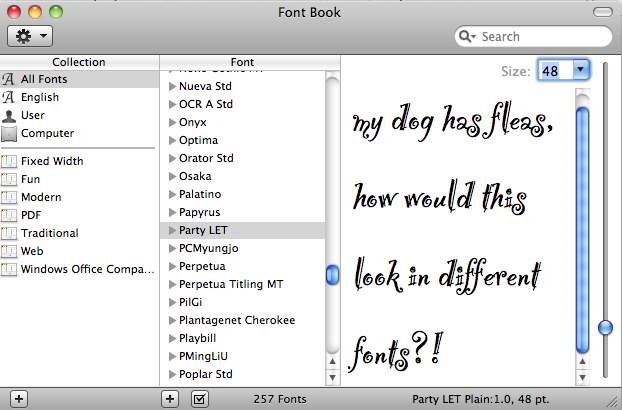
2. To modify the preview window, from the top menu go Preview > Custom. You can now type the txt you’d like to display during preview.
3. Arrow down your font list to see your text in various font styles.

Finding and downloading more fonts
You may find that the fonts installed on the system your working on are not adequate. There are many freely available fonts available to legally download and use from the internet. One good site is www.dafont.com
Installing Fonts in Font Book
Once you’ve downloaded and unzipped your font all you need to do to install it is
1. Select the User folder from within Font Book
2. Click the Plus sign to add a new font to that folder
3. Locate the font file you just downloaded (usually ends with a .ttf for True Type Font) and click OK
