Difference between revisions of "Library 0406"
From Help Wiki
m (Krusea moved page Library 0406 AV Classroom to Library 0406) |
|||
| Line 1: | Line 1: | ||
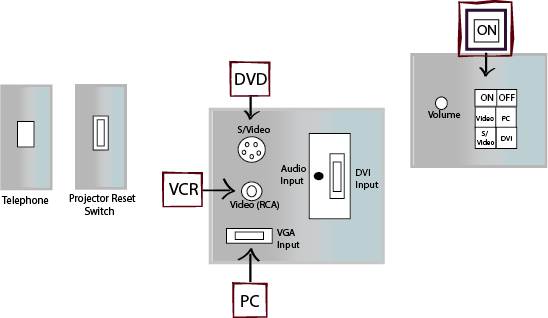
[[File:0406-AV-graphic.png]] | [[File:0406-AV-graphic.png]] | ||
| − | |||
| − | |||
| − | |||
| − | |||
| − | |||
| − | |||
| − | |||
| − | |||
| − | ===== | + | =====LAPTOP: (You may play a DVD through your laptop)===== |
| − | + | # You may need to lower the screen using the pull-down cord. | |
| − | # | + | # Press the ON button to turn on the Data Projector. Projector will take 30 seconds to warm up. ON button will stop blinking when Projector is ready. |
| − | #Press the ON button to turn on the Data Projector. | + | # Select PC/Laptop |
| − | #Select | + | # Locate VGA cable (hanging from hook) and insert VGA cable into VGA input on your laptop. Insert audio mini jack into laptop’s headphone input. |
| − | # | + | # Turn on your laptop. |
| − | #Turn on | + | # Use volume knob (located on black panel on wall) to adjust audio levels |
| − | #Use | + | |
| − | + | ||
| − | ===== | + | |
| − | + | =====DVD: (You may play a DVD through your laptop)===== | |
| − | + | # You may need to lower the screen using the pull-down cord. | |
| − | # Press the ON button to turn on the Data Projector. | + | # Press the ON button to turn on the Data Projector. Projector will take 30 seconds to warm up. ON button will stop blinking when Projector is ready. |
| − | # Select Video if using the RCA input or S/Video if using | + | # Select Video on the Media Control Panel if using the RCA input or press S/Video if using S/Video inputs. |
| − | # Insert the cable from your | + | # Insert the RCA cable from your DVD player into either the composite or S/Video inputs. |
| − | # Turn on | + | # Turn on DVD player. |
| − | # Use | + | # Use volume knob (located on black panel on wall) to adjust audio levels. |
| − | :( | + | |
| + | |||
| + | =====VCR: (You may bring in a VCR)===== | ||
| + | # You may need to lower the screen using the pull-down cord. | ||
| + | # Press the ON button to turn on the Data Projector. Projector will take 30 seconds to warm up. ON button will stop blinking when Projector is ready. | ||
| + | # Select Video on the Media Control Panel if using the RCA input or press S/Video if using S/Video inputs. | ||
| + | # Insert the RCA cable from your DVD player into either the composite or S/Video inputs. | ||
| + | # Turn on VCR player. | ||
| + | # Use volume knob (located on black panel on wall) to adjust levels. | ||
[[Category:Media Classrooms]] | [[Category:Media Classrooms]] | ||
Revision as of 10:28, 1 December 2015
LAPTOP: (You may play a DVD through your laptop)
- You may need to lower the screen using the pull-down cord.
- Press the ON button to turn on the Data Projector. Projector will take 30 seconds to warm up. ON button will stop blinking when Projector is ready.
- Select PC/Laptop
- Locate VGA cable (hanging from hook) and insert VGA cable into VGA input on your laptop. Insert audio mini jack into laptop’s headphone input.
- Turn on your laptop.
- Use volume knob (located on black panel on wall) to adjust audio levels
DVD: (You may play a DVD through your laptop)
- You may need to lower the screen using the pull-down cord.
- Press the ON button to turn on the Data Projector. Projector will take 30 seconds to warm up. ON button will stop blinking when Projector is ready.
- Select Video on the Media Control Panel if using the RCA input or press S/Video if using S/Video inputs.
- Insert the RCA cable from your DVD player into either the composite or S/Video inputs.
- Turn on DVD player.
- Use volume knob (located on black panel on wall) to adjust audio levels.
VCR: (You may bring in a VCR)
- You may need to lower the screen using the pull-down cord.
- Press the ON button to turn on the Data Projector. Projector will take 30 seconds to warm up. ON button will stop blinking when Projector is ready.
- Select Video on the Media Control Panel if using the RCA input or press S/Video if using S/Video inputs.
- Insert the RCA cable from your DVD player into either the composite or S/Video inputs.
- Turn on VCR player.
- Use volume knob (located on black panel on wall) to adjust levels.

