Difference between revisions of "Microsoft Authenticator Setup"
From Help Wiki
m |
m |
||
| Line 1: | Line 1: | ||
__NOTOC__ | __NOTOC__ | ||
{{TwoColumn|lead= | {{TwoColumn|lead= | ||
| − | + | The following steps will get you setup using the Microsoft Authenticator app for MFA. | |
|content= | |content= | ||
| − | + | ||
| − | [[File:Android.png|alt=Android Authenticator QR code|right| | + | [[File:Ios.png|alt=iOS Authenticator QR code|right|150px]] |
| − | [[File:M365 login.png|alt=M365 login page for Evergreen|right| | + | [[File:Android.png|alt=Android Authenticator QR code|right|150px]] |
| + | [[File:M365 login.png|alt=M365 login page for Evergreen|right|150px]] | ||
=== Installing Microsoft Authenticator=== | === Installing Microsoft Authenticator=== | ||
# Install the Microsoft Authenticator app on your phone. If prompted allow notifications. | # Install the Microsoft Authenticator app on your phone. If prompted allow notifications. | ||
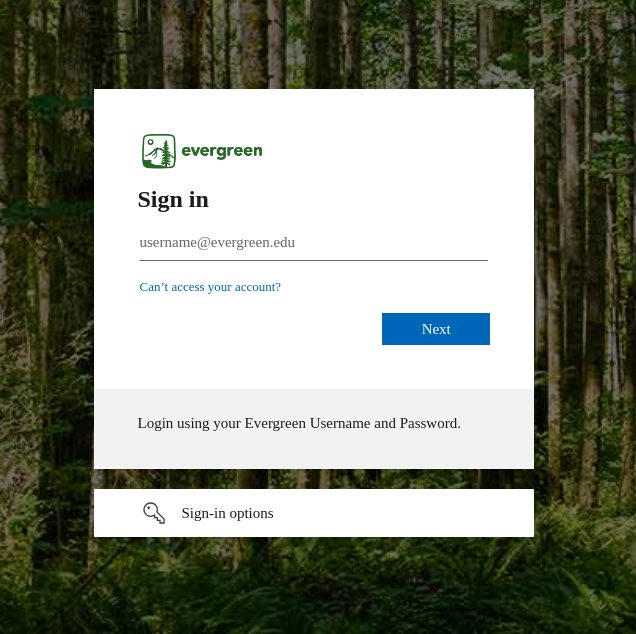
| − | # Next, visit Microsoft’s MFA setup page, preferably: https://aka.ms/mfasetup Sign in with your Evergreen account (e.g. username@cwu.edu). You may also be asked to sign in to the Evergreen sign in page. | + | # Next, visit Microsoft’s MFA setup page, preferably: https://aka.ms/mfasetup Sign in with your Evergreen account (e.g. username@cwu.edu). You may also be asked to sign in to the Evergreen sign-in page. |
# Once signed in, you will be prompted to provide more information. Click Next. | # Once signed in, you will be prompted to provide more information. Click Next. | ||
| − | #[[File:More infomation.png|alt=More information page as part of setting up Authenticator|right| | + | #[[File:More infomation.png|alt=More information page as part of setting up Authenticator|right|150px]]If you've already downloaded the authenticator app, click the Next button on your computer. |
# Open the Authenticator app. If prompted, allow notifications. Then select "Add Work or School Account" and select "Scan QR code." You may need to allow the Microsoft Authenticator app to access your camera. If these options do not show up, press the plus icon at the top right of the app. With the scan option ready, you can now begin the process of retrieving the QR code. Click next on your computer. | # Open the Authenticator app. If prompted, allow notifications. Then select "Add Work or School Account" and select "Scan QR code." You may need to allow the Microsoft Authenticator app to access your camera. If these options do not show up, press the plus icon at the top right of the app. With the scan option ready, you can now begin the process of retrieving the QR code. Click next on your computer. | ||
# Hold your phone up to your computer screen and scan the QR code displayed on your computer. The account will be added to your Microsoft Authenticator app temporarily. Select Next on the computer to make this into a permanent method. | # Hold your phone up to your computer screen and scan the QR code displayed on your computer. The account will be added to your Microsoft Authenticator app temporarily. Select Next on the computer to make this into a permanent method. | ||
Revision as of 13:54, 23 September 2024
The following steps will get you setup using the Microsoft Authenticator app for MFA.


Installing Microsoft Authenticator
- Install the Microsoft Authenticator app on your phone. If prompted allow notifications.
- Next, visit Microsoft’s MFA setup page, preferably: https://aka.ms/mfasetup Sign in with your Evergreen account (e.g. username@cwu.edu). You may also be asked to sign in to the Evergreen sign-in page.
- Once signed in, you will be prompted to provide more information. Click Next.
- If you've already downloaded the authenticator app, click the Next button on your computer.

- Open the Authenticator app. If prompted, allow notifications. Then select "Add Work or School Account" and select "Scan QR code." You may need to allow the Microsoft Authenticator app to access your camera. If these options do not show up, press the plus icon at the top right of the app. With the scan option ready, you can now begin the process of retrieving the QR code. Click next on your computer.
- Hold your phone up to your computer screen and scan the QR code displayed on your computer. The account will be added to your Microsoft Authenticator app temporarily. Select Next on the computer to make this into a permanent method.
- You should see a message on your computer saying Let’s try it out and you should get an approval notification on your smartphone. Enter the number that appears on your computer screen into the notification on your phone.

Multifactor Auth
- About MFA
- MFA for New Users
- MFA - User Guide/FAQ
- Microsoft Authenticator Setup
- MFA - Alternative Authentication Methods
Get Help
Submit a technology support request
No account or having problems logging in?
Request help as a guest