Difference between revisions of "Keyframe Editing - Premiere Pro"
From Help Wiki
(→Modify Keyframe Values) |
|||
| Line 39: | Line 39: | ||
===Modify Keyframe Values=== | ===Modify Keyframe Values=== | ||
| − | + | * Click and drag a keyframe in the '''Value''' graph. | |
| − | + | * Put the playhead over the keyframe to be modified and adjust the property value by clicking and dragging the number left or right. | |
| − | + | ||
Revision as of 16:24, 18 October 2012
Keyframes can be used to change values over time for various effects.
A keyframe marks the point in time where you specify a value, such as spatial position, opacity, or audio volume. Values between keyframes are interpolated. To create a change in a property over time, you set at least two keyframes—one keyframe for the value at the beginning of the change, and another keyframe for the value at the end of the change.
Contents
Effects Control Panel
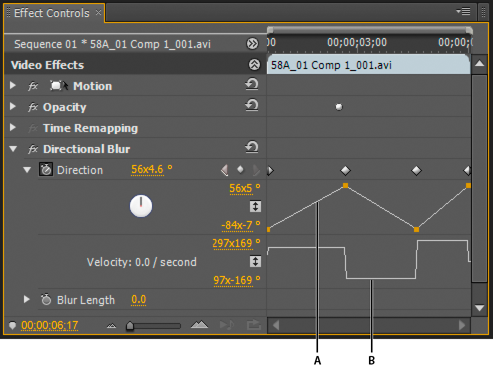
View Keyframes in the Effect Controls panel
- Select a clip in the Timeline panel.
- Click on the Effects Controls panel.
- Click the triangle to the left of the effect name to expand the effect you want to view. Any existing keyframes will display in the Effect Controls timeline.
- To view the Value and Velocity graphs of an effect property, click the triangle next to the Toggle Animation icon
 .
.
- The left-pointing arrow moves the current-time indicator to the previous keyframe.
- The right-pointing arrow moves the current-time indicator to the next keyframe.
- Shift-drag the Playhead to snap to a keyframe.
Add Keyframes
- Click the triangle to expand the effect property and display its Value and Velocity graphs.
- Move the playhead to the point in time where you want to add a keyframe.
- Click the Add/Remove Keyframe button
 and then adjust the effect property’s value.
- Adjusting the controls for an effect’s property will automatically create a keyframe at the current time if there is no keyframe.
- Repeat as needed to add keyframes and adjust the effect property.
Select Keyframes
- Click on a keyframe to select it.
- Shift-click to select multiple contiguous or noncontiguous keyframes.
- Click and drag to select multiple contiguous keyframes.
- Click the layer property name to select all keyframes for a property.
Delete Keyframes
- Select one or more keyframes and choose Edit > Clear. You can also press Delete.
- To delete all keyframes for an effect property, click the Toggle Animation button
 to the left of the name of the effect or property. When prompted to confirm your decision, click OK.
Modify Keyframe Values
- Click and drag a keyframe in the Value graph.
- Put the playhead over the keyframe to be modified and adjust the property value by clicking and dragging the number left or right.
