Radio Practice - Olympus LS-100
A proficiency test is required to check out this recorder. Schedule a proficiency at the front desk of Media Loan or by calling 360-867-6253. Read this operating guide and complete the written portion of the Olympus LS-100 Proficiency Test prior to your scheduled proficiency. Bring your answer sheet with you to the test, which should take approximately 30 - 45 minutes. (Please note: if you have a proficiency in the Zoom and Marantz recorders, you will still have to take the proficiency test for the Olympus LS-100.)
This operating guide is not a substitute for the complete manual, which you can download here: Olympus LS-100 Manual
Contents
- 1 About Media Loan's Olympus LS-100
- 2 Name of Each Part
- 3 Internal Memory
- 4 Inserting an SD Card
- 5 Battery
- 6 USB and Power Settings
- 7 Formatting the Recorder/SD Card and Erasing All Data
- 8 Connect Microphones
- 9 Connect to Computer
- 10 Playback
- 11 The Menu System
- 12 Tuner
- 13 Metronome
- 14 Recorder
- 15 Multitrack
- 16 Lissajous
About Media Loan's Olympus LS-100
- 96kHz/24 bit linear PCM recording
- Supports linear PCM & MP3 audio formats
- Internal 4GB built-in flash memory
- Two 90° stereo condenser microphones
- Left & right XLR / phone combo inputs
- Multi-track recording & editing
- DO NOT drop, submit to extreme temperatures, or get wet.
- You are 100% financially responsible for all equipment checked out from Media Loan.
- DO NOT drop, submit to extreme temperatures, or get wet.
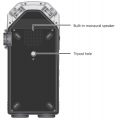
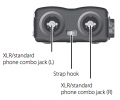
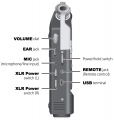
Name of Each Part
Internal Memory
Internal Memory = 4Gb
PCM WAV 48.0 kHz/16 bit = 4 hours 45 min
PCM WAV 48.0 kHz/24 bit = 3 hours
PCM WAV 44.1 kHz/16 bit = 5 hours
PCM WAV 44.1 kHz/24 bit = 3 hours 15 min
MP3 320 kbps = 22 hours 30 min
Purchasing your own 8Gb card will give you 2X as much recording time.
A standard good sampling rate for high quality recording is: PCM WAV 48.0 kHz/24 bit = 3 hours
Inserting an SD Card
If you purchase your own SD card to use with the Olympus LS-100:
- Slide the lock switch to OPEN when the recorder is stopped and open the SD card cover.
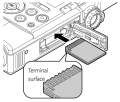
- Insert the SD card with the terminal face facing up, as shown in the figure.
- If the SD card is inserted in the wrong direction or at an angle, the contact face may be damaged or the SD card may get stuck.
- Recording cannot start unless the SD card is inserted all the way in.
- After closing the SD card cover, slide the lock switch to LOCK.
- When the SD card is inserted, the recording media switching screen appears.
- To record data in the SD card, select Yes by pressing the + or − button.
- Press OK.
- To remove, push card in all the way then pull out.
Battery
- Slide the lock switch to OPEN on the battery cover.
- Insert the battery so that the direction of the arrow (label) on the recorder matches the direction of the arrow on the battery.
- Close the battery cover and slide the lock switch to LOCK.
USB and Power Settings
The USB Connection setting needs to be changed to either connect the recorder to a computer or to power the recorder from AC while recording. There are 3 options:
- PC: allows the recorder to be connected to a computer. Can be used to charge the batteries.
- AC Adapter: allows the recorder to be in record mode while connected to AC. Can be used to charge the batteries.
- Optional: anytime the recorder is connected to a computer or the AC Adaptor it will display a menu to select PC or AC Adapter. Use this setting.
- Press the MENU button
- Forward through the tabs to the DEVICE MENU
- Press the - button down to select USB Settings and press OK.
- Select USB Connection and press OK.
- Select Optional and press OK.
Formatting the Recorder/SD Card and Erasing All Data
Perform this function before every use to ensure maximum file space on the recorder/SD card and to erase all data before turning it back in to Media Loan.
- Press the MENU button
- Forward through the tabs to the DEVICE MENU
- Press the - button down to select FORMAT and press OK.
- Select Internal Memory or SD Card (You must provide your own card) and press OK.
- Select Start, and press OK.
Connect Microphones
Connect to Computer
Playback
Playback the Recording
- Press the List button.
- Use the + and - buttons to select a file and press OK.
- The file name will be displayed in the window.
- Press the Play button.
Playback Speed
- While playing an audio file the speed can be changed from 50% to 400%.
- During playback the up and down arrow button on the front right of the recorder adjust the playback speed.
- Leave it set to 100%.
The Menu System
Press the MENU button
Record Menu
Record Mode
- Normal - each microphone that is being used to record produces it's respective track.
- Overdub - The live microphone is mixed with the file that is being played back. The original file does not get erased.
- Play Sync - This allows you to playback a file and while only the live microphone is recorded.
- V-Sync Rec - a feature that automatically starts a recording when the recorder detects a sound louder than the voice sync level (detection level) setting; when the sound level decreases, recording stops automatically.
Mic Gain
Mic Gain this option let's you adjust the sensitivity of the selected mic
- Built-in Mic - Hi (preferable), Mid, Lo
- External Mic - Hi (preferable), Mid, Lo
- XLR L - Hi or Lo
- XLR R - Hi or Lo
Record Level
- Manual - let's you adjust the recording manually. Preferred.
- Auto - the recording level is adjusted automatically.
- Press the REC button to enter the recording standby mode.
- Adjust the REC LEVEL dial according to the sound source.
- The REC LEVEL dial can separately adjust the level of the input source for the L/R channels.
Input Select
- Built-in Mic - sound is input through the built-in stereo microphone.
- External Mic - sound is input by connecting an external microphone to the MIC jack.
- Line - sound is input by connecting an external unit to the MIC jack.
- XLR/Phone - sound is input through a musical instrument or the microphone connected to the XLR/standard phone combo jack.
Mic Power
- Phantom power - +48V or 24V This setting sets the voltage of the phantom power. Set to +48V.
- Plug in power - ON/OFF This supplies power over the stereo-mini mic input to certain mics.
Rec Format
- PCM WAV 48.0kHz/24bit - Ideal selection for high quality sound files.
- MP3 - highly compressed and less desirable.
Low Cut Filter
This cuts low frequencies to reduce handling noise and unwanted bass-like sounds. Select the frequency you want the cut-off to start at.
- 100Hz
- 300Hz
Pre-Recording
This records 2 seconds prior to you pressing the record button
- On/Off
Rec Monitor
- On/Off - turns On or Off the EAR jack
PLAY MENU
- Play Mode - one file or list
- Skip Space - Forward skip, Reverse skip
FILE MENU
- File Lock - On/Off
- Move/Copy - Copies and moves the files within the memory
- File Divide - Divides a file recorded on this device
- Property - Displays information about a file or folder
- MP3 Convert - converts a PCM WAV into an MP3 format file
- CD Write - Directly writes a PCM WAV format file into a CD
- Bounce - Saves all the tracks in a multi-track mode project to one file
Metronome Menu
- On/Off
- Display - On/Off
- Countdown
- Tempo - lets you adjust using the + or - buttons
- Sound - Metronome 1 (vibrato), Metronome 2 (moderato)
- Pattern - 1/1, 1/4, 2/4, 3/4, 4/4, 6/4, 8/4, 6/8
- Volume - use the - or + button to adjust volume
LCD/Sound Menu
- Backlight - lighting time, dim light time, brightness
- LED - On/Off
- Beep - lets you adjust the beep volume that occurs when any buttons are pressed
- Language - let's you change the language
- Voice Guide - On/Off, Speed, Volume. The recorder will talk to you.
- Intro Play - 10 sec, 5 sec, 3 sec, OFF
Device Menu
- Fn. Setting - function key menu. Let's you assign the F1, F2, F3 keys as a shortcut to menu options that you can choose from.
- Memory Select - allows you to choose from the 4Gb internal memory or to use the external memory slot in which you would provide your own SD card.
- Power Save - turns the recorder Off after a selected amount of time (5min, 10min, 30min, 1hour, or OFF)
- Time & Date - let's you adjust the time and date which can be helpful in file management
- USB Setting - Let's you choose from PC, AC adapter, Optional
- Reset Setting - Resets the settings to default
- Format - Formats the selected memory and erases all files
- Memory info - Displays the remaining memory and capacity
- System info - Model/Version/Serial No.
Press the HOME button
Tuner
- Calibration - the frequency of the reference tone A can be adjusted by 1Hz increments in the range of 435Hz to 445Hz.
- Chromatic Tuner - adjust the mismatch between the one of the musical instrument you have entered and the reference tone to ensure a proper response to all the musical scales.
- Guitar - tune to a guitar chords chart
- Bass - tune to a bass chords chart
Metronome
- Let's you adjust beats per minute. You must enter the MENU system for more parameters.
Recorder
- Let's you access the Normal Record mode, choose your folder, and select your input source.
Multitrack
- This mode allows you to separately record and playback different parts/sound sources.
- You can manage up to 8 tracks per project. Recorded tracks can be edited separately to adjust the output level or balance.
- You can record over an existing track unlike the recorder mode. Edited tracks can be mixed (bounced) into a single file.
Lissajous
- You must plug in two microphones to use this feature.
- This helps you obtain the optimal positioning of a microphone in order to reduce phase. Phase is the slight difference between two sound waves that is recorded by two different microphones which will produce a slight time difference between the two waveforms which could cancel out certain frequencies.


