Intro to Premiere Pro - PP
Contents
Intro
Premiere Pro is a non-linear video editing application. It can capture DV tape and work with most digital video and digital audio files. The audio and video clips are arranged and edited in sequences.
Each Premiere Pro project can contain multiple sequences
Windows
Windows are called panels in Premiere. Under the Windows menu you can open various panels. Many windows have a Panel Menu in the top right corner which can be used to change settings for that window. ![]()
Any panel can be expanded to full screen by pressing the ` (tilde) key while the mouse is over that panel. Press the ` key again to return to normal.
Media Browser
The Media Browser makes it easy to browse to files, and to find them by their type. Unlike the Import dialog box, the Media Browser can be left open, and docked, like any other panel. The Media Browser gives you quick access to all your assets while you edit. Also, you can use the Media Browser to import clips copied from video storage media such as P2 cards, SxS cards, XDCAM disks, and DVDs. When you import an asset Premiere Pro leaves it in its current location, and creates a clip in the Project panel that points to it. Always transfer files from their file-based media to a local hard disk. Then, import them into Premiere Pro projects from the hard disk.
Project
The Project panel lists detailed information about each asset in your project. You can view and sort assets in either List view or Icon view. List view displays additional information about each asset. You can customize the information it displays to meet the needs of your project. In Icon view, you can use the "hover scrub" feature to preview footage without having to open it into a new window.
Info
The Info panel displays several data about a selected item, and timecode information for clips under the current-time indicator in the Timeline.
Timeline
In Premiere Pro, you specify the settings for each sequence, trim your clips, and assemble clips in sequences.
You assemble and rearrange sequences in one or more Timeline panels, where their clips, transitions, and effects are represented graphically. You can open a particular sequence on a tab in a Timeline panel among other sequences, or keep it by itself in its own dedicated Timeline panel.
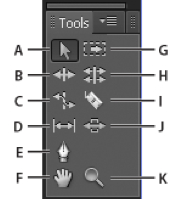
Tools
This panel is for selecting which tool to use in the Timeline. The mouse pointer will change shape when it is over the Timeline. Tools can also be change with keyboard shortcuts.
A. Selection toolB. Ripple Edit tool
C. Rate Stretch tool
D. Slip tool
E. Pen tool
F. Hand tool
G. Track Select tool
H. Rolling Edit tool
I. Razor tool
J. Slide tool
K. Zoom tool
Source
The Source Monitor plays back individual clips. In the Source Monitor, you prepare clips that you want to add to a sequence. You set In points and Out points, and specify the clip’s source tracks (audio or video). You can also insert clip markers and add clips to a sequence in a Timeline panel.
Program
The Program Monitor plays back the sequence of clips that you are assembling. It’s your view of the active sequence in a Timeline panel. You can set sequence markers and specify sequence In points and Out points. Sequence In points and Out points define where frames are added or removed from the sequence.

