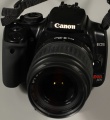
Canon Rebel XSi Operating Guide
A Camera that can be used for photo and video.
Contents
- 1 Caring for Media Loan Equipment
- 2 How to Use this Camera
- 2.1 Installing & Removing Battery
- 2.2 Attaching & Detaching Lens
- 2.3 Installing & Removing CF Card
- 2.4 Dioptric Adjustment
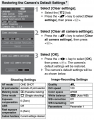
- 2.5 Menu Operations
- 2.6 Manual Focusing
- 2.7 Auto-Focusing
- 2.8 Selecting the Metering Mode
- 2.9 Exposure
- 2.10 Selecting the Drive Mode
- 2.11 Setting the White Balance
- 2.12 Setting the ISO Speed
- 2.13 Advanced Operations
- 2.14 Image-Recording Quality Settings
- 2.15 Playback
- 2.16 Displaying the Images on a TV
- 2.17 Transferring Images to a Computer
- 2.18 Rebel XSi
- 2.19 Trouble Shooting
- 2.20 Precautions
- 2.21 Media Loan Help
- 2.22 Media Loan Wikis
A proficiency test is required to check out this camera. Schedule a proficiency at the front desk of Media Loan or by calling 360-867-6253. Read this operating guide and Canon Rebel T1i/T2i Operating Guide and complete the written portion of the Canon Rebel Proficiency Test prior to your scheduled proficiency. Bring your answer sheet with you to the test, which should take approximately 30 - 45 minutes.
Caring for Media Loan Equipment
Media Loan has a limited number of Canon Rebel XT and XSi cameras. We appreciate your help in caring for this item to insure it's long-term use at Evergreen.
Do NOT:
- Drop this camera
- Submerge this camera in water
- Leave this camera near a strong magnetic field!
- Leave this camera in excessive heat, such as a car
- Store this camera in excessive cold
- Use a blow dryer to blow dust from the camera
- Store this camera in a location where there may be corrosive chemicals
- Use excessive physical force
- Please be gentle with this camera; it looks hardy, but it's delicate.
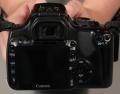
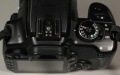
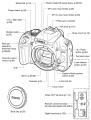
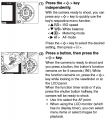
XT Parts
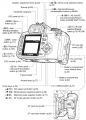
XT Parts
XT LCD Panel
XT Viewfinder
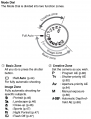
XT Mode Dial


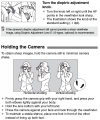
How to Use this Camera
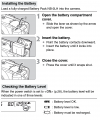
Installing & Removing Battery
- To open the battery compartment, slide the compartment lever in the direction of the back of the camera as shown by the arrow.
- Insert the battery with the power contacts pointed downward until the battery locks into place.
- Close the cover and slide the lever back in place as indicated by the arrow until it snaps shut.
- Do not charge the battery for 24 hours or more!
About the Battery's Life
When the camera is ON, the battery level will be indicated in 1 of 3 levels:
- Battery level is OK
- Battery level is low
- Battery must be recharged
Tip: To save battery power, you may set the Auto-off function of the menu to turn the camera off automatically.
XT Installing Battery
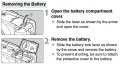
XT Removing Battery


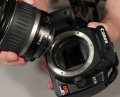
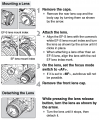
Attaching & Detaching Lens
- To attach the lens, align the EF-S lens with the camera's white EF-S lens mount index and turn the lens in a clockwise direction as shown by the arrow until the lens clicks into place.
- When attaching a lens other than an EF-S lens, align the lens with the red EF lens index mark.
- To detach the lens, while pressing the lens release button, turn the lens in a counter-clockwise direction.
- Turn the lens until it stops, then detach it.
When attaching or detaching the lens, take care to prevent dust from entering the camer through the lens mount. Removing the lens can cause debris to get inside the camera making the camera highly susceptible to serious damage. If the lens is removed, avoid putting your fingers inside the camera. If the mirror, or any other part of the inside of this camera gets dirty, please bring it back to Media Loan so that a qualified staff member can service the camera.
XT Lens


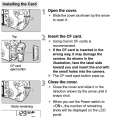
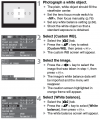
Installing & Removing CF Card
- To insert the CF Card open the compartment cover.
- Insert the CF Card until the CF Card's eject button pops up.
- Close the cover and slide it back in place as indicated by the arrow until the cover snaps shut.
Unless you plan to put the CF card into a card reader, please do not remove it. Do not bend the card or put the card into the card slot backwards.
Install Card
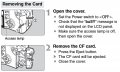
Remove Card


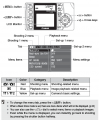
Dioptric Adjustment
- Turn the dioptric adjustment knob left or right until the AF points in the viewfinder look sharp.
- By adjusting the diopter to suit your eyesight, you can see a sharp viewfinder image even without eyeglasses.
XT Dioptric Adjustment

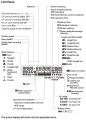
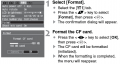
Menu Operations
XT
XT
XT
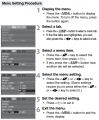
XT
XT
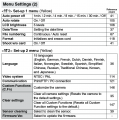
XT
XT


Manual Focusing
- Set the lens focus mode switch to MF and focus the subject by turning the lens focusing ring.
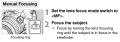
XT Manual Focus
Auto-Focusing
- On the lens, set the focus mode to AF. If the lens is set to MF, auto-focus will not be possible.
- Setting the mode dial to Full Auto will set the following:
- The AF mode will set to AI Focus AF*.
- The drive mode will set to Single Shooting.
- The Metering Mode will set to Evaluate Metering.
- AI Focus AF wil automatically change to AI Servo AF to track a subject that's moving.
Auto-Focus can fail to achieve focus (the focus confirmation light blinks) with certain subjects such as the following:
- Low-contrast subjects.
- Solid-color walls.
- Subject in low light.
- Extremely backlit and reflective subjects, e.g. reflection from car window.
- Overlapping near and far objects, e.g. animal in a cage.
- Repetitive patterns, e.g. skyscraper windows.

XT Shutter Bug

Selecting the Metering Mode
- The camera has three metering modes; Evaluate, Partial and Center-weighted average metering.
- Evaluate Metering is the camera's standard metering mode suited for most subjects even under backlit conditions.
- During manual focusing, evaluative metering is based on the center AF point.
- Partial Metering is effective when the background is much brighter than the subject due to backlighting.
- Center-weighted Average Metering is weighted at the center and then averaged for the entire scene.
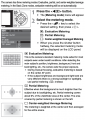
XT Metering Mode

Exposure
Manual Exposure
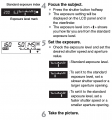
Manual Exposure
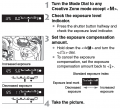
Exposure Compensation


Selecting the Drive Mode
- Look at the LCD panel and press the button to select mode.
- Single shooting - When you press the shutter button completely, one shot will be taken.
- Continuous Shooting - While you press the shutter button completely, shots will be taken continuously according to speed allowed by current settings.
- Self Timer/Remote Control - Press the shutter button completely, a beeper will sound, the self-timer lamp will start blinking and the shot will be taken about 10 sec. later.
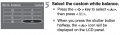
Setting the White Balance
Normally, the white balance is set automatically, but if natural-looking colors cannot be obtained, you can set the white balance manually to suit the respective light source. Please be considerate of other users and return the white balance setting back to automatic (AWB).
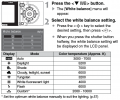
XT White Balance
XT White Balance
XT White Balance


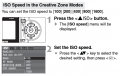
Setting the ISO Speed
- The ISO speed is set automatically within ISO 100-400.
- You can set the ISO speed to [100] [200] [400] [800] [1600] only in creative modes.
- Tip: At higher ISO speeds and higher ambient temperatures, the image will look more grainy. Also, high temperatures, high ISO speeds, or long exposures may cause irregular colors in the image.
XT ISO Speed

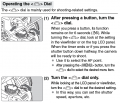
Advanced Operations
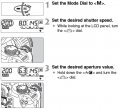
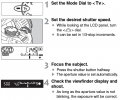
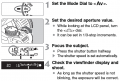
With the Creative Zone modes, you can set the desired shutter speed or aperture value depending which mode is currently selected.
- P - Program Auto Exposure is a general purpose shooting mode. The camera automatically sets the shutter speed and aperture value to suit the subject's brightness.
- Tv - Shutter-priority AE is used to set the shutter speed. The camera will automatically set the aperture value to suit the subject's brightness.
- Turn the shutter dial to change priority settings. A faster shutter speed can freeze the motion of a fast-moving subject.
- Av - Aperture-priority AE lets you set the desired aperture and the camera sets the shutter speed automatically to suit the subject brightness.
- M - Manual Exposure lets you manually set both the shutter speed and aperture value as desired, use Av +/ button to toggle between settings.
- A-Dep - Automatic Depth-of-Field AE is used to obtain a wide depth of field automatically between a near subject and far subject. It is effective for group photos or landscapes.
XT TV
XT AV
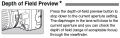
XT Depth of Field Preview


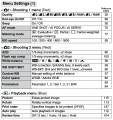
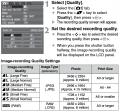
Image-Recording Quality Settings
Image File Size & CF Card Capacity
Tip: The RAW file setting assumes that the image will undergo post-processing with a personal computer. Special software such as Adobe Bridge or Photoshop is required to view the images or edit them for printing. Try and test before assuming your setup will work for major projects.
XT Image Quality

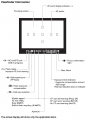
Playback
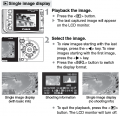
XT Playback
XT Playback


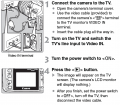
Displaying the Images on a TV
- Connect the camera to the TV.
- Open the camera's terminal cover.
- Use the video cable to connect the camera's video out terminal to the TV monitor's VIDEO IN terminal.
- Turn on the TV and switch the TV's line input to Video IN.
- Turn the power switch to ON
- Press the PLAY button on camera back.
- The image will appear on the TV screen. (The camera's LCD monitor will display nothing.)
- After you finish set the power switch to OFF, turn off the TV and disconnect the cable.
XT
XT


Transferring Images to a Computer
(Using Windows Vista, XP or Mac OSX (v 10.3/10.4)
- Plug camera USB cable into Camera USB port.
- Plug other end of cable into an available USB port.
- Turn camera on and wait follow on-screen prompts.
Note: It may take a few minutes for the initial install before you can transfer your photos.
Disconnecting the Camera
Make sure no information is being transferred (Red light is not flashing and LCD does not display "BUSY"). Then unplug the USB cable and turn off the camera.
Please note: For some older versions of Mac OS you must unmount the camera drive by dragging it to the trash bin before disconnecting the USB cable or turning the camera off.
Rebel XSi


Differences from the XTi/XT
- The Rebel XSi introduces a number of new features, however, to most users there are only a few updates to be aware of. Liveview, Spot metering and a few moved buttons (see diagram, right) are the more relevant changes made.
- Live View
- It is possible to view a real-time image through the LCD screen by using the Live View function. Live View only works in the creative zone modes, so make sure to set the shooting mode accordingly.
- To turn on Live View, open the camera menu and select the Tools 2 menu (tools icon with 2 dots). Select “Live View Function Settings” and press SET.
- Select “Live View Shoot” and press SET.
- Select “Enable” and press SET again.
- Press the MENU button to exit.
- To display the Live View image, press SET and the image should appear on the LCD. This image will reflect the actual brightness of the captured image.
- Spot metering
- WIth the new XSi you can now choose spot metering, which uses a large circular area for metering in the center of the viewfinder.
Trouble Shooting
This is to help you navigate through error messages and simple problems. Remember, never try to force the camera! If this guide does not help you with your problem, please return the camera to Media Loan and describe the issue to a staff member.
- Only the icon blinks on the top of LCD panel
- The battery is almost exhausted.
- No images can be shot nor recorded
- The CF card is not properly inserted.
- The CF card is full.
- The battery is exhausted.
- You did not focus perfectly (When focused, the focus confirmation light in the viewfinder blinks.
- Settings are incorrect for exposure.
- The LCD panel does not display a clear image
- Bring camera back to Media Loan for servicing.
- The image is out of focus
- The Lens focus mode switch is set to MF (manual).
- The camera was shaken when the picture was taken or shutter speed was not fast enough for hand held shooting.
| 12 | |||
|---|---|---|---|
| f | |||
| g | |||
| g | v |